Home
gantt
    title A Gantt Diagram
    dateFormat  YYYY-MM-DD
    section Section
    A task           :a1, 2014-01-01, 30d
    Another task     :after a1  , 20d
    section Another
    Task in sec      :2014-01-12  , 12d
    another task      : 24d
Development Tools
mdbook
mdBook is a command line tool to create books with Markdown. It is ideal for creating product or API documentation, tutorials, course materials or anything that requires a clean, easily navigable and customizable presentation.
# install
cargo install mdbook

# tools
## init --theme --title --ignore --force
mdbook init
mdbook init path/to/book

## The build command is used to render your book --open --dest-dir
mdbook build
mdbook build path/to/book

## The watch command is useful when you want your book to be rendered on every file change.
mdbook watch path/to/book

## The serve command is used to preview a book by serving it via HTTP at localhost:3000 by default:
mdbook serve
mdbook serve path/to/book

## mdBook supports a test command that will run all available tests in a book
mdbook test path/to/book

## The clean command is used to delete the generated book and any other build artifacts.
mdbook clean
mdbook clean path/to/book
mdbook clean --dest-dir=path/to/book
mdbook-mermaid
mdbook-mermaid 不会自动更新 mermaid.min.js 文件,如果需要更新 Mermaid 版本,可以重新运行 mdbook-mermaid install 或手动替换文件。
cargo install mdbook-mermaid

mdbook-mermaid install /path/to/your/book
[preprocessor.mermaid]
command = "mdbook-mermaid"

[output.html]
additional-js = ["mermaid.min.js", "mermaid-init.js"]
mdBook Documentation
git
Git is the version control system (VCS) designed and developed by Linus Torvalds, the creator of the Linux kernel.
| 常用 | |
|---|---|
| 提交记录 | git log --pretty=oneline |
| 仓库状态 | git status |
| 追加修改到仓库 | git add . |
| 提交commit | git commit -m "feat: init" |
| fetch 更新 origin 仓库 的指定分支 | git fetch origin remote:local |
| push 提交 本地 develop 分支 到 origin 仓库 develop2 分支 | git push origin develop:develop2 |
| 查看其他分支文件 | git show develop:README.md |
| 刷新以应用新的配置文件 | git rm --cached -r & git reset --hard |
| 远程分支删除后,本地同步清理 | git remote prune origin |
config
说明:
- 全局配置目录 windows10
C:\Users\xxx\.gitconfig - 当前工作目录文件
workdir/.git/config
# example
git config -h
# 查看 `global` 全部 配置
git config -l
git config -l --global
# 查看 `local` 全部 配置
git config -l --local
user & email 配置文件
# vim .git/config
[user]
	name = xxx
	email = xxx@xx.com
# 全局 git user
git config --global user.name xxx
git config --global user.email xxx@xx.com
# 单库 git user
git config user.name xxx
git config --local user.name xxx
git config user.email xxx@xx.com
git config --local user.email xxx@xx.com
crlf & lf 跨平台脚本之灾
GitHub reference
git reference
core.autocrlf falseIf you’re a Windows programmer doing a Windows-only project, then you can turn off this functionality, recording the carriage returns in the repository by setting the config value to falsecore.autocrlf trueIf you’re on a Windows machine, set it to true this converts LF endings into CRLF when you check out codecore.autocrlf inputIf you’re on a Linux or macOS system that uses LF line endings, then you don’t want Git to automatically convert them when you check out files; however, if a file with CRLF endings accidentally gets introduced, then you may want Git to fix it. You can tell Git to convert CRLF to LF on commit but not the other way around by setting core.autocrlf to input: This setup should leave you with CRLF endings in Windows checkouts, but LF endings on macOS and Linux systems and in the repository.
主要应对 shell 脚本、bat 批处理文件等对换行符敏感的语言
不建议直接 copy 文件;手动创建文件 copy 文件内容相对稳妥
当添加配置文件或使用参数配置后,并不会生效。配置文件方式重新clone代码即可生效,git config 删掉除 .git 的全部文件,手动下载仓库代码,然后解压把代码放进去即可
windows 安装时默认会设置为 true 
# 配置 core.autocrlf

## **全局**
### linux & mac
git config --global core.autocrlf input
### windows
git config --global core.autocrlf true

## **单库**
### linux & mac
git config --local core.autocrlf input
### windows
git config --local core.autocrlf true
配置文件
# 全局 windows C:\Users\xxx\.gitconfig
[core]
	autocrlf = true

# 单库 .git/config
[core]
	autocrlf = true
The .gitattributes file must be created in the root of the repository and committed like any other file.
.gitattributes
#
# https://help.github.com/articles/dealing-with-line-endings/
#
# Set the default behavior, in case people don't have core.autocrlf set.
# text=auto Git will handle the files in whatever way it thinks is best. This is a good default option
# * text=auto
# text eol=crlf Git will always convert line endings to CRLF on checkout. You should use this for files that must keep CRLF endings, even on OSX or Linux.
# * text eol=crlf
# text eol=lf Git will always convert line endings to LF on checkout. You should use this for files that must keep LF endings, even on Windows.
* text eol=lf
# Explicitly declare text files you want to always be normalized and converted
# to native line endings on checkout.
*.c text
*.h text
*.cpp text
*.hpp text
*.cmake text
*.sh text
*.md text
*.java text
*.py text
*.sql text
*.xml text
*.yml text
*.yaml text
*.properties text
*.gradle text
*.pom text
# Declare files that will always have CRLF line endings on checkout.
*.sln text eol=crlf
*.bat text eol=crlf
# Denote all files that are truly binary and should not be modified.
*.png binary
*.jpg binary
*.jpeg binary
启用较长路径名称
基于 Windows 的 Git:启用较长的路径名称。
默认情况下,Git for Windows 禁用对较长文件路径的支持,这会阻止克隆目标路径长度超过 255 个字符的任何文件。
通过以管理员身份运行下列命令来启用较长的文件路径,从而避免此问题:
git config --global core.longpaths true
刷新以应用新的配置文件
git rm --cached -r
git reset --hard
tag
注意:tag name 与 branch name 不能相同
参考文档
# 列出标签
git tag
# 查找标签0.0.开头的标签,需要-l或者--list
git tag -l "0.0.*"
# 创建轻量标签 不需要-a,-s,-m选项,只需要提供标签名字
git tag 0.0.1
# 创建附注标签 可以被校验,包含打标签者的`name`,`email`,日期地址,标签信息,并且可以使用GNU Privacy Guard(GPG)签名验证
git tag -a 0.0.2 -m "0.0.2版本"
# 对某一提交码打标签
git tag -a 0.0.3 e37da745df4102b68b81d0ec681ba28e910d2344
# 查看信息
git show 0.0.1
# 推送单个tag到远程仓库
git push origin 0.0.1
# 推送全部标签到远程仓库
git push origin --tags
# 删除标签
git tag -d 0.0.1
# 删除远程仓库上的标签
git push origin --delete 0.0.1
push
注意:gitlab 默认将 master 分支设置为 protect 不允许强制 push -f
参考文档
# 当前分支与远程分支已关联
git push
# 推送 HEAD 当前分支 到远程已关联的分支
git push origin HEAD
# 推送 local_develop 分支到已关联的分支
git push origin local_develop
# 推送 HEAD 当前分支到远程 remote 分支
git push origin HEAD:remote
# 推送 local_develop 分支到远程 remote_develop 分支
git push origin local_develop:remote_develop
# 强制提交 风险极高 本地commit会强制覆盖远程commit
git push -f origin develop
gpg
# 新增 gpg

# 根据提示输入`用户名`,`邮箱`,`密钥长度4096`,`过期时间`,`是否信任`,`github` 要注意邮箱要是 github 验证过的邮箱
gpg --full-generate-key

# 列出本地存储的所有gpg密钥信息
gpg --list-keys

# 打印公钥字符串,复制添加到git仓库
gpg --armor --export xxxx(pub key)

# 全局使用此gpg
git config --global user.signingkey {key_id}

# `-S` 表示这次提交需要使用GPG密钥签名
git commit -S -m "xxx"

# 当前仓库每次commit 时自动要求签名
git config --local commit.gpgsign true
gpg 过期处理
gpg --list-keys列出本地存储的所有gpg密钥信息gpg --edit-key xxxxxxx进入编辑模式gpg>expire更新过期日期gpg>trust添加信任模式gpg>save保存
gpg --armor --export xxxx(pub key)打印公钥字符串,删除旧的,复制添加到git仓库即可
ssh
添加 ssh 私钥 github 需要设置密码参考
win10 powershell
# rsa
ssh-keygen -t rsa -b 4096  -C "xxx@xx.com"

# ed25519
ssh-keygen -t ed25519 -C "xxx@xx.com"

# ed25519_sk
ssh-keygen -t ed25519-sk -C "your_email@example.com"

# ecdsa-sk
ssh-keygen -t ecdsa-sk -C "your_email@example.com"

# clip 复制到粘贴板
cat ~/.ssh/xxx.pub | clip
linux
# rsa
ssh-keygen -t rsa -b 4096  -C "xxx@xx.com"

# ed25519
ssh-keygen -t ed25519 -C "xxx@xx.com"

# ed25519_sk
ssh-keygen -t ed25519-sk -C "your_email@example.com"

# ecdsa-sk
ssh-keygen -t ecdsa-sk -C "your_email@example.com"


cat ~/.ssh/xxx.pub
多 ssh 配置 vim ~/.ssh/config
Host git.aiclr.cn
HostName git.aiclr.cn
  PreferredAuthentications publickey
  IdentityFile ~/.ssh/gitlab_rsa
Host aiclr.github
  HostName github.com
  PreferredAuthentications publickey
  IdentityFile ~/.ssh/github_aiclr_rsa
Host aiclr2.github
  HostName github.com
  PreferredAuthentications publickey
  IdentityFile ~/.ssh/github_aiclr2_rsa
Host替换掉真实域名git clone git@aiclr.github:aiclr/aiclr.github.io.gitHostName真实域名git clone git@github.com:aiclr/aiclr.github.io.git
检测
ssh git@git.parkere.cn
ssh git@caddyRen
ssh git@bougainvilleas
reflog
# 查看本地git操作日志
git reflog
# 回滚到 提交码 02a3260
git reset --hard 02a3260
# 远程提交回退
git push origin HEAD --force
rebase
将b1的基线变更为b2
#当前在b1分支
git rebase b2

# 当前不在b1分支
git rebase b2 b1
仅推荐在本地分支push前合并未提交到远程的 commit,不熟悉rebase机制 易造成 git 提交顺序日期混乱
有冲突,解决冲突(建议使用idea解决冲突),将解决冲突后的文件 add 加入仓库,rebase 每个 commit 都可能会有冲突,依次解决所有 commit 的冲突
冲突
git add .
#(继续)
git rebase --continue
#(跳过)
git rebase --skip
#(取消 rebase)
git rebase --abort
合并多个未提交远程 commit
注意:
仅限本地分支进行
切勿对已提交的 commit 合并
可使用 reflog 进行回退
# 1. 在当前分支的起始点(如提交码为12345678),rebase时以此节点为基础 rebase
git rebase -i 12345678
# 2. 自动进入 vim 编辑模式,可以看到 12345678 到当前的所有 commit 信息
# 3. 第一行 pick commit,其余行 squash。wq 保存退出vim
# 4. 编辑 git message 作为合并后的 commit message,wq保存
# 5. 有冲突手动解决后执行
git add .
git --continue
# 6. 直到所有冲突解决完成,则选择的 commit 会合并为一个 commit
修改 commit
修改 commit message
修改最新一次提交的提交信息
# 1. 执行以下命令:
git commit --amend
# 2. 这将打开默认的文本编辑器,允许你修改提交信息。如果你希望直接指定新的提交信息而不打开编辑器,可以使用 -m 参数:
git commit --amend -m "new message"
# 3. 如果你已经将提交推送到远程仓库,并且需要更新远程仓库上的提交信息,你需要强制推送这次更改:
git push --force-with-lease
# 使用 --force-with-lease 而不是简单的 --force 是一种更安全的做法,因为它只会覆盖当你上次拉取后没有其他人对这个分支进行过更改的情况。
修改历史提交中的提交信息
# 1. 找到你想修改提交信息的那个提交的哈希值或计算出它相对于当前HEAD的位置(例如,如果它是5次提交之前,则为 HEAD~5)。
# 2. 开始交互式变基:
git rebase -i HEAD~n
# 这里的 n 是指你想回退的提交数量,以便找到目标提交。
# 3. 在打开的文本编辑器中,将你想修改的那条提交前面的 pick 改为 reword 或简单地改为 r,然后保存并关闭编辑器。(:wq)
# 4. 对于每一条标记为 reword 的提交,Git会再次打开编辑器让你修改这条提交的信息。在这里输入新的提交信息,保存并关闭编辑器(:wq)。
# 5. 完成所有修改后,如需要更新远程仓库。
git push --force-with-lease
修改 commit 作者信息
修改最新一次提交作者信息
# 1. 在终端中执行以下命令来修改提交信息:
git commit --amend --author="caddy <aiclr@qq.com>"
# 2. 如果你也想修改提交的信息(可选),可以在执行上述命令后编辑提交信息(:wq)。
# 3. 将更改推送到远程仓库。注意,强制推送可能会影响其他开发者,所以请谨慎使用。
git push --force-with-lease
修改历史提交的作者信息
# 1. 找到你想开始修改的第一条提交的哈希值或者计算出需要回退的提交数量n。这里的 n 是你想要修改的从最近往回数的提交数量。
# 2. 执行交互式变基命令
git rebase -i HEAD~n
# 3. 在打开的文本编辑器中,将你想修改的每个提交前的单词 pick 改为 edit,然后保存并关闭编辑器(:wq)。
# 4. 对于每一个标记为 edit 的提交,Git 将暂停变基过程,允许你修改该提交。对于每个这样的提交,运行:
git commit --amend --author='caddy <aiclr@qq.com>'
# 5. 然后继续变基过程:
git rebase --continue
# 6. 全部完成所有修改后,强制更新远程仓库。
git push --force-with-lease
merge
参考文档
merge 之前 两个分支都要先 commit
# 当前分支 develop 将 temp 分支合并到develop
git merge temp
# 产生冲突(IDEA工具更方便处理冲突)
# 手动处理冲突代码后执行
git add 冲突文件
git commit -m "feat: merge temp into develop"
init
local
# 初始化不指定分支名称 默认创建 master 分支
git init -b <branch-name> --initial-branch=<branch-name>

git init -b develop
git config --local user.email "xxx@xx.com"
git config --local user.name "caddy"
git status
git add README.md
git commit -m "feat: init"
git log --pretty=oneline

# 添加远程分支
# 可以添加多个远程仓库 比如一份代码需要提交到两个仓库
git remote add origin https://xxx/temp.git
git remote -v
git fetch origin

# gitlab 默认将 master 分支设置为 protect 不允许强制 push
# git push -f 强制提交 风险极高 本地commit会强制覆盖远程commit
git push -f origin develop
gitlab
Create a new repository
git clone URL
cd testcaddy
touch README.md
git add README.md
git commit -m "add README"
git push -u origin master
Push an existing folder
cd existing_folder
git init
git remote add origin URL
git add .
git commit -m "Initial commit"
git push -u origin master
Push an existing Git repository
cd existing_repo
git remote rename origin old-origin
git remote add origin URL
git push -u origin --all
git push -u origin --tags
commit
# 修改 commit message

# 未提交 远程
git commit --amend

# 已提交 远程
git reset --soft HEAD~1
git commit -m "new message"
git push -f origin branchname
show
# 查看其他分支文件
git show develop:README.md
clone
git clone git@github.com:aiclr/aiclr.github.io.git
git clone https://github.com/aiclr/aiclr.github.io.git
git clone git@github.com:aiclr/aiclr.github.io.git -b develop
branch
# 查
## 查看本地分支
git branch
## 查看远程分支
git branch -r
## 查看全部分支
git branch -a
## 查看分支详情
git branch -v -a

# 增
## 创建分支但不切换
### 以当前分支为基线创建 temp 分支
git branch temp
### 以 base 为基线创建 temp 分支, base 可以为 tag 或 提交码
git branch temp base

## 仅切换
git checkout temp

## 创建并切换
### 以当前分支为基线创建 temp 分支,并切换到 temp 分支
git checkout -b temp
### 以base为基线创建 temp 分支并切换到 temp,base 可以为 tag 或 提交码
git checkout -b temp base
### 以远程仓库 origin 内的 develop 分支为基线创建 develop 分支,并切换到 develop 分支
git checkout -b develop origin/develop

# 删
## 远程分支删除后,本地同步清理
git remote prune origin
## 删除本地 temp 分支:
### `-d`delete fully merged branch
### `-D` delete branch (even if not merged)
git branch -d temp

## 删除远程 `master` 分支
git push origin --delete master

# 改
## Rename your local `master` branch into `main` with:
git branch --move master main
## 将当前分支与远程 main 分支绑定
git push --set-upstream origin main
remote
# git remote [-v | --verbose]
git remote -v
# git remote add [-t <branch>] [-m <master>] [-f] [--[no-]tags] [--mirror=(fetch|push)] <name> <URL>
git remote add origin_new xxx.git
# git remote rename [--[no-]progress] <old> <new>
git remote rename origin origin_bak
# git remote remove <name>
git remote remove origin
# git remote set-head <name> (-a | --auto | -d | --delete | <branch>)
# git remote set-branches [--add] <name> <branch>…
# git remote get-url [--push] [--all] <name>
# git remote set-url [--push] <name> <newurl> [<oldurl>]
# git remote set-url --add [--push] <name> <newurl>
# git remote set-url --delete [--push] <name> <URL>
# git remote [-v | --verbose] show [-n] <name>…
# git remote prune [-n | --dry-run] <name>…
# git remote [-v | --verbose] update [-p | --prune] [(<group> | <remote>)…]
推荐阅读 git-flow 相关博客
分支名称规范
masterormain主分支hotfix- 生产环境版本紧急缺陷修复发布分支
- 由 master 分支 fork
- 可 merge 到 develop、master,完全 merge 后可删除分支
release- 灰度发布分支、公测发布分支
- 由 develop fork
- 可 merge 到 master,完全merge后可移除当前分支
- 除了修复 bug 提交外不可 commit 其他内容,
develop- 开发主轴
- 不建议直接 commit
- 由 master 或 hotfix 分支 fork
- 可 merge 到 release
- 可从 release、hotfix、feature 分支merge
feature- 新功能分支
- 可 merge 到 develop,完全 merge 后可删除分支
commit message type
feat新功能fixBug修复bugdocs文档相关style代码格式化相关refactor重构perf性能优化test测试相关build构建系统或包依赖相关ciCI配置,脚本文件相关chorec库或测试文件相关revertcommit 回退
gradle
Gradle Build Tool is a fast, dependable, and adaptable open-source build automation tool with an elegant and extensible declarative build language.
官方文档
支持java版本对照
使用指引
例子
故障
多项目 includeBuild
多模块
gradle.properties for Build Environment
Build Environment
Command-line flags such as –build-cache. These have precedence优先 over properties and environment variables
System properties such as systemProp.http.proxyHost=somehost.org stored in a gradle.properties file in a root project directory.
Gradle properties such as org.gradle.caching=true that are typically stored in a gradle.properties file in a project directory or in the GRADLE_USER_HOME.
Environment variables such as GRADLE_OPTS sourced by the environment that executes Gradle.
command
upgrade
#  扫描并查看弃用视图 view the deprecations view of the generated build scan
gradle help --scan
# 或者查看全部警告,来确认是否有弃用内容
gradle help --warning-mode=all
# 手动清除不再支持的 plugins
# to update the project to 7.4.2.
gradle wrapper --gradle-version 7.4.2
# try to run the project
gradle.properties
org.gradle.caching=(true,false)
When set to true, Gradle will reuse重复使用 task outputs from any previous build, when possible, resulting in much faster builds.
Learn more about using the build cache.
By default, the build cache is not enabled.
org.gradle.caching.debug=(true,false)
When set to true, individual单独的 input property hashes and the build cache key for each task are logged on the console.
Learn more about task output caching.
Default is false
org.gradle.configureondemand=(true,false)
Enables incubating孵化 configuration on demand需要, where Gradle will attempt to configure only necessary projects.
Default is false.
org.gradle.console=(auto,plain,rich,verbose)
Customize定制 console output coloring or verbosity赘述.
Default depends on how Gradle is invoked调用. See command-line logging for additional details.
org.gradle.continuous.quietperiod=(# of quiet period millis)
When using continuous连续的 build, Gradle will wait for the quiet period时段 to pass before triggering触发 another build.
Any additional额外的 changes within this quiet period restart waiting for the quiet period.
Default is 250 milliseconds.
org.gradle.daemon=(true,false)
When set to true the Gradle Daemon is used to run the build.
Default is true, builds will be run using the daemon.
org.gradle.daemon.idletimeout=(# of idle millis)
Gradle Daemon will terminate(使)停止 itself after specified指定 number of idle空闲 milliseconds.
Default is 10800000 (3 hours).
org.gradle.debug=(true,false)
When set to true, Gradle will run the build with remote debugging enabled, listening on port 5005.
Note that this is the equivalent相同的 of adding -agentlib:jdwp=transport=dt_socket,server=y,suspend=y,address=5005 to the JVM command line and will suspend挂起 the virtual machine until a debugger is attached所附的.
Default is false.
org.gradle.debug.host=(host address)
Specifies指定 the host address to listen on or connect to when debug is enabled.
In the server mode on Java 9 and above, passing * for the host will make the server listen on all network interfaces.
By default, no host address is passed to JDWP, so on Java 9 and above, the loopback address is used, while earlier versions listen on all interfaces.
org.gradle.debug.port=(port number)
Specifies the port number to listen on when debug is enabled.
Default is 5005.
org.gradle.debug.server=(true,false)
If set to true and debugging is enabled, Gradle will run the build with the socket-attach mode of the debugger.
Otherwise, the socket-listen mode is used.
Default is true.
org.gradle.debug.suspend=(true,false)
When set to true and debugging is enabled, the JVM running Gradle will suspend until a debugger is attached.
Default is true.
org.gradle.java.home=(path to JDK home)
Specifies the Java home for the Gradle build process.
The value can be set to either a jdk or jre location, however, depending on what your build does, using a JDK is safer.
This does not affect the version of Java used to launch the Gradle client VM (see Environment variables).
A reasonable default is derived from your environment (JAVA_HOME or the path to java) if the setting is unspecified.
org.gradle.jvmargs=(JVM arguments)
Specifies the JVM arguments used for the Gradle Daemon.
The setting is particularly尤其;特别 useful for configuring JVM memory settings for build performance性能.
This does not affect the JVM settings for the Gradle client VM.
The default is -Xmx512m -XX:MaxMetaspaceSize=384m.
org.gradle.logging.level=(quiet,warn,lifecycle,info,debug)
When set to quiet, warn, lifecycle, info, or debug, Gradle will use this log level.
The values are not case sensitive这些值不区分大小写. See Choosing a log level.
The lifecycle level is the default.
org.gradle.logging.stacktrace=(internal,all,full)
Specifies whether stacktraces堆栈磁道 should be displayed as part of the build result upon在…之上 an exception. See also the –stacktrace command-line option.
When set to internal, a stacktrace is present出现 in the output only in case of internal exceptions.
When set to all or full, a stacktrace is present出现 in the output for all exceptions and build failures.
Using full doesn’t truncate截断 the stacktrace, which leads to a much more verbose冗长的 output.
Default is internal.
org.gradle.parallel=(true,false)
When configured, Gradle will fork up付出;支付 to org.gradle.workers.max JVMs to execute projects in parallel.
To learn more about parallel task execution, see the section on Gradle build performance.
Default is false.
org.gradle.priority=(low,normal)
Specifies the scheduling priority调度优先级 for the Gradle daemon and all processes launched by it. See also performance command-line options.
Default is normal.
org.gradle.vfs.verbose=(true,false)
Configures verbose冗长的 logging when watching the file system.
Default is false.
org.gradle.vfs.watch=(true,false)
Toggles切换 watching the file system.
When enabled Gradle re-uses再利用 information it collects about the file system between builds.
Enabled by default on operating systems where Gradle supports this feature.
org.gradle.warning.mode=(all,fail,summary,none)
When set to all, summary or none, Gradle will use different warning type display. See Command-line logging options for details.
Default is summary.
org.gradle.welcome=(never,once)
Controls whether Gradle should print a welcome message.
If set to never then the welcome message will be suppressed.
If set to once then the message is printed once for each new version of Gradle.
Default is once.
org.gradle.workers.max=(max # of worker processes)
When configured, Gradle will use a maximum of the given number of workers. See also performance command-line options.
Default is number of CPU processors.
example
org.gradle.caching=true
org.gradle.jvmargs=-Xmx2g -XX:MaxMetaspaceSize=512m -XX:+HeapDumpOnOutOfMemoryError -Dfile.encoding=UTF-8
org.gradle.parallel=true
Maven
Maven is a build automation tool used by Java developers to compile, build and deploy code, documentation and libraries.
Java不仅是一门编程语言,还是一个平台通过JRuby和Jython我们可以在Java平台上编写和运行Ruby和Python程序。
Maven不仅是构建工具,还是一个依赖管理工具和项目信息管理工具。提供了中央仓库,能帮助自动下载构件。
Java应用都会借用一些第三方的开源类库,这些类库都可以通过依赖的方式引入到项目中来。
随着依赖的增多,版本不一致,版本冲突,依赖臃肿等问题。
maven提供了一个优秀的解决方案,它通过一个坐标系统准确地定位每一个构件(artifact),也就通过一组坐标maven能够找到任何一个java类库。
Maven给这个类库世界引入了经纬,让他们变得有秩序,于是我们可以借助它来有序地管理依赖,轻松地解决那些繁杂的依赖问题
Maven还能帮助我们管理原本分散在项目中各个角落的项目信息,包括项目描述,开发者列表,版本控制系统地址,许可证缺陷管理系统地址等,能帮助我们节省大量寻找这些信息的时间。
通过Maven自动生成的站点,以及一些已有的插件,我们还能够轻松获得项目文档,测试报告,静态分析报告,源码版本日志报告等非常有价值的项目信息。
Maven提供了免费的中央仓库,通过Maven的衍生工具(Nexus)我们还能进行快速地搜索,只要定位了坐标,Maven就能够帮我们自动下载,省去了手工劳动。
Maven对于项目目录结构,测试用例命令方式等内容都有既定的规则,遵循这些规则,节约学习成本,约定优于配置(Convention Over Configuration)
安装目录说明
配置环境变量
- M2_HOME = 安装目录( bin的上级目录)
- Path = %M2_HOME%\bin
bin
bin 目录包含了mvn运行的脚本
这些脚本用来配置Java命令,准备好classpath和相关的Java系统属性,然后执行java命令。
其中mvn是基于unix平台的shell脚本,mvn.bat是基于Windows平台的bat脚本。在命令行输入任何一条mvn时实际上就是在调用这些脚本。
该目录还包含了mvnDebug和mvnDebug.bat两个文件,mvn和mvnDebug基本一样,mvnDebug多了一条Maven_DEBUG_OPTS配置,其作用就是在运行Maven时开启debug,以便调试maven本身。
此外,该目录还包含m2.conf文件,这是classworlds的配置文件。
boot
boot目录包含一个文件,plexus-classworlds-2.2.3.jar。
plexus-classworlds是一个类加载器框架,相对于默认的java类加载器,他提供了更丰富的语法以方便配置,Maven使用该框架加载自己的类库。更多信息。一般用户不必关心该文件。
Conf
该目录包含一个非常重要的文件 settings.xml 直接修改该文件,就能在机器上全局地定制maven的行为,建议复制该文件到 ***~/.m2/***目录下。
该命令打印出所有java系统属性和环境变量。
mvn help:system
默认情况下 .m2文件夹放置了Maven本地仓库 .m2/repository
所有的Maven构件都被存储到该仓库中,以方便复用。
Maven根据一套规则来确定任何一个构件在仓库中的位置,由于maven仓库是通过简单文件系统透明地展示给Maven用户的,所以可以绕过Maven直接查看或修改仓库文件,遇到问题这种方式十分有用。
默认情况下不使用 ~/.m2/repository作为本地仓库,
而是复制 M2_HOME/conf/settings.xml文件到 ~/.m2/settings.xml 修改自定义仓库配置
<localRepository>E:/maven/repository</localRepository>
Lib
该目录包含了所有maven运行时需要的java类库,maven本身是分模块开发的,因此用户能看到诸如maven-core-3.0.jar、maven-model-3.0.jar之类的文件。
此外这里还包含一些Maven用到的第三方依赖。可以说lib目录就是真正的Maven,用户可以在这个目录中找到Maven内置的超级pom。
其他
- LICENSE.txt 记录Maven使用的软件许可证Apache License Version 2.0
- NOTICE.txt 记录了Maven包含的第三方软件
- README.txt 包含了Maven的简要介绍,包括安装需求以及如何安装简要指令
生命周期
Maven有三套相互独立的生命周期
- clean
- default
- site
每个生命周期包含一些阶段phase,这些阶段是有顺序的,并且后面的阶段依赖于前面的阶段
用户与maven最直接的交互方式就是调用这些生命周期
用户调用某个生命周期的某个阶段,不会影响其他的生命周期
clean
clean 生命周期目的是清理项目,包含三个阶段
- pre-clean 执行一些清理前需要完成的工作。调用 pre-clean 的时候只有 pre-clean 阶段得以执行
- clean 清理上一次构建生成的文件。调用clean,pre-clean和clean阶段会得以顺序执行
- post-clean 执行一些清理后需要完成的工作。调用post-clean,pre-clean,clean,post-clean会顺序执行
default
default 生命周期的目的是构建项目。定义真正构建时所需要执行的所有步骤,它是所有生命周期中最核心的部分。包含以下阶段
- Validate:
- Initialize:
- Generate-sources:
- Process-sources:处理项目主资源文件,一般来说是对src/main/resources目录的内容进行变量替换等工作后,复制到项目输出的主classpath目录中
- Generate-resources:
- Process-resources:
- Compile:编译项目的主源码,一般来说,是便宜src/main/java目录下的Java文件至项目输出的主classpath目录中
- Process-classes:
- Generate-test-sources:
- Process-test-sources:处理项目测试资源文件,一般来说是对src/test/resources目录的内容进行变量替换等工作后,复制到项目输出的测试classpath目录中
- Generate-test-resources:
- Process-test-resources:
- Test-compile:编译项目的测试代码,一般来说是编译src/test/java目录下的java文件至项目输出的测试classpath目录中,
- Process-test-classes:
- Test:
- Prepare-package:
- Package:接受编译好的代码,打包成可发布的格式,jar,war等
- Pre-integration-test:
- Integration-test:
- Post-integration-test:
- Verify:
- Install:将安装包到maven本地仓库,供本地其他项目使用
- Deploy:将最终的包复制到远程仓库,供其它开发人员和maven项目使用
site
site 生命周期的目的是建立项目站点。建立和发布项目站点,maven 能够给予 pom 所包含的信息,自动生成一个友好的站点,方便团队交流和发布项目信息。包含以下阶段
- Pre-site:执行一些在生成项目站点之前需要完成的工作
- Site:生成项目站点文档
- Post-site:执行一些在生成项目站点之后需要完成的工作
- Site-deploy:将生成项目站点发布到服务器上
命令行与生命周期
命令行执行 maven 任务的最主要方式就是调用 maven 的生命周期阶段,需要注意的是,各个生命周期是相互独立的,而一个生命周期的阶段有前后依赖关系。maven中主要的生命周期阶段并不多,而常用的maven命令实际都是基于这些阶段简单组合而成的。
# 该命令调用clean生命周期的clean阶段,实际执行的阶段为clean生命周期的pre-claen和clean阶段。
mvn clean

# 生命周期的test阶段,执行阶段为defaul生命周期的validate,initialize。。。直到test的所有阶段
# 所以执行测试的时候,项目的代码能够自动得以编译。
mvn test default

# 调用clean的clean阶段,和default的install阶段,在执行真正的项目构建之前清理项目是一个很好的实践。
mvn clean install

# 该命令调用clean生命周期的clean阶段,default生命周期的deploy阶段以及site生命周期的site-deploy阶段
mvn clean deploy site-deploy
总结
# 任何maven项目中都可以执行这些命令

# 编译
mvn clean compile

# 执行test之前会先执行compile
mvn clean test

# 打包 执行package之前会先执行test
mvn clean package

# 安装 执行install之前会执行package
mvn clean install
error
20171017 cmd 执行 mvn clean compile 报错
错误描述:
No compiler is provided in this environment. Perhaps you are running on a JRE rather than a JDK?
问题触发条件:
使用 JDK1.8 安装后,会在 Win10 系统 path 中新增 C:\ProgramData\Oracle\Java\javapath
cmd 命令行执行 mvn clean compile 会出现上述错误
解决方法:
把 C:\ProgramData\Oracle\Java\javapath 从(系统)path 中删除
命令解析:
- clean maven 清理输出目录 target/
- compile maven 编译项目
从日志输出中看到 maven 首先执行了 clean:clean 任务,删除 target/ 目录。默认情况下maven构建的所有输出都在 target/ 目录中;
接着执行 resources:resources 任务(未定义项目资源,暂且略过);
最后执行 compile:compile 任务,将项目主代码编译至 target/classes
20171018 cmd mvn clean test
mvn clean test
maven实际执行的还有
- clean:clean
- resources:resources
- compiler:compiler
- resources:testResources
- compiler:test:Compiler
在Maven执行测试test之前,会先自动执行项目主资源处理,主代码编译,测试资源处理,测试代码编译等工作,这是maven生命周期的一个特性。
测试代码通过编译之后在 target/test-classes 下生成二进制文件,surefile:test 任务运行测试,surefire 是 maven 中 负责执行测试的插件,这里它运行测试用例 HelloWorldTest,并且输出测试报告,显示一共运行了多少测试,失败多少,出错多少,跳过多少
mvn clean package
项目编译,测试之后一个重要步骤是打包,HelloWorld的POM中没有指定打包类型,使用默认打包类型jar
类似地maven会在打包之前执行编译,测试等操作。
jar:jar 任务负责打包,实际上是jar插件的jar目标将项目主代码打包成一个名为 hello-world-1.0-SNAPSHOT.jar的文件,该文件也位于 ***target/***输出目录中,他是根据 artifact-version.jar 规则进行命名的,有需要还可以使用 finalName来定义改文件的名称。
可以复制 jar 文件到其他项目的 classpath中从而使用 HelloWorld 类
mvn clean install
其他 maven 项目直接引用这个 jar 需要一个安装步骤
在打包之后又执行了安装任务 install:install,从输出可以看到该项目输出的jar安装到了Maven本地仓库中,只有将 HelloWorld 的构件安装到本地仓库后,其他maven项目才能通过 GAV坐标使用该 jar
可运行 jar 包
默认打包生成的 jar 不能够直接运行的,因为带有 main 方法的类信息不会添加到 manifest 中(打开jar文件中的 META-INF/MANIFEST.MF文件,将无法看到 Main-Class行)。
借助 maven-shade-plugin 生成可执行的jar文件,在pom中配置该插件
插件
插件目标
Maven 的核心仅仅定义了抽象的生命周期,具体的任务是交由插件完成的,插件以独立的构件形式存在,因此,Maven核心的分发包只有不到3MB的大小,Maven会在需要的时候下载并使用插件。
对于插件本身,为了能够复用代码,它往往能够完成多个任务。
maven-dependency-plugin能够基于项目的依赖分析项目依赖,帮助找出潜在的无用依赖;它能够列出项目的依赖树,帮助分析来源,列出项目所有已解析的依赖。为每个这样的功能编写一个独立的插件显然是不可取的,因为这些任务背后有很多可以复用的代码,因此,这些功能聚集在一个插件里,每个功能就是一个插件目标。
Maven-dependency-plugin有十多个目标,每个目标对应一个功能。通用写法,冒号前是插件前缀,冒号后面是插件目标
- Dependency:analyze 分析依赖
- Dependency:tree 列出依赖树
- Dependency:list 列出所有已解析的依赖
插件绑定
Maven的生命周期与插件相互绑定,用以完成实际的构建任务,具体而言是生命周期的阶段与插件的目标相互绑定,以完成某个具体的构建任务。
例如项目编译对应default生命周期的compile阶段,maven-compile-plugin这一插件的compile目标能够完成该任务,因此他们绑定就能实现项目编译的目的。
- 内置绑定: 为了能让用户不用任何配置就能构建maven项目,maven在核心为一些主要的生命周期阶段绑定了很多插件的目标,当用户通过命令行调用生命周期阶段的时候没对应的插件目标就会执行相应的任务
- 自定义绑定: 用户可以将某个插件目标绑定到生命周期的某个阶段上,这种自定义绑定方式能让Maven项目在构建过程中执行更多更丰富的特色的任务
  <build>
   <plugins>
      <plugin>
          <groupId>org.apache.maven.plugins</groupId>
          <artifactId>maven-source-plugin</artifactId>
          <version>2.1.1</version>
          <executions>
              <execution>
                  <id>attach-sources</id>
                  <phase>verify</phase>
                  <goals>
                      <goal>jar-no-fork</goal>
                  </goals>
              </execution>
          </executions>
      </plugin>
    </plugins>
  </build>
查看帮助
# 该命令输出对应插件的详细信息
mvn help:describe -Dplugin org.apache.maven.plugins:maven-source-plugin:2.1.1 -Ddetails
当插件目标被绑定到不同的生命周期阶段的时候,其执行顺序由生命周期阶段的先后顺序决定,如果多个目标被绑定到同一阶段,他们的执行顺序由插件声明的先后顺序决定。在 POM 文件的 build 元素下的 plugins 子元素中声明插件的使用。该例中用到的是 maven-source-plugin
- groupId: org.apache.maven.plugins(属于 maven官方插件的 groupId)
- artifactId: maven-source-plugin
- version: 2.1.1
对于自定义绑定的插件,用户总是应该声明一个非快照版本,这样可以避免由于插件版本变化造成构建不稳定
插件执行配置,executions 下每个 execution 子元素可以用来配置执行一个任务
该例中配置了一个 id 为 attach-sources 的任务,通过 phrase 配置,将其绑定到 verify 生命周期阶段上,再通过 goals 配置指定要执行的插件目标
运行 mvn verify,maven-source-plugin:jar-no-fork 会得以执行,它会创建一个以 -sources.jar 结尾的源码文件包
有时候即使不通过 phase 元素配置生命周期阶段,插件目标也能绑定到生命周期中去,如删除 phase 这一行,再执行 mvn verify 仍然可以看到 maven-source-plugin:jar-no-fork 得以执行,这是因为有很多插件的目标在编写时已经定义了默认绑定阶段,可以使用 maven-help-plugin 查看插件详细信息,了解插件目标的默认绑定阶段。
插件配置
配置插件目标的参数,进一步调整插件目标所执行的任务以满足项目的需求,几乎所有 maven 插件的目标都有一些可配置的参数,用户可以通过命令行和POM配置等方式来配置这些参数。
Maven-surefire-plugin 提供了一个 maven.test.skip 参数,当其值为 true 时会跳过执行测试。于是在运行命令的时候加上如下 -D 参数就能跳过测试。
-D 是 java 自带的,其功能是通过命令行设置一个 java 系统属性,maven 简单地重用了该参数,在准备插件的时候检查系统属性,便实现了插件参数的配置。
# 命令行插件配置
mvn install –Dmaven.test.skip=true
并不是所有插件参数都适合命令行配置,有些参数的值从项目创建到项目发布都不会改变,或者说很少改变,对于这种情况,在 POM文件中一次性配置就显然比重复在命令行输入要方便。这样绑定到 compile 阶段的maven-compiler-plugin:testCompiler 任务,就能够使用该配置,基于 Java1.5 版本进行编译
<!-- POM插件全局配置 -->
<build>
    <plugins>
        <plugin>
            <groupId>org.apache.maven.plugins</groupId>
            <artifactId>maven-compiler-plugin</artifactId>
            <version>2.1</version>
            <configuration>
                <!-- 配置maven-compiler-plugin告诉它编译JAVA1.5版本的源文件-->
                <source>1.5</source>
                <!-- 配置maven-compiler-plugin告诉它生成与JVM1.5兼容的字节码文件-->
                <target>1.5</target>
            </congiguration>
        </plugin>
    </plugins>
</build>
传递性依赖和依赖范围
依赖范围不仅可以控制依赖与三种classpath的关系,还对传递性依赖产生影响。
A依赖于B,B依赖于C,我们说A对于B是第一直接依赖,B对于C是第二直接依赖,A对于C是传递性依赖。
第一直接依赖的范围和第二直接依赖的范围决定了传递性依赖的范围
| 传递性依赖的范围 | 第二直接依赖→ | compile | test | provided | runtime |
|---|---|---|---|---|---|
| 第一直接依赖↓ | |||||
| compile | compile | - | - | runtime | |
| test | test | - | - | test | |
| provided | provided | - | provided | provided | |
| runtime | runtime | - | - | runtime |
依赖调解
引入传递性依赖机制,大大简化和方便依赖声明,大部分情况只需要关心项目的直接依赖是什么,而不用考虑这些直接依赖会引入什么传递性依赖
但是当传递性依赖造成问题( jar 包版本冲突)的时候就需要清楚地知道传递性依赖是从那条依赖路径引入的
如果有两个版本,maven依赖调解 Dependency Mediation 的第一原则:路径最近者优先
如果路径长度一样,maven2.0.9 开始 maven 定义了依赖调解第二原则:第一声明者优先
在 POM 中依赖声明的顺序决定了谁会被解析使用,顺序最靠前的那个依赖优胜
但是还是要尽量避免版本冲突,因为高版本有的,低版本不一定有,造成不必要的错误
可选依赖
A依赖B,B有两个互斥特性,分别依赖于 X,Y,用户不可能同时使用两个特性,
<!-- B的依赖声明:使用 optional 元素表示 mysql 和 postgresql 这两个依赖为可选依赖,只会对 B 产生影响,当其他项目依赖 B 时这两个依赖不会被传递 -->
<project>
    <modelVersion>4.0.0</modelVersion>
    <groupId>cn.aiclr.mvn</groupId>
    <artifactId>project-b</artifactId>
    <version>1.0.0</version>
    <dependencies>
        <dependency>
            <groupId>mysql</groupId>
            <artifactId>mysql-connector-java</artifactId>
            <version>5.1.10</version>
            <optional>true</optional>
        </dependency>
        <dependency>
            <groupId>postgresql</groupId>
            <artifactId>postgresql</artifactId>
            <version>8.4-701.jdbc3</version>
            <optional>true</optional>
        </dependency>
    </dependencies>
</project>
<!-- A的依赖声明当项目A依赖B时,如果A使用mysql数据库,那么A需要显示地声明msql依赖 -->
<project>
    <modelVersion>4.0.0</modelVersion>
    <groupId>cn.aiclr.mvn</groupId>
    <artifactId>project-a</artifactId>
    <version>1.0.0</version>
    <dependencies>
        <dependency>
            <groupId>cn.aiclr.mvn</groupId>
            <artifactId>project-b</artifactId>
            <version>1.0.0</version>
        </dependency>
        <dependency>
            <groupId>mysql</groupId>
            <artifactId>mysql-connector-java</artifactId>
            <version>5.1.10</version>
        </dependency>
    </dependencies>
</project>
在理想情况下,不应该使用可选依赖,在面向对象设计中,有单一职责性原则,意指一个类应该只有一项职责,而不是糅合太多的功能,这个原则在规划 Maven 项目的时候也同样适用
上述例子更好的处理方式是为 mysql 和 postgesql 分别创建一个 maven 项目,基于同样的 groupId 分配不同的 artifactId。
cn.aiclr.mvn:project-b-mysql
<project>
    <modelVersion>4.0.0</modelVersion>
    <groupId>cn.aiclr.mvn</groupId>
    <artifactId>project-b-mysql</artifactId>
    <version>1.0.0</version>
    <dependencies>
        <dependency>
            <groupId>mysql</groupId>
            <artifactId>mysql-connector-java</artifactId>
            <version>5.1.10</version>
            <optional>true</optional>
        </dependency>
    </dependencies>
</project>
cn.aiclr.mvn:project-b-postgresql
<project>
    <modelVersion>4.0.0</modelVersion>
    <groupId>cn.aiclr.mvn</groupId>
    <artifactId>project-b-postgresql</artifactId>
    <version>1.0.0</version>
    <dependencies>
        <dependency>
            <groupId>postgresql</groupId>
            <artifactId>postgresql</artifactId>
            <version>8.4-701.jdbc3</version>
            <optional>true</optional>
        </dependency>
    </dependencies>
</project>
在各自的 pom 中声明对应的 JDBC 驱动依赖,用户根据需要选择使用 mysql 或者 postgresql 。利用传递性依赖,就不用再次声明 JDBC 驱动依赖
<!-- A的依赖声明当项目A依赖B时,如果A使用mysql数据库,那么A不需要显示地声明msql依赖 -->
<project>
    <modelVersion>4.0.0</modelVersion>
    <groupId>cn.aiclr.mvn</groupId>
    <artifactId>project-a</artifactId>
    <version>1.0.0</version>
    <dependencies>
        <dependency>
            <groupId>cn.aiclr.mvn</groupId>
            <artifactId>project-b-mysql</artifactId>
            <version>1.0.0</version>
        </dependency>
    </dependencies>
</project>
排除依赖
传递性依赖会给项目隐式地引入很多依赖,这极大地简化了项目依赖的管理,但是有时候需要排除一些不需要的依赖
项目A依赖B,不想引入传递性依赖C,而是自己显示地声明C,1.1.0版本的依赖
使用<exclusions><exclusion>元素声明排除依赖,声明exclusion时只需要<groupId><artifactId>不需要version元素
因为只需要groupId和artifactId就能唯一定位依赖图中的某个依赖
Maven解析后的依赖中,不可能出现groupId和artifactId相同version不同的两个依赖
<project>
  <modelVersion>4.0.0</modelVersion>
  <groupId>com.juvenxu.mvnbook</groupId>
  <artifactId>project-a</artifactId>
  <version>1.0.0</version>
  <dependencies>
      <dependency>
          <groupId>com.juvenxu.mvnbook</groupId>
          <artifactId>project-b</artifactId>
          <version>1.0.0</version>
      <exclusions>
          <exclusion>
          <groupId> com.juvenxu.mvnbook </groupId>
                  <artifactId>project-c</artifactId>
          </exclusion>
      </exclusions>
      </dependency>
      <dependency>
          <groupId> com.juvenxu.mvnbook </groupId>
          <artifactId>project-c</artifactId>
          <version>1.1.0</version>
      </dependency>
  </dependencies>
</project>
归类依赖
在邮箱验证模块有很多关于 springframework 的依赖
<dependency>
    <groupId>org.springframework</groupId>
    <artifactId>spring-core</artifactId>
    <version>2.5.6</version>
</dependency>
<dependency>
    <groupId>org.springframework</groupId>
    <artifactId>spring-beans</artifactId>
    <version>2.5.6</version>
</dependency>
<dependency>
    <groupId>org.springframework</groupId>
    <artifactId>spring-context</artifactId>
    <version>2.5.6</version>
</dependency>
<dependency>
    <groupId>org.springframework</groupId>
    <artifactId>spring-context-support</artifactId>
    <version>2.5.6</version>
</dependency>
使用 Maven 属性,properties元素定义 Maven 属性,定义了 springframework.version 子元素其值为 2.5.6。
Maven 运行时会将 POM 中所有的 ${springframework.version} 替换为 2.5.6 美元符号加大括号环绕的方式引用 Maven属性。可以优化为如下,更简洁
<properties>
	<springframework.version>2.5.6</springframework.version>
</properties>
 <dependencies>
 	<dependency>
		<groupId>org.springframework</groupId>
		<artifactId>spring-core</artifactId>
		<version>${springframework.version}</version>
	</dependency>
	<dependency>
		<groupId>org.springframework</groupId>
		<artifactId>spring-beans</artifactId>
		<version>${springframework.version}</version>
	</dependency>
	<dependency>
		<groupId>org.springframework</groupId>
		<artifactId>spring-context</artifactId>
		<version>${springframework.version}</version>
	</dependency>
	<dependency>
		<groupId>org.springframework</groupId>
		<artifactId>spring-context-support</artifactId>
		<version>${springframework.version}</version>
	</dependency>
 <dependencies>
优化依赖
Maven会自动解析所有项目的直接依赖和传递性依赖,并且根据规则正确判断每一个依赖的范围。对于一些依赖冲突,也能进行调节,以确保任何一个构件只有唯一的版本在依赖中存在,在上面这些工作之后,最后得到的依赖称为已解析依赖。
# 查看依赖
mvn dependency:list

# 查看依赖树
mvn dependency:tree

# 分析当前项目依赖
mvn dependency:analyze
多模块
DepencyManagement: 在顶层的POM文件中,通过DepencyManagement元素来管理jar包的版本,让子项目中引用一个依赖而不用显示的列出版本号。Maven会沿着父子层次向上走,直到找到一个拥有 dependencyManagement 元素的项目,然后它就会使用在这个dependencyManagement元素中指定的版本号。可以统一管理项目的版本号,确保应用的各个项目的依赖和版本一致,保证测试和发布是相同的成果,因此在顶层 pom 中定义共同的依赖关系,同时可以避免在每个使用的子项目中都声明一个版本号,这样想升级或者切换版本,只需在父类容器更新。如果子项目需要另外一个版本号时,只需要在自己的pom的dependencies中声明一个版本号,子项目就可以使用自己声明的版本号,不继承父类版本号。Dependencies:相对于depencyManagement,所有声明在dependencies里的依赖都会自动引入,并默认被所有子项目继承
区别:
dependencies即使在子项目中不写该依赖项,那么子项目仍然会从父项目中继承该依赖项(全部继承)dependencyManagement里只是声明依赖,并不实际引入,因此子项目需要显示的声明需要用的依赖- 不在子项目中声明依赖,不会从父项目中继承依赖
- 只有在子项目中写了该依赖项,并且没有指定具体版本,才会从父项目中继承该项,并且
version和scope都读取自父 pom。如果子项目中指定了版本号,那么会使用子项目中指定的jar版本
spring
The Spring Framework provides a comprehensive programming and configuration model for modern Java-based enterprise applications - on any kind of deployment platform.
fork into my github
下载源码
git clone git@github.com:aiclr/spring-framework.git
切换到想编译的分支
git checkout -b 5.3.x origin/5.3.x
5.3.20
env:
- archlinux
- git
- jdk / openjdk 11
- idea 2022.2
直接运行 ./gradlew build 不出意外的话会出现下面列出的意外 解决问题后使用 *idea 打开项目
error
执行命令
./gradlew clean build
异常日志
spring-framework/spring-core/src/main/java/org/springframework/core/CoroutinesUtils.java:74: warning: [deprecation] isAccessible() in AccessibleObject has been deprecated
                if (method.isAccessible() && !KCallablesJvm.isAccessible(function)) {
                          ^
error: warnings found and -Werror specified
1 error
1 warning
解决方案:
添加 @SuppressWarnings(“deprecation”)
vim spring-core/src/main/java/org/springframework/core/CoroutinesUtils.java
code:
	/**
	 * Invoke a suspending function and converts it to {@link Mono} or
	 * {@link Flux}.
	 */
	@SuppressWarnings("deprecation")
	public static Publisher<?> invokeSuspendingFunction(Method method, Object target, Object... args) {
		KFunction<?> function = Objects.requireNonNull(ReflectJvmMapping.getKotlinFunction(method));
		if (method.isAccessible() && !KCallablesJvm.isAccessible(function)) {
			KCallablesJvm.setAccessible(function, true);
		}
        ......
    }
bug
spring 文件是否为空 boolean isEmpty();
- org.springframework.web.multipart.MultipartFile
- org.springframework.web.multipart.support.StandardMultipartHttpServletRequest
- org.springframework.web.multipart.commons.CommonsMultipartFile
- org.springframework.mock.web.MockMultipartFile
- MultipartFile 的 isEmpty() 方法是根据文件大小进行判断,不是判断对象是否为 null。 规范使用防止 NPE
source code
    StandardMultipartHttpServletRequest
    @Override
    public boolean isEmpty()
    {
        return (this.part.getSize() == 0);
    }
    CommonsMultipartFile
    @Override
    public boolean isEmpty()
    {
        return (this.size == 0);
    }
    MockMultipartFile
    @Override
    public boolean isEmpty()
    {
        return (this.content.length == 0);
    }
分层打包
分层打包
env
- springboot:2.5.5
- jdk1.8
- reference
Dockerfile
FROM alpine4jre8:1.0.0 as builder
MAINTAINER aiclr <aiclr@qq.com>
WORKDIR application
ARG JAR_FILE=build/libs/*.jar
COPY ${JAR_FILE} application.jar
RUN java -Djarmode=layertools -jar application.jar extract && \
if [ -z "$(ls -A snapshot-dependencies/)" ]; then touch snapshot-dependencies/v; else echo "snapshot-dependencies is not Empty"; fi

FROM alpine4jre8:1.0.0 as layer
MAINTAINER aiclr <aiclr@qq.com>
WORKDIR application
ARG CONFIG=src/main/resources/config/
COPY --from=builder application/dependencies/ ./
COPY --from=builder application/spring-boot-loader/ ./
COPY --from=builder application/snapshot-dependencies/ ./
COPY ${CONFIG} config/
COPY --from=builder application/application/ ./
VOLUME ["/application/config","/application/logs"]
ENTRYPOINT ["java", "org.springframework.boot.loader.JarLauncher"]
分层jar 没有snapshot依赖时,snapshot-dependencies是空文件夹不会创建layer,后面COPY无法获取到该层报错,所以加入一行if进行处理
docker-compose.yml
version: "3.9"
services:
  rabbitmq:
    image: rabbitmq
    ports:
      - "5672:5672"
      - "15672:15672"
    environment:
      - RABBITMQ_DEFAULT_USER=guest
      - RABBITMQ_DEFAULT_PASS=guest
  app:
    image: app:0.0.1
    depends_on:
      - rabbitmq
    ports:
      - "8080:8080"
    volumes:
      - "/home/caddy/app/config:/application/config"
      - "/home/caddy/app/logs:/application/logs"
- docker build
docker build -f Dockerfile -t app:0.0.1 - docker-compose run
docker-compose up rabbitmq app - layertools
java -Djarmode=layertools -jar application.jar extract
Spring Cloud provides tools for developers to quickly build some of the common patterns in distributed systems (e.g. configuration management, service discovery, circuit breakers, intelligent routing, micro-proxy, control bus, short lived microservices and contract testing). Coordination of distributed systems leads to boiler plate patterns, and using Spring Cloud developers can quickly stand up services and applications that implement those patterns. They will work well in any distributed environment, including the developer’s own laptop, bare metal data centres, and managed platforms such as Cloud Foundry.
-
服务治理是SpringCloud的核心
- Consul
- Eureka(Netflix)
- spring cloud eureka 是 Spring Cloud 对 Netflix 开源的一款服务治理产品进行二次封装而出现的一个子项目
-
微服务治理
- 服务注册
- 服务发现
- 服务注销
- 服务状态监控
- 负载均衡
-
微服务网关
- 微服务映射
- 服务路由管理
- 请求过滤
- AB测试
- 金丝雀测试
-
微服务容错
- 服务降级
- 熔断机制
- 超时管理
- 回退机制
- 服务限流
-
统一配置
- 加载与刷新
- 配置存储
- 版本管理
- 加密与解密
-
微服务监控
- 日志聚合
- 日志监控
- 调用链监控
- 可视化分析
- 健康检查
- Metrics监控
-
微服务通信
- 基于RESTful协议
- 消息中间件整合
- 发布-订阅模式
- 远程事件
-
微服务安全
- Session管理
- 单点登录
- OAuth认证
- JWT授权
-
微服务部署与编排
- Docker
- K8s
- 服务编排
- 自动发布
Spring Cloud 技术概览
Spring Cloud 是在 Netflix OSS 等多家开源的基础上,使用 SpringBoot 风格将这些比较成熟的微服务框架组合起来,屏蔽掉复杂的配置和实现原理。为快速构建微服务机构的应用提供了一套基础设施工具和开发支持。
- 基于Netflix实现服务治理、客户端负载均衡、声明式调用
- 服务网关
- 微服务容错管理
- 整合消息中间件提供消息驱动式开发
- 基于SpringSecurity提供微服务安全、单点登录功能
- 分布式、版本化的统一配置管理
- 微服务调用链及追踪管理
Spring Cloud子项目
- 对现有成熟的第三方开源项目 SpringBoot 化,开箱即用
- 新增一些微服务机构开发所需的基础设施
- Spring Cloud Config 统一配置中心
- Spring Cloud Stream 快速集成 Kafka,RabbitMQ 等消息中间件
eureka
Eureka
Eureka Client 配置项
# 服务注册中心实例的主机名

eureka.instance.hostname=localhost

# 注册在Eureka服务中的应用组名

eureka.instance.app-group-name=

# 注册在的Eureka服务中的应用名称

eureka.instance.appname=

# 该实例注册到服务中心的唯一ID

eureka.instance.instance-id=

# 该实例的IP地址

eureka.instance.ip-address=

# 该实例,相较于hostname是否优先使用IP

eureka.instance.prefer-ip-address=false

# 用于AWS平台自动扩展的与此实例关联的组名,

eureka.instance.a-s-g-name=

# 部署此实例的数据中心

eureka.instance.data-center-info=

# 默认的地址解析顺序

eureka.instance.default-address-resolution-order=

# 该实例的环境配置

eureka.instance.environment=

# 初始化该实例,注册到服务中心的初始状态

eureka.instance.initial-status=up

# 表明是否只要此实例注册到服务中心,立马就进行通信

eureka.instance.instance-enabled-onit=false

# 该服务实例的命名空间,用于查找属性

eureka.instance.namespace=eureka

# 该服务实例的子定义元数据,可以被服务中心接受到

eureka.instance.metadata-map.test = test

# 服务中心删除此服务实例的等待时间(秒为单位),时间间隔为最后一次服务中心接受到的心跳时间

eureka.instance.lease-expiration-duration-in-seconds=90

# 该实例给服务中心发送心跳的间隔时间,用于表明该服务实例可用

eureka.instance.lease-renewal-interval-in-seconds=30

# 该实例,注册服务中心,默认打开的通信数量

eureka.instance.registry.default-open-for-traffic-count=1

# 每分钟续约次数

eureka.instance.registry.expected-number-of-renews-per-min=1

# 该实例健康检查url,绝对路径

eureka.instance.health-check-url=

# 该实例健康检查url,相对路径

eureka.instance.health-check-url-path=/health

# 该实例的主页url,绝对路径

eureka.instance.home-page-url=

# 该实例的主页url,相对路径

eureka.instance.home-page-url-path=/

# 该实例的安全健康检查url,绝对路径

eureka.instance.secure-health-check-url=

# https通信端口

eureka.instance.secure-port=443

# https通信端口是否启用

eureka.instance.secure-port-enabled=false

# http通信端口

eureka.instance.non-secure-port=80

# http通信端口是否启用

eureka.instance.non-secure-port-enabled=true

# 该实例的安全虚拟主机名称(https)

eureka.instance.secure-virtual-host-name=unknown

# 该实例的虚拟主机名称(http)

eureka.instance.virtual-host-name=unknown

# 该实例的状态呈现url,绝对路径

eureka.instance.status-page-url=

# 该实例的状态呈现url,相对路径

eureka.instance.status-page-url-path=/status

# 该客户端是否可用

eureka.client.enabled=true

# 实例是否在eureka服务器上注册自己的信息以供其他服务发现,默认为true

eureka.client.register-with-eureka=false

# 此客户端是否获取eureka服务器注册表上的注册信息,默认为true

eureka.client.fetch-registry=false

# 是否过滤掉,非UP的实例。默认为true

eureka.client.filter-only-up-instances=true

# 与Eureka注册服务中心的通信zone和url地址

eureka.client.serviceUrl.defaultZone=http://${eureka.instance.hostname}:${server.port}/eureka/

# client连接Eureka服务端后的空闲等待时间,默认为30 秒

eureka.client.eureka-connection-idle-timeout-seconds=30

# client连接eureka服务端的连接超时时间,默认为5秒

eureka.client.eureka-server-connect-timeout-seconds=5

# client对服务端的读超时时长

eureka.client.eureka-server-read-timeout-seconds=8

# client连接all eureka服务端的总连接数,默认200

eureka.client.eureka-server-total-connections=200

# client连接eureka服务端的单机连接数量,默认50

eureka.client.eureka-server-total-connections-per-host=50

# 执行程序指数回退刷新的相关属性,是重试延迟的最大倍数值,默认为10

eureka.client.cache-refresh-executor-exponential-back-off-bound=10

# 执行程序缓存刷新线程池的大小,默认为5

eureka.client.cache-refresh-executor-thread-pool-size=2

# 心跳执行程序回退相关的属性,是重试延迟的最大倍数值,默认为10

eureka.client.heartbeat-executor-exponential-back-off-bound=10

# 心跳执行程序线程池的大小,默认为5

eureka.client.heartbeat-executor-thread-pool-size=5

# 询问Eureka服务url信息变化的频率(s),默认为300秒

eureka.client.eureka-service-url-poll-interval-seconds=300

# 最初复制实例信息到eureka服务器所需的时间(s),默认为40秒

eureka.client.initial-instance-info-replication-interval-seconds=40

# 间隔多长时间再次复制实例信息到eureka服务器,默认为30秒

eureka.client.instance-info-replication-interval-seconds=30

# 从eureka服务器注册表中获取注册信息的时间间隔(s),默认为30秒

eureka.client.registry-fetch-interval-seconds=30

# 获取实例所在的地区。默认为us-east-1

eureka.client.region=us-east-1

# 实例是否使用同一zone里的eureka服务器,默认为true,理想状态下,eureka客户端与服务端是在同一zone下

eureka.client.prefer-same-zone-eureka=true

# 获取实例所在的地区下可用性的区域列表,用逗号隔开。(AWS)

eureka.client.availability-zones.china=defaultZone,defaultZone1,defaultZone2

# eureka服务注册表信息里的以逗号隔开的地区名单,如果不这样返回这些地区名单,则客户端启动将会出错。默认为null

eureka.client.fetch-remote-regions-registry=

# 服务器是否能够重定向客户端请求到备份服务器。 如果设置为false,服务器将直接处理请求,如果设置为true,它可能发送HTTP重定向到客户端。默认为false

eureka.client.allow-redirects=false

# 客户端数据接收

eureka.client.client-data-accept=

# 增量信息是否可以提供给客户端看,默认为false

eureka.client.disable-delta=false

# eureka服务器序列化/反序列化的信息中获取“_”符号的的替换字符串。默认为“__“

eureka.client.escape-char-replacement=__

# eureka服务器序列化/反序列化的信息中获取“$”符号的替换字符串。默认为“_-”

eureka.client.dollar-replacement="_-"

# 当服务端支持压缩的情况下,是否支持从服务端获取的信息进行压缩。默认为true

eureka.client.g-zip-content=true

# 是否记录eureka服务器和客户端之间在注册表的信息方面的差异,默认为false

eureka.client.log-delta-diff=false

# 如果设置为true,客户端的状态更新将会点播更新到远程服务器上,默认为true

eureka.client.on-demand-update-status-change=true

# 此客户端只对一个单一的VIP注册表的信息感兴趣。默认为null

eureka.client.registry-refresh-single-vip-address=

# client是否在初始化阶段强行注册到服务中心,默认为false

eureka.client.should-enforce-registration-at-init=false

# client在shutdown的时候是否显示的注销服务从服务中心,默认为true

eureka.client.should-unregister-on-shutdown=true

# 获取eureka服务的代理主机,默认为null

eureka.client.proxy-host=

# 获取eureka服务的代理密码,默认为null

eureka.client.proxy-password=

# 获取eureka服务的代理端口, 默认为null

eureka.client.proxy-port=

# 获取eureka服务的代理用户名,默认为null

eureka.client.proxy-user-name=

# 属性解释器

eureka.client.property-resolver=

# 获取实现了eureka客户端在第一次启动时读取注册表的信息作为回退选项的实现名称

eureka.client.backup-registry-impl=

# 这是一个短暂的×××的配置,如果最新的×××是稳定的,则可以去除,默认为null

eureka.client.decoder-name=

# 这是一个短暂的编码器的配置,如果最新的编码器是稳定的,则可以去除,默认为null

eureka.client.encoder-name=

# 是否使用DNS机制去获取服务列表,然后进行通信。默认为false

eureka.client.use-dns-for-fetching-service-urls=false

# 获取要查询的DNS名称来获得eureka服务器,此配置只有在eureka服务器ip地址列表是在DNS中才会用到。默认为null

eureka.client.eureka-server-d-n-s-name=

# 获取eureka服务器的端口,此配置只有在eureka服务器ip地址列表是在DNS中才会用到。默认为null

eureka.client.eureka-server-port=

# 表示eureka注册中心的路径,如果配置为eureka,则为http://x.x.x.x:x/eureka/,在eureka的配置文件中加入此配置表示eureka作为客户端向注册中心注册,从而构成eureka集群。此配置只有在eureka服务器ip地址列表是在DNS中才会用到,默认为null

eureka.client.eureka-server-u-r-l-context=
Eureka Server 配置项
server 与 client 关联的配置
# 服务端开启自我保护模式。无论什么情况,服务端都会保持一定数量的服务。避免client与server的网络问题,而出现大量的服务被清除。

eureka.server.enable-self-preservation=true

# 开启清除无效服务的定时任务,时间间隔。默认1分钟

eureka.server.eviction-interval-timer-in-ms= 60000

# 间隔多长时间,清除过期的delta数据

eureka.server.delta-retention-timer-interval-in-ms=0

# 过期数据,是否也提供给client

eureka.server.disable-delta=false

# eureka服务端是否记录client的身份header

eureka.server.log-identity-headers=true

# 请求频率限制器

eureka.server.rate-limiter-burst-size=10

# 是否开启请求频率限制器

eureka.server.rate-limiter-enabled=false

# 请求频率的平均值

eureka.server.rate-limiter-full-fetch-average-rate=100

# 是否对标准的client进行频率请求限制。如果是false,则只对非标准client进行限制

eureka.server.rate-limiter-throttle-standard-clients=false

# 注册服务、拉去服务列表数据的请求频率的平均值

eureka.server.rate-limiter-registry-fetch-average-rate=500

# 设置信任的client list

eureka.server.rate-limiter-privileged-clients=

# 在设置的时间范围类,期望与client续约的百分比。

eureka.server.renewal-percent-threshold=0.85

# 多长时间更新续约的阈值

eureka.server.renewal-threshold-update-interval-ms=0

# 对于缓存的注册数据,多长时间过期

eureka.server.response-cache-auto-expiration-in-seconds=180

# 多长时间更新一次缓存中的服务注册数据

eureka.server.response-cache-update-interval-ms=0

# 缓存增量数据的时间,以便在检索的时候不丢失信息

eureka.server.retention-time-in-m-s-in-delta-queue=0

# 当时间戳不一致的时候,是否进行同步

eureka.server.sync-when-timestamp-differs=true

# 是否采用只读缓存策略,只读策略对于缓存的数据不会过期。

eureka.server.use-read-only-response-cache=true
server 自定义实现的配置
# json的转换的实现类名

eureka.server.json-codec-name=

# PropertyResolver

eureka.server.property-resolver=

# eureka server xml的编解码实现名称

eureka.server.xml-codec-name=
server node 与 node 之间关联的配置
# 发送复制数据是否在request中,总是压缩

eureka.server.enable-replicated-request-compression=false

# 指示群集节点之间的复制是否应批处理以提高网络效率。

eureka.server.batch-replication=false

# 允许备份到备份池的最大复制事件数量。而这个备份池负责除状态更新的其他事件。可以根据内存大小,超时和复制流量,来设置此值得大小

eureka.server.max-elements-in-peer-replication-pool=10000

# 允许备份到状态备份池的最大复制事件数量

eureka.server.max-elements-in-status-replication-pool=10000

# 多个服务中心相互同步信息线程的最大空闲时间

eureka.server.max-idle-thread-age-in-minutes-for-peer-replication=15

# 状态同步线程的最大空闲时间

eureka.server.max-idle-thread-in-minutes-age-for-status-replication=15

# 服务注册中心各个instance相互复制数据的最大线程数量

eureka.server.max-threads-for-peer-replication=20

# 服务注册中心各个instance相互复制状态数据的最大线程数量

eureka.server.max-threads-for-status-replication=1

# instance之间复制数据的通信时长

eureka.server.max-time-for-replication=30000

# 正常的对等服务instance最小数量。-1表示服务中心为单节点。

eureka.server.min-available-instances-for-peer-replication=-1

# instance之间相互复制开启的最小线程数量

eureka.server.min-threads-for-peer-replication=5

# instance之间用于状态复制,开启的最小线程数量

eureka.server.min-threads-for-status-replication=1

# instance之间复制数据时可以重试的次数

eureka.server.number-of-replication-retries=5

# eureka节点间间隔多长时间更新一次数据。默认10分钟。

eureka.server.peer-eureka-nodes-update-interval-ms=600000

# eureka服务状态的相互更新的时间间隔。

eureka.server.peer-eureka-status-refresh-time-interval-ms=0

# eureka对等节点间连接超时时间

eureka.server.peer-node-connect-timeout-ms=200

# eureka对等节点连接后的空闲时间

eureka.server.peer-node-connection-idle-timeout-seconds=30

# 节点间的读数据连接超时时间

eureka.server.peer-node-read-timeout-ms=200

# eureka server 节点间连接的总共最大数量

eureka.server.peer-node-total-connections=1000

# eureka server 节点间连接的单机最大数量

eureka.server.peer-node-total-connections-per-host=10

# 在服务节点启动时,eureka尝试获取注册信息的次数

eureka.server.registry-sync-retries=

# 在服务节点启动时,eureka多次尝试获取注册信息的间隔时间

eureka.server.registry-sync-retry-wait-ms=

# 当eureka server启动的时候,不能从对等节点获取instance注册信息的情况,应等待多长时间。

eureka.server.wait-time-in-ms-when-sync-empty=0
server 与 remote 关联的配置
# 过期数据,是否也提供给远程region

eureka.server.disable-delta-for-remote-regions=false

# 回退到远程区域中的应用程序的旧行为 (如果已配置) 如果本地区域中没有该应用程序的实例, 则将被禁用。

eureka.server.disable-transparent-fallback-to-other-region=false

# 指示在服务器支持的情况下, 是否必须为远程区域压缩从尤里卡服务器获取的内容。

eureka.server.g-zip-content-from-remote-region=true

# 连接eureka remote note的连接超时时间

eureka.server.remote-region-connect-timeout-ms=1000

# remote region 应用白名单

eureka.server.remote-region-app-whitelist=

# 连接eureka remote note的连接空闲时间

eureka.server.remote-region-connection-idle-timeout-seconds=30

# 执行remote region 获取注册信息的请求线程池大小

eureka.server.remote-region-fetch-thread-pool-size=20

# remote region 从对等eureka加点读取数据的超时时间

eureka.server.remote-region-read-timeout-ms=1000

# 从remote region 获取注册信息的时间间隔

eureka.server.remote-region-registry-fetch-interval=30

# remote region 连接eureka节点的总连接数量

eureka.server.remote-region-total-connections=1000

# remote region 连接eureka节点的单机连接数量

eureka.server.remote-region-total-connections-per-host=50

# remote region抓取注册信息的存储文件,而这个可靠的存储文件需要全限定名来指定

eureka.server.remote-region-trust-store=

# remote region 储存的文件的密码

eureka.server.remote-region-trust-store-password=

# remote region url.多个逗号隔开

eureka.server.remote-region-urls=

# remote region url.多个逗号隔开

eureka.server.remote-region-urls-with-name=
server 与 ASG/AWS/EIP/route52 之间关联的配置***
# 缓存ASG信息的过期时间。

eureka.server.a-s-g-cache-expiry-timeout-ms=0

# 查询ASG信息的超时时间

eureka.server.a-s-g-query-timeout-ms=300

# 服务更新ASG信息的频率

eureka.server.a-s-g-update-interval-ms=0

# AWS访问ID

eureka.server.a-w-s-access-id=

# AWS安全密钥

eureka.server.a-w-s-secret-key=

# AWS绑定策略

eureka.server.binding-strategy=eip

# 用于从第三方AWS 帐户描述自动扩展分组的角色的名称。

eureka.server.list-auto-scaling-groups-role-name=

# 是否应该建立连接引导

eureka.server.prime-aws-replica-connections=true

# 服务端尝试绑定候选EIP的次数

eureka.server.e-i-p-bind-rebind-retries=3

# 服务端绑定EIP的时间间隔.如果绑定就检查;如果绑定失效就重新绑定。当且仅当已经绑定的情况

eureka.server.e-i-p-binding-retry-interval-ms=10

# 服务端绑定EIP的时间间隔.当且仅当服务为绑定的情况

eureka.server.e-i-p-binding-retry-interval-ms-when-unbound=

# 服务端尝试绑定route53的次数

eureka.server.route53-bind-rebind-retries=3

# 服务端间隔多长时间尝试绑定route53

eureka.server.route53-binding-retry-interval-ms=30

#

eureka.server.route53-domain-t-t-l=10
RESTful API
以资源为中心进行URL设计
资源是 RESTful API 的核心,所有操作都是针对某一特定资源进行
简洁、清晰、结构化的 URL统一资源定位符设计至关重要
/users/users/{id}/users/{loginName}/products/{id}/comments
根据 RFC3986 标准中规定,URL 是大小写敏感的,SpringMVC 默认对 URL 区分大小写,避免歧义定义URL时最好都使用小写字母。RESTful API 设计最好做到 Hypermedia 化,也就是在返回结果中包含所提供相关资源的链接使得用户可以根据返回结果就能得到后续操作需要访问的地址;这种设计也被称为 HATEOASHypermedia As The Engine Of Application State
例如 github api 设计:https://api.github.com 获取api列表
{
  "current_user_url": "https://api.github.com/user",
  "current_user_authorizations_html_url": "https://github.com/settings/connections/applications{/client_id}"
}
正确使用HTTP方法及状态码
- 2xx:请求正常处理并返回
- 3xx:重定向,请求资源位置发生变化
- 4xx:客户端发送的请求有错误
- 5xx:服务器端错误
- 查询及分页处理原则
例子
xxx?state=closed:查询指定状态xxx?limit=10:指定返回10条记录xxx?page=2&size=25&sort=created,desc:分页查询及排序方式
spring Data 的 Pageable 进行分页查询时,需要传入的分页参数的默认名如下
- page
- size
- sortASC|DESC默认ASC
- sort=firstname&sort=lastname,asc
如果分页参数和项目中不同,可以通过实现 PageableHandlerMethodArgument ResolverCustomizer 接口进行自定义
其他指导原则
- 使用 JSON 作为响应返回格式
- API 域名,尽量将API部署在一个专用域名下
- API 版本最好放到URL中 https://xxx/v1/xxx
- 给出明确的错误信息
regexp
正则表达式
| Regexp | 匹配 |
|---|---|
| “x.y” | x后面接任何一个字符再接y |
| “x.y” | x后面接.再接y |
| “xz?y” | x后面最多接一个z再接y; 这样,可以是 xy 或 xzy,但不是 xz 或 xdy。 |
| “xz*y” | x后面接任意数量的z再接y; 这样,可以是 xy 或 xzy 或 xzzzy ,但不是 xz 或 xdy。 |
| “xz+y” | x后面接一个或多个z再接y; 这样,可以是 xzy 或 xzzy,但不是 xy、xz 或 xdy。 |
| “s[xyz]t” | s后面接x、y或z中的任何一个字符再接t; 这样,可以是 sxt、syt 或 szt,但不是 st 或 sat。 |
| “a[x0-9]b” | a后面接x或0-9之间的任何一个字符再接b; 这样,可以是 axb 或 a0b 或、a4b,但不是 ab 或 aab。 |
| “s[^xyz]t” | s 后面接非x、y、z的任何一个字符再接t; 这样,可以是 sdt 或 set,但不是 sxt、syt 或 szt。 |
| “s[^x0-9]t” | s后面接非x或非0-9之间的任何一个字符再接t; 这样,可以是 slt 或 smt,但不是 sxt、s0t 或 s4t。 |
| “^x” | x在字符串的开头; 这样,可以是 xzy 或 xzzy,但不是 yzy 或 yxy。 |
| “x$” | x在字符串的末尾; 这样,可以是 yzx 或 yx,但不是 yxz 或 zxy。 |
| 通配符 | 支持语言 | 匹配 |
|---|---|---|
| \ | 全部 | 转义后面的字符。切换后续符号是否作为通配符。根据程序的不同,后续的字母或数字可用各种不同的方式解释。 |
| . | 全部 | 任何字符。 |
| ^ | 全部 | 行首。 |
| $ | 全部 | 行尾。 |
| […] | 全部 | 在括号内的任何字符。 |
| [^…] | 全部 | 除括号内字符的任何字符。 |
| * | 全部 | 次数不定的重复前一个元素。 |
| ? | egrep/Emacs, Perl/Python | 0次或1次重复前一个元素。 |
| + | egrep/Emacs, Perl/Python | 1次或多次重复前一个元素。 |
| {n} | egrep, Perl/Python; Emacs中为 \{n\} | 只n次重复前一个元素。一些较老的regexp引擎不支持。 |
| {n,} | egrep, Perl/Python; Emacs中为 \{n,\} | n次或n次以上重复前一个元素。一些较老的regexp 引擎不支持。 |
| {m,n} | egrep, Perl/Python; Emacs中为 \{m,n\} | 最少重复m次、最多重复n次前一个元素。一些较老的 regexp 引擎不支持。 |
| | | egrep, Perl/Python; Emacs中为 \| | 接受左边或者右边的元素。通常用于一些模式分类分隔符形式。 |
| (…) | Perl/Python;老一点的版本为\(...\) | 在较新的 regexp引擎中,如Perl和 python 把这种模式作为组。较老的regexp引擎,如Emacs和 grep 中,要求\(...\)。 |
nacos
Nacos is an easy-to-use platform designed for dynamic service discovery and configuration and service management. It helps you to build cloud native applications and microservices platform easily.
# docker
docker run --name nacos -e MODE=standalone -p 8848:8848 -p 9848:9848 -d nacos/nacos-server:latest

# podman
podman run --name nacos -e MODE=standalone -p 8848:8848 -p 9848:9848 -d docker.io/nacos/nacos-server:latest
Nacos 控制台 http://127.0.0.1:8848/nacos/ default username and password nacos/nacos
nginx
nginx (pronounced “engine X”), is a free, open-source, high-performance HTTP web server and reverse proxy, as well as an IMAP/POP3 proxy server, written by Igor Sysoev in 2005. nginx is well known for its stability, rich feature set, simple configuration, and low resource consumption.
install
Install one of the following packages:
- nginx-mainline - mainline branch: new features, updates, bugfixes.
- nginx - stable branch: major bugfixes only.
- angieAUR - fork and drop-in replacement for nginx with more features.
- freenginx-mainlineAUR - drop-in replacement that preserves the free and open development of nginx.
sudo pacman -S nginx
running
# start
sudo systemctl start nginx.service
# if use Angie
sudo systemctl start angie.service

# status
sudo systemctl status nginx.service
# if use Angie
sudo systemctl status angie.service

# enable
sudo systemctl enable nginx.service
# if use Angie
sudo systemctl enable angie.service
configuration
First steps with nginx are described in the Beginner’s Guide. You can modify the configuration by editing the files in /etc/nginx/ The main configuration file is located at /etc/nginx/nginx.conf.
More details and examples can be found in https://wiki.nginx.org/Configuration and the official documentation.
The examples below cover the most common use cases. It is assumed that you use the default location for documents (/usr/share/nginx/html). If that is not the case, substitute your path instead.
Tip: A Nginx configuration tool has been provided by DigitalOcean.
configuration example
#user http;
worker_processes  1;

#error_log  logs/error.log;
#error_log  logs/error.log  notice;
#error_log  logs/error.log  info;

#pid        logs/nginx.pid;


events {
    worker_connections  1024;
}


http {
    include       mime.types;
    default_type  application/octet-stream;

    #log_format  main  '$remote_addr - $remote_user [$time_local] "$request" '
    #                  '$status $body_bytes_sent "$http_referer" '
    #                  '"$http_user_agent" "$http_x_forwarded_for"';

    #access_log  logs/access.log  main;

    sendfile        on;
    #tcp_nopush     on;

    #keepalive_timeout  0;
    keepalive_timeout  65;

    #gzip  on;

    server {
        listen       80;
        server_name  localhost;

        #charset koi8-r;

        #access_log  logs/host.access.log  main;

        location / {
            root   /usr/share/nginx/html;
            index  index.html index.htm;
        }

        #error_page  404              /404.html;

        # redirect server error pages to the static page /50x.html
        #
        error_page   500 502 503 504  /50x.html;
        location = /50x.html {
            root   /usr/share/nginx/html;
        }

        # proxy the PHP scripts to Apache listening on 127.0.0.1:80
        #
        #location ~ \.php$ {
        #    proxy_pass   http://127.0.0.1;
        #}

        # pass the PHP scripts to FastCGI server listening on 127.0.0.1:9000
        #
        #location ~ \.php$ {
        #    root           html;
        #    fastcgi_pass   127.0.0.1:9000;
        #    fastcgi_index  index.php;
        #    fastcgi_param  SCRIPT_FILENAME  /scripts$fastcgi_script_name;
        #    include        fastcgi_params;
        #}

        # deny access to .htaccess files, if Apache's document root
        # concurs with nginx's one
        #
        #location ~ /\.ht {
        #    deny  all;
        #}
    }

    server {
        listen       8080;
        server_name  localhost;

        #charset koi8-r;

        #access_log  logs/host.access.log  main;

        location / {
            root   /usr/share/nginx/aiclr;
            index  index.html index.htm;
        }

        #error_page  404              /404.html;

        # redirect server error pages to the static page /50x.html
        #
        error_page   500 502 503 504  /50x.html;
        location = /50x.html {
            root   /usr/share/nginx/aiclr;
        }

        # proxy the PHP scripts to Apache listening on 127.0.0.1:80
        #
        #location ~ \.php$ {
        #    proxy_pass   http://127.0.0.1;
        #}

        # pass the PHP scripts to FastCGI server listening on 127.0.0.1:9000
        #
        #location ~ \.php$ {
        #    root           html;
        #    fastcgi_pass   127.0.0.1:9000;
        #    fastcgi_index  index.php;
        #    fastcgi_param  SCRIPT_FILENAME  /scripts$fastcgi_script_name;
        #    include        fastcgi_params;
        #}

        # deny access to .htaccess files, if Apache's document root
        # concurs with nginx's one
        #
        #location ~ /\.ht {
        #    deny  all;
        #}
    }


    # another virtual host using mix of IP-, name-, and port-based configuration
    #
    #server {
    #    listen       8000;
    #    listen       somename:8080;
    #    server_name  somename  alias  another.alias;

    #    location / {
    #        root   html;
    #        index  index.html index.htm;
    #    }
    #}


    # HTTPS server
    #
    #server {
    #    listen       443 ssl;
    #    server_name  localhost;

    #    ssl_certificate      cert.pem;
    #    ssl_certificate_key  cert.key;

    #    ssl_session_cache    shared:SSL:1m;
    #    ssl_session_timeout  5m;

    #    ssl_ciphers  HIGH:!aNULL:!MD5;
    #    ssl_prefer_server_ciphers  on;

    #    location / {
    #        root   html;
    #        index  index.html index.htm;
    #    }
    #}

}
run nginx with docker
挂载外部配置文件时,注意先创建 nginx.conf
可以先启动一个不挂载外部配置的容器,将容器内配置文件复制到宿主机编辑修改
docker run --name mynginx -d =p 8080:80 imageid

docker run --name mynginx -d -p8080:80 \
-v /root/nginx/html:/usr/share/nginx/html:ro \
-v /root/nginx/conf/nginx.conf:/etc/nginx/nginx.conf:ro \
-v /root/nginx/conf.d:/etc/nginx/conf.d:ro \
-v /root/nginx/logs:/var/log/nginx \
nginx:latest
进入nginx容器:
alpine linux 默认使用 /bin/sh
docker container exec -it containerid /bin/sh
其他发行版一般使用 /bin/bash
docker container exec -it containerid /bin/bash
复制容器内配置文件 nginx.conf 到宿主机 /etc/nginx/docker/nginx.conf
docker cp containerid:/etc/nginx/nginx.conf /etc/nginx/docker/nginx.conf
nginx for vue and react
FROM nginx:stable-alpine

MAINTAINER bougainvilleas <bougainvilleas@qq.com>

WORKDIR app

ENV TZ=Asia/Shanghai \
    LANG=en_US.UTF-8

COPY nginx.conf /etc/nginx/nginx.conf
# 将npm build 生成的前端包拷贝 /usr/share/nginx/html/ 这个目录下面
COPY dist  /usr/share/nginx/html/

RUN echo 'echo init ok!!'
#!/bin/bash

image_name="app"
version="0.0.0"
port="3000"


echo -e "\n==> begin delete all container of " $image_name
docker rm $(docker stop $(docker ps -a | grep $image_name | awk '{print $1}'))

echo -e "\n==> begin delete all images of " $image_name
docker rmi -f $(docker images | grep $image_name | awk '{print $3}')

echo -e "\n==> begin build your images of " $image_name
docker build -f Dockerfile -t $image_name:$version .

echo -e "\n==> begin to create a container of " $image_name
docker run -d -p $port:$port --name=$image_name --privileged=true $image_name:$version

docker logs -f -t --tail 500 $(docker ps | grep $image_name | awk '{print $1}')

docker exec -it $(docker container ls | grep $image_name | awk '{print $1}') /bin/sh

docker stop $(docker ps -a | grep $image_name | awk '{print $1}')
psid=$(docker ps -a | grep $image_name | awk '{print $1}')
if [[ -n $psid ]]; then
  docker rm $psid
fi

echo -e "\n==> begin to package your image to tar file"
docker save $image_name:$version > ../docker/$image_name-$version.tar

echo -e "\n==> begin load your images of " $image_name
docker load < $image_name-$version.tar
redis
Redis is a software project that implements data structure servers. It is open-source, networked, in-memory, and stores keys with optional durability.
注意:
- Redis Cluster only supports database zero
- redis 6.0 以后的新功能
ACL访问控制列表:- A container for Access List Control commands 访问控制列表
docker
docker run -v /root/redis/conf:/usr/local/etc/redis -v /root/redis/data:/data -p 6379:6379 --name redis redis:6.2.6
k8s
apiVersion: apps/v1
kind: Deployment
metadata:
  name: redis
  labels:
    app: redis
spec:
  replicas: 1
  selector:
    matchLabels:
      app: redis
  template:
    metadata:
      labels:
        app: redis
    spec:
      imagePullSecrets:
        - name: fly-reg
      containers:
        - name: redis
          image: fly.reg.com/redis:6.2.6
          imagePullPolicy: IfNotPresent
          ports:
            - containerPort: 6379
          volumeMounts:
            - name: redis
              mountPath: /etc/localtime
              readOnly: true
      volumes:
        - name: redis
          hostPath:
            path: /etc/localtime
---
apiVersion: v1
kind: Service
metadata:
  name: redis
spec:
  type: NodePort
  selector:
    app: redis
  ports:
    - name: http
      port: 6379
      targetPort: 6379
      nodePort: 30003
commands
# 测试 connect
redis-cli -h localhost -p 6379 ping

# 密码 测试 connect
redis-cli -h localhost -p 6379 -a password ping

# connect
redis-cli -h localhost -p 6379

# 密码 connect
redis-cli -h localhost -p 6379 -a password

# 默认连接 localhost 6379
redis-cli

# 按数据原有格式打印数据,不展示额外的类型信息;
# 显示中文
redis-cli --raw

# 连接后 认证
# localhost:6379> AUTH [username] password

# ACL
# redis 6.0 以后的新功能 A container for Access List Control commands 访问控制列表
# 默认用户 default ,设置不同用户并授予命令或数据权限
# localhost:6379> ACL USERS

# 切换数据库 index[0,15] 供16个库,默认连接0
# localhost:6379> select 1

# 显示当前数据库索引
# Return the number of keys in the currently-selected database
# localhost:6379> dbsize
redisjson
支持 JSON 的 redis rejson
home
github
java client github
docker and podman
docker run -v /root/redis/conf:/usr/local/etc/redis -v /root/redis/data:/data -p 6379:6379 --name rejson redislabs/rejson:2.0.6
podman run -v /root/redis/conf:/usr/local/etc/redis -v /root/redis/data:/data -p 6379:6379 --name rejson redislabs/rejson:2.0.6
rejson k8s
apiVersion: apps/v1
kind: Deployment
metadata:
  name: redisjson
  labels:
    app: redisjson
spec:
  replicas: 1
  selector:
    matchLabels:
      app: redisjson
  template:
    metadata:
      labels:
        app: redisjson
    spec:
      imagePullSecrets:
        - name: fly-reg
      containers:
        - name: redisjson
          image: fly.reg.com/redisjson:2.0.6
          imagePullPolicy: IfNotPresent
          ports:
            - containerPort: 6379
          volumeMounts:
            - name: redisjson
              mountPath: /etc/localtime
              readOnly: true
      volumes:
        - name: redisjson
          hostPath:
            path: /etc/localtime
---
apiVersion: v1
kind: Service
metadata:
  name: redisjson
spec:
  type: NodePort
  selector:
    app: redisjson
  ports:
    - name: http
      port: 6379
      targetPort: 6379
      nodePort: 30004
redisjson commands
localhost:6379> JSON.SET doc $ '{"a":2,"b":3,"nested":{"a":4,"b":null}}' OK
localhost:6379> get keys (nil)
localhost:6379> dbsize (integer) 1
localhost:6379> GET * (nil)
localhost:6379> JSON.GET doc "{\"a\":2,\"b\":3,\"nested\":{\"a\":4,\"b\":null}}"
localhost:6379> JSON.GET doc $..b "[3,null]"
localhost:6379> JSON.GET doc ..a $..b "{\"..a\":[2,4],\"$..b\":[3,null]}"
localhost:6379> JSON.GET doc ..a "2"
localhost:6379> JSON.GET doc $..a "[2,4]"
localhost:6379> JSON.GET doc $..a $..b "{\"$..a\":[2,4],\"$..b\":[3,null]}"
jrejson
RedisJson java client
github
maven search
maven
<dependency>
  <groupId>com.redislabs</groupId>
  <artifactId>jrejson</artifactId>
  <version>1.5.0</version>
</dependency>
gradle
implementation 'com.redislabs:jrejson:1.5.0'
example
import redis.clients.jedis.Jedis;
import com.redislabs.modules.rejson.JReJSON;

...

 First get a connection
JReJSON client = new JReJSON("localhost", 6379);

 Setting a Redis key name _foo_ to the string _"bar"_, and reading it back
client.set("foo", "bar");
String s0 = (String) client.get("foo");

 Omitting the path (usually) defaults to the root path, so the call above to
 `get()` and the following ones // are basically interchangeable
String s1 = (String) client.get("foo", new Path("."));
String s2 = (String) client.get("foo", Path.ROOT_PATH);

 Any Gson-able object can be set and updated
client.set("obj", new Object());             // just an empty object
client.set("obj", null, new Path(".zilch"));
Path p = new Path(".whatevs");
client.set("obj", true, p);
client.set("obj", 42, p);
client.del("obj", p);
...
RabbitMQ
RabbitMQ is a messaging broker, an intermediary for messaging. It gives your applications a common platform to send and receive messages, and your messages a safe place to live until received.
docker
Management Plugin rabbitmq default username and password of guest/guest
docker run -d -p 5672:5672 -p 15672:15672 --name containerName imageID
docker run -d -p 5672:5672 -p 15672:15672 --name containerName imageName:version
docker run -d --hostname my-rabbit --name some-rabbit -e RABBITMQ_DEFAULT_USER=user -e RABBITMQ_DEFAULT_PASS=password rabbitmq:3.11-management-alpine
go to container exit container will not stop
docker exec -it containerID /bin/bash
# alpine linux
docker exec -it containerID /bin/sh
go to container exit container will stop
docker attach containerID
exit container
- exit 退出容器伪终端并关闭容器
- ctrl+d 退出容器伪终端并关闭容器
- ctrl+c 退出容器伪终端不关闭容器
- ctrl+p+ctrl+q 退出容器伪终端不关闭容器
rabbitmqadmin
exchange
rabbitmqadmin -u username -p password declare exchange name=exchange type=topic
queue
rabbitmqadmin -u username -p password declare queue name=queue durable=true
binding
rabbitmqadmin -u username -p password declare binding source=exchange destination=queue routing_key=key
k8s
rabbitmq-deployment.yaml
apiVersion: apps/v1
kind: Deployment
metadata:
  name: rabbitmq-deployment
  labels:
    app: rabbitmq
spec:
  replicas: 1
  selector:
    matchLabels:
      app: rabbitmq
  template:
    metadata:
      labels:
        app: rabbitmq
    spec:
      containers:
      - name: rabbitmq
        image: rabbitmq:3.8.26-management-alpine
        imagePullPolicy: Never # IfNotPresent Always Never
        ports:
        - name: manager
          containerPort: 15672
          protocol: TCP
        - name: http
          containerPort: 5672
          protocol: TCP
        env:
        - name: RABBITMQ_DEFAULT_USER
          value: user
        - name: RABBITMQ_DEFAULT_PASS
          value: "123456"
        volumeMounts:
          - name: mq-time
            mountPath: /etc/localtime
            readOnly: true
      volumes:
        - name: mq-time
          hostPath:
            path: /etc/localtime
Create the Deployment
kubectl apply -f rabbitmq-deployment.yaml
kubectl get deployments
kubectl get deploy -o wide
kubectl get rs
kubectl get rs -w
kubectl get pods
kubectl get pods --show-labels
kubectl describe po -l app=rabbitmq
Scaling a Deployment
kubectl scale deployment/rabbitmq-deployment --replicas=3
kubectl autoscale deployment/rabbitmq-deployment --min=3 --max=5 --cpu-percent=80
update
kubectl set image deployment.v1.apps/rabbitmq-deployment rabbitmq=rabbitmq:3.9-management-alpine
kubectl set image deployment/rabbitmq-deployment rabbitmq=rabbitmq:3.9-management-alpine
kubectl rollout status deployment/rabbitmq-deployment
kubectl rollout history deployment/rabbitmq-deployment
kubectl rollout history deployment/rabbitmq-deployment --revision=2
rollback
kubectl rollout undo deployment/rabbitmq-deployment
kubectl rollout undo deployment/rabbitmq-deployment --to-revision=2
Pausing and Resuming a Deployment
# 暂停
kubectl rollout pause deployment/rabbitmq-deployment

# 执行更新等操作
# do something
# 执行更新等操作

# 恢复 并应用更新
kubectl rollout resume deployment/rabbitmq-deployment
rabbitmq-service.yaml
apiVersion: v1
kind: Service
metadata:
  name: rabbitmq-service
spec:
  type: NodePort
  selector:
    app: rabbitmq
  ports:
    - name: manager
      protocol: TCP
      port: 15672
      targetPort: 15672
      nodePort: 30001
    - name: http
      protocol: TCP
      port: 5672
      targetPort: 5672
      nodePort: 30002
emacs
Emacs is an extensible, customizable, self-documenting real-time display editor.
| key | desc |
|---|---|
C-<chr> | hold the CONTROL key while typing the character <chr> |
M-<chr> | hold the META or ALT key down while typing <chr>.If there is no META or ALT key, instead press and release the ESC key and then type <chr>. We write <ESC> for the ESC key. |
<DEL> | This is the key on the keyboard usually labeled “Backspace”–the same one you normally use, outside Emacs, to delete the last character typed. |
<Delete> | There is usually another key on your keyboard labeled <Delete>, but that’s not the one we refer to as <DEL> in Emacs. |
<SPC> | the Space bar |
<Return> | this is the key on the keyboard which is sometimes labeled “Enter” |
| IF EMACS STOPS RESPONDING | |
| C-g | If Emacs stops responding to your commands, you can stop it safely by typing C-g. You can use C-g to stop a command which is taking too long to execute. You can also use C-g to discard a numeric argument or the beginning of a command that you do not want to finish. |
| undo | |
| C-/ | undo command |
| C-_ | alternative undo command; it works exactly the same as C-/. On some text terminals, you can omit the shift key when you type C-_. On some text terminals, typing C-/ actually sends C-_ to Emacs. Alternatively, C-x u also works exactly like C-/, but is a little less convenient to type. |
| C-x u | undo command |
| del、cut、copy、yank、paste | |
| Some other editors call killing and yanking “cutting” and “pasting” | |
<DEL> | Delete the character just before the cursor |
M-<DEL> | Killcut the word immediately before the cursor |
| C-d | Delete the next character after the cursor |
| M-d | Killcut the next word after the cursor |
| C-k | Killcut from the cursor position to end of line |
| M-k | Killcut to the end of the current sentence句子 |
| C-y | yankpaste.If you do several C-kM-k’s in a row, all of the killedcuted text is saved together, so that one C-y will yank all of the lines at once. |
| C-y M-y M-y… | yank the previous text.After you have done C-y to get the most recent kill, typing M-y replaces that yanked text with the previous kill. Typing M-y again and again brings in earlier and earlier kills. When you have reached the text you are looking for, you do not have to do anything to keep it. Just go on with your editing, leaving the yanked text where it is. |
| C-y C-u 1 M-y | 粘贴上一个 |
| C-y C-u -1 M-y | 粘贴下一个 |
M-x repl s<Return>changed<Return>altered<Return> | replaced the word “changed” with “altered” wherever it occurred, after the initial position of the cursor. |
| select text | |
C-<SPC> | type C-<SPC>. (<SPC> is the Space bar.) Next, move the cursor to the other end of the text you intend to kill. As you do this, Emacs highlights the text between the cursor and the position where you typed C-<SPC>. Finally, type C-w. This kills all the text between the two positions. |
| C-@ | C-<SPC> 被占用可使用此组合代替 |
| C-w | cut select |
| M-w | copy select |
| SEARCHING | |
| Emacs can do searches for strings (a “string” is a group of contiguous characters) either forward through the text or backward through it. Searching for a string is a cursor motion command; it moves the cursor to the next place where that string appears. | |
| C-s | C-s starts a search that looks for any occurrence of the search string AFTER the current cursor position. When you type C-s you’ll notice that the string “I-search” appears as a prompt in the echo area. This tells you that Emacs is in what is called an incremental search waiting for you to type the thing that you want to search for. Type C-s again, to search for the next occurrence of you typed.Type <DEL> the cursor moving backward the first occurrence and The del the string.Type <Return> to terminate the search.C-g would also terminate the search |
| C-r | C-r starts a search that looks for any occurrence of the search string BEFORE the current cursor position. |
| move | |
| C-v | Move forward one screenful |
| M-v | Move backward one screenful |
| C-l | Clear screen and redisplay all the text,moving the text around the cursor to the center of the screen.(That’s CONTROL-L, not CONTROL-1.) |
| C-p | ↑ Move to previous line |
| C-n | ↓ Move to next line |
| C-f | → Move forward a character |
| C-b | ← Move backward a character |
| M-f | → Move forward a word |
| M-b | ← Move backward a word |
| C-a | Move to beginning of line |
| C-e | Move to end of line |
| M-a | Move back to beginning of sentence句子 |
| M-e | Move forward to end of sentence |
M-< | (META Less-than) moves to the beginning of the whole text. On most terminals, the “<” is above the comma逗号, so you must use the shift key to type it. On these terminals you must use the shift key to type M-< also; without the shift key, you would be typing M-comma逗号. |
M-> | (META Greater-than) moves to the end of the whole text. |
| C-u | Most Emacs commands accept a numeric argument; for most commands, this serves as a repeat-count. The way you give a command a repeat count is by typing C-u and then the digits before you type the command. If you have a META (or ALT) key, there is another, alternative way to enter a numeric argument: type the digits while holding down the META key. |
| C-u 8 C-f | →moves forward eight characters |
| C-u 8 C-v | C-v and M-v are another kind of exception. When given an argument,they scroll the text up or down by that many lines, rather than by a screenful. For example, C-u 8 C-v scrolls by 8 lines. |
| argument | |
| C-u | Most Emacs commands accept a numeric argument; for most commands, this serves as a repeat-count. The way you give a command a repeat count is by typing C-u and then the digits before you type the command. If you have a META (or ALT) key, there is another, alternative way to enter a numeric argument: type the digits while holding down the META key. |
| C-u 8 C-f | moves forward eight characters |
| C-u 8 C-v | C-v and M-v are another kind of exception. When given an argument,they scroll the text up or down by that many lines, rather than by a screenful. For example, C-u 8 C-v scrolls by 8 lines. |
| C-u 8 * | insert ******** |
| Extending the command set | |
| C-x | Character eXtend. Followed by one character |
| M-x | Named command eXtend. Followed by a long name. Just type repl s<TAB> and Emacs will complete the name. (<TAB> is the Tab key, usually found above the Caps Lock or Shift key near the left edge of the keyboard.) Submit the command name with <Return>. |
| BUFFERS | |
| Emacs stores each file’s text inside an object called a “buffer” | |
| C-x C-b | List buffers |
| C-x b | Switch buffer |
| file | |
| You can find an existing file, to view it or edit it. You can also find a file which does not already exist. This is the way to create a file with Emacs | |
| Emacs periodically writes an “auto save” file for each file that you are editing. The auto save file name has a # at the beginning and the end; for example, if your file is named “hello.c”, its auto save file’s name is “#hello.c#”. When you save the file in the normal way, Emacs deletes its auto save file. | |
| C-x C-f | Find a file |
| C-x C-s | Save the file |
| C-x s | Save some buffers to their files |
| C-x C-c | Quit Emacs.C-x C-c offers to save each changed file before it kills Emacs. |
| MULTIPLE WINDOWS | |
| C-x 1 | Delete all but One window (i.e., kill all other windows). That is CONTROL-x followed by the digit 1. C-x 1 expands the window which contains the cursor, to occupy the full screen. It deletes all other windows. |
| C-x 2 | splits the screen into two windows. The editing cursor stays in the top window. |
| C-M-v | scroll the bottom window(If you do not have a real META key, type <ESC> C-v.) |
| C-x o | Type C-x o (“o” for “other”) to move the cursor to the other window. |
| C-x 4 C-f | Type C-x 4 C-f followed by the name of one of your files. End with <Return>. See the specified file appear in the bottom window. The cursor goes there, too. |
| MULTIPLE FRAMES | |
| Emacs can also create multiple “frames”. A frame is what we call one collection of windows, together with its menus, scroll bars, echo area, etc. On graphical displays, what Emacs calls a “frame” is what most other applications call a “window”. Multiple graphical frames can be shown on the screen at the same time. On a text terminal, only one frame can be shown at a time. | |
| C-x 5 2 | create A new frame |
| C-x 5 0 | removes the selected frame. |
| Suspend | |
| C-z | C-z is the command to exit Emacs temporarily–so that you can go back to the same Emacs session afterward. When Emacs is running on a text terminal, C-z “suspends” Emacs; that is, it returns to the shell but does not destroy the Emacs job. In the most common shells, you can resume Emacs with the “fg” command or with “%emacs”. |
| Major MODE | |
M-x fundamental-mode <Return> | The default mode is Fundamental |
M-x text-mode <Return> | editing human-language text you should probably use Text Mode. |
| Minor MODE | |
| Minor modes are not alternatives to the major modes, just minor modifications of them. Each minor mode can be turned on or off by itself, independent of all other minor modes, and independent of your major mode. So you can use no minor modes, or one minor mode, or any combination of several minor modes | |
M-x auto-fill-mode <Return> | When this mode is on, Emacs breaks the line in between words automatically whenever you insert text and make a line that is too wide.If the mode is off, this command turns it on, and if the mode is on, this command turns it off. |
| C-u 120 C-x f | The margin is usually set at 70 characters, but you can change it with the C-x f command. You should give the margin setting you want as a numeric argument.If you make changes in the middle of a paragraph, Auto Fill mode does not re-fill it for you. To re-fill the paragraph, type M-q (META-q) with the cursor inside that paragraph. |
| M-q | If you make changes in the middle of a paragraph, Auto Fill mode does not re-fill it for you. To re-fill the paragraph, type M-q (META-q) with the cursor inside that paragraph. |
| INSTALLING PACKAGES | |
| M-x list-packages | To see a list of all available packages |
M-x package-install <Return>evil<Return> | install evil |
| help | |
If C-h does not display a message about help at the bottom of the screen, try typing the F1 key or M-x help <Return> instead | |
| C-h k C-f | 在新window显示 C-f 帮助说明 |
| C-h c C-p | 在echo area 显示简要说明 |
| C-h x | Describe a command. You type in the name of the command. |
| C-h a | Command Apropos. Type in a keyword and Emacs will list all the commands whose names contain that keyword. These commands can all be invoked with META-x. For some commands, Command Apropos will also list a sequence of one or more characters which runs the same command. |
C-h a file <Return> | This displays in another window a list of all M-x commands with “file” in their names. You will see character-commands listed beside the corresponding command names (such as C-x C-f beside find-file). |
| C-h i | Read included Manuals (a.k.a. Info). This command puts you into a special buffer called “info” where you can read manuals for the packages installed on your system. Type m emacs <Return> to read the Emacs manual. If you have never before used Info, type h and Emacs will take you on a guided tour of Info mode facilities. Once you are through with this tutorial, you should consult the Emacs Info manual as your primary documentation. |
grep
ps aux |grep java
grep 常用选项
-E开启扩展的正则表达式 Extend-i忽略大小写ignore case-v反选 invert-n显示行号-w匹配单词:like=like like!=liker-c显示匹配了多少行-o只显示匹配到的字符串--color=[always|never|auto] --colour=[always|never|auto]将匹配到的内容高亮显示-A num显示匹配到的字符串所在的行及其后num行 after-B num显示匹配到的字符串所在的行及其前num行 before-C num显示匹配到的字符串所在的行及其前后各num行 context
demo
grep "高亮显示内容" 202108212.log --color -n
grep "两个文件里需要高亮显示的内容" 202108212.log 202108211.log --color -n
grep "一共匹配了多少行" 202108212.log -c
# 先搜索 202112 再从结果里搜索 20211201
grep "202112" 202108212.log | grep "20211201" --color
egrep
extend grep grep -E
demo
# | 或运算
egrep "开闸请求参数|使用线下卷,上传数据到平台" 202108212.log --color -n
grep "开闸请求参数|使用线下卷,上传数据到平台" 202108212.log -E --color -n
fgrep
fast grep
demo
fgrep -c "快速搜索统计匹配的行数" 202108212.log
less
less -N
参数
-b <缓冲区大小> 设置缓冲区的大小
-e  当文件显示结束后,自动离开
-f  强迫打开特殊文件,例如外围设备代号、目录和二进制文件
-g  只标志最后搜索的关键词
-i  忽略搜索时的大小写
-m  显示类似more命令的百分比
-N  显示每行的行号
-o <文件名> 将less 输出的内容在指定文件中保存起来
-Q  不使用警告音
-s  显示连续空行为一行
-S  行过长时间将超出部分舍弃
-x <数字> 将“tab”键显示为规定的数字空格
命令模式
/字符串:向下搜索“字符串”的功能
?字符串:向上搜索“字符串”的功能
mxxx: 在当前位置下锚点xxx
'xxx:  转到xxx锚点位置
F: 类似tail -f的滚动输出 ctrl c退出回到less
e:  打开另一个文件,n下一个p上一个,进行切换
G: 转到尾行
g: 转到首行
n:重复前一个搜索(与 / 或 ? 有关)
N:反向重复前一个搜索(与 / 或 ? 有关)
z  向后翻一页
d  向后翻半页
b	向上翻一页
h  显示帮助界面
Q/q  退出less 命令
u  向前滚动半页
y  向前滚动一行
空格键 滚动一页
回车键 滚动一行
[pagedown]: 向下翻动一页
[pageup]:   向上翻动一页
example
-
显示行号
less -N xxx.log -
显示百分比
less -m xxx.log -
搜索时忽略大小写
less -i xxx.log -
冒号后输入指令
- 向下搜索
/xxx 向下搜索xxx - 向上搜索
?xxx 向上搜索xxx
- 向下搜索
JVM
The Java® Virtual Machine
备注
- 内存
- 是非常重要的系统资源,是硬盘和cpu的中间仓库及桥梁,承载着操作系统和应用程序的实时运行。
- JVM内存布局规定了java在运行过程中内存申请、分配、管理的策略,保证了JVM的高效稳定运行。
- 不同的JVM对于内存的划分方式和管理机制存在着部分差异。
- JVM 定义了若干种程序运行期间会使用到的
run-time data areas- 生命周期与JVM一致的内存区域
heap areanon-heapmethod areajdk8采用metaspace元空间作为method area的落地实现- 代码缓存
JIT编译产物
- 线程私有区域
- 生命周期与JVM一致的内存区域
Every Java application has a single instance of class Runtime that allows the application to interface with the environment in which the application is running. The current runtime can be obtained获得 from the getRuntime method.每个JVM只有一个Runtime实例。即为运行时环境
public class Runtime extends Object
线程
线程是一个程序里的运行单元。JVM允许一个应用有多个线程并发的执行。Hotspot JVM里,每个线程都与操作系统的本地线程直接映射。
- 当一个
java线程准备好执行以后,一个操作系统的本地线程也同时创建,java线程执行终止后本地线程也会回收 操作系统负责所有线程的安排调度到任何一个可用的cpu上,一旦本地线程初始化成功,会调用java线程中的run()方法
线程出现异常
- 捕获处理异常也相当于java线程正常终止
- 未捕获处理异常,java线程肯定终止,此时操作系统还要判断一下是否要终止 JVM
deamon守护线程,如果JVM中只剩demon则JVM可以退出- 非守护线程 当前线程为最后一个非守护线程则终止
JVM
后台系统线程
hotspot JVM的后台系统线程,使用jconsole或者其他调试工具,能看到后台有许多线程在运行,不包括main方法的main线程以及所有这个main线程自己创建的线程
- 虚拟机线程
- 这种线程的操作是需要
JVM达到安全点才会出现。 - 这些操作必须在不同线程中发生的原因是他们都需要
JVM达到安全点,这样heap area才不会变化。 - 这种线程的执行类型包括
STWstop-the-world的垃圾收集、线程栈收集、线程挂起、偏向锁撤销。
- 这种线程的操作是需要
- 周期任务线程:这种线程是时间周期事件的体现比如中断,他们一般用于周期性操作的调度执行
- GC线程:这种线程对在
JVM里不同种类的垃圾收集行为提供了支持 - 编译线程:这种线程在运行时会将字节码编译成本地代码
- 信号调度线程:这种线程接收信号并发送给
JVM,在它内部通过调用适当的方法进行处理
JVM Options
注意:-server 启动 server模式,64位系统默认是Server模式,在server模式下才可以启用逃逸分析
mi :: ~ » java -version
openjdk version "17.0.7" 2023-04-18
OpenJDK Runtime Environment (build 17.0.7+7)
OpenJDK 64-Bit Server VM (build 17.0.7+7, mixed mode)

mi :: ~ » java -version
openjdk version "1.8.0_372"
OpenJDK Runtime Environment (build 1.8.0_372-b07)
OpenJDK 64-Bit Server VM (build 25.372-b07, mixed mode)
-XX:+PrintFlagsInitial:查看所有参数的默认初始值-XX:+PrintFlagsFinal:查看所有参数的最终值修改后的值-Xms10M或者-XX:InitialHeapSize=10M设置初始heap size,只影响新生区和养老区, 默认大小为物理机内存大小除以64。-Xmx10M或者-XX:MaxHeapSize=10M设置最大heap size,只影响新生区和养老区 默认大小为物理机内存大小除以4。- 通常将
-Xms和-Xmx设置为相同的值,目的是为了能够在Java垃圾回收机制清理完堆区后不需要重新分割计算堆区的大小从而提高性能
- 通常将
- 设置
Young区和Old区的比例-XX:NewRatio=2‘默认2,表示Young占1份,Old占2份’-XX:NewRatio=4‘表示Young占1份,Old占4份’
-Xmn100M设置Young区的大小一般不使用。当与-XX:NewRatio=2一起配置冲突时,以-Xmn设置的值来分配Young区大小,剩余的区域分给Old区-XX:SurvivorRatio=8设置Young区下的Eden区、survivor0区、survivor1区的比例- 默认值
8:1:1。由于自适应的内存分配策略,查看时可能是6:1:1,显式地设置为8查看时才是8:1:1。
- 默认值
- 开启 or 关闭自适应的内存分配策略
- 开启
-XX:+UseAdaptiveSizePolicy - 关闭
-XX:-UseAdaptiveSizePolicy
- 开启
-XX:MaxTenuringThreshold=15设置Promotion晋升Old区阈值。默认值15。- 开启 or 关闭 TLAB
Thread Local Allocation Buffer。-XX:+UseTLAB默认开启-XX:-UseTLAB关闭’
-XX:TLABSize=512k设置TLAB空间大小。If this option is set to 0, then the JVM chooses the initial size automatically.-XX:+PrintGCDetails输出详细的GC处理日志-XX:+PrintGC输出GC简要信息- 逃逸分析JDK6_23后默认开启
-XX:+DoEscapeAnalysis默认开启逃逸分析-XX:-DoEscapeAnalysis关闭逃逸分析-XX:+PrintEscapeAnalysis查看逃逸分析的筛选结果
- 开启 or 关闭 标量替换
-XX:+EliminateAllocations默认开启标量替换-XX:-EliminateAllocations关闭标量替换
Method area size方法区-XX:PermSize=20.75MJDK7及以前设置PermanentGenerationSpace初始值 默认20.75M-XX:MaxPermSize=82MJDK7及以前设置PermanentGenerationSpace最大可分配空间。32位机器默认是64M,64位机器默认是82M-XX:MetaspaceSize=21MJDK8及以后,设置元空间初始值,平台不同默认值不同,windows下默认约为21M\-XX:MaxMetaspaceSize=-1JDK8及以后,设置元空间最大可分配空间,-1表示没有限制
-XX:HandlePromotionFailure=true设置空间分配担保JDK6_24后过时
Native Method Stacks
Oracle 官方文档
An implementation of the Java Virtual Machine may use conventional传统的 stacks, colloquially通俗地 called “C stacks,” to support native methodsmethods written in a language other than the Java programming language.Native method stacks may also be used by the implementation of an interpreter解释程序 for the Java Virtual Machine’s instruction(计算机的)指令 set in a language such as C. Java Virtual Machine implementations that cannot load native methods and that do not themselves rely on依靠 conventional传统的 stacks need not supply native method stacks.If supplied, native method stacks are typically通常 allocated分配…(给) per thread when each thread is created.
This specification规范 permits native method stacks either to be of a fixed固定的 size or to dynamically expand and contract伸缩 as required by the computation计算.If the native method stacks are of a fixed size, the size of each native method stack may be chosen选择 independently独立地 when that stack is created.
A Java Virtual Machine implementation may provide the programmer or the user control over支配 the initial size of the native method stacks,as well as, in the case of varying-size大小不一 native method stacks, control over支配 the maximum and minimum method stack sizes.
The following exceptional conditions情况 are associated with与…有关 native method stacks: If the computation in a thread requires a larger native method stack than is permitted, the Java Virtual Machine throws a StackOverflowError. If native method stacks can be dynamically expanded and native method stack expansion is attempted but insufficient不足的 memory can be made available, or if insufficient不足的 memory can be made available to create the initial native method stack for a new thread, the Java Virtual Machine throws an OutOfMemoryError.
《深入理解Java虚拟机》
Native Method Stacks 与JVM Stacks 所发挥的作用是非常相似的,其区别只是JVM Stacks为jvm执行Java方法也就是字节码 服务,而Native Method Stacks是为jvm使用到的Native Method服务。JVM规范对Native Method Stacks中方法使用的语言、使用方式、数据结构并没有任何强制规定,因此具体的jvm可以根据需要自由实现它,甚至有的JVMHotSpot直接把Native Method Stacks与JVM Stacks合二为一。与JVM一样,Native Method Stacks也会在stack深度溢出时抛出StackOverflowError或者stack扩展失败时抛出OutOfMemoryError
Native Method Stacks特点
- 管理
Native Method的调用 - 线程私有
- 容量允许被实现成固定大小或可动态扩展
Native Method InterfaceJNI,本地方法接口Native Method Library本地方法库
Native Method
A native method is a java method whose implementation is provided by non-java code
概述
Native Method是java调用非java代码实现的接口.该方法的实现由非java语言实现例如c或c++。- 这个特征非java所特有,很多编程语言都有这一机制例如:
c++中可以使用extern "C"告知c++编译器去调用一个c函数 - 在定义一个
native method时,并不提供具体实现有些像定义一个java interface, 其具体实现是由非java语言在jvm外部实现 Native Method Interface的作用是融合不同的编程语言为Java所用,初衷是融合c/c++程序
本地方法使用c语言实现时
- 具体做法是
native method stacks中登记native方法 - 在
Execution engine执行时加载native method library - 当某个线程调用一个
native method时他就进入了一个全新的并且不再受JVM限制的世界,它和虚拟机拥有同样的权限native method可以通过native method interface来访问JVM内部的runtime data area- 它甚至可以直接使用本地处理器中的寄存器
- 直接从本地内存的堆中分配任意数量的内存
注意:
使用native标识符修饰,不能与abstract修饰符连用
java.lang.Objectpublic native int hashCode();public final native void notify();public final native void notifyAll();
java.lang.Threadprivate native void start0();private native void setPriority0(int newPriority);private native void stop0(Object o);private native void suspend0();private native void resume0();private native void interrupt0();private native void setNativeName(String name);
使用原因
- 主要原因是java应用需要与java外面的环境交互。
- 有些层次的任务使用java实现起来不容易,或者对程序的效率有影响
- 当java需要与一些底层系统,如操作系统或某些硬件交换信息时的情况,
native method正是这样一种交流机制 - 通过
native method提供一个非常简洁的接口JNI,无需去了解java应用之外的繁琐的细节
- 与操作系统交互
- JVM支持java语言本身和运行时库,它是java程序赖以生存的平台,由一个解释器解释字节码和一些连接到本地代码的库组成
- JVM不是一个完整的系统,经常依赖于一些底层系统的支持。这些底层系统常常是强大的操作系统
- 通过使用
native method得以用java实现了jre与底层系统的交互,甚至 JVM 的一些部分都是 C 写的 - 如果使用一些java语言本身没有提供封装的操作系统的特性时,我们也需要使用
native method
sun's java- Sun的解释器是用
C实现的,这使得它能像一些普通的C一样与外部交互,jre大部分是Java实现的,也有通过一些native method与外界交互 - 例如
java.lang.Thread的setPriority()方法是由java实现的,- 但是
setPriority()的实现调用的是java.lang.Thread的native method setPriority0() setPriority0()方法是由C实现的,并被植入JVM内部- 在
Windows95的平台上,这个本地方法最终将调用Win32 setPriority() API
- 但是
- 这是一个
native method的具体实现由JVM直接提供的例子,更多的情况是native method由external dynamic link library外部的动态链接库提供,然后被JVM调用
- Sun的解释器是用
- 现状
- 与硬件有关的应用。
- 停车场管理系统通过JNI与硬件设备交互。
- 通过java程序驱动打印机
- Java系统管理生产设备
- 在企业级应用中比较少见因为现在的异构领域间通信很发达,比如可以使用socket通信,也可以使用Web Service等
- 与硬件有关的应用。
java 对象实例化
创建对象的方式
- new
- 最常见的 new
- 单例模式构造器访问权限被设置为私有,通过调用静态方法创建对象
- XxxBuilder/XxxFactory 工厂模式的静态方法创建对象
- newInstance()
- Class的newInstance()
- jdk9被标记为过时,反射方式,比较苛刻,只能调用空参构造器,且构造器访问权限必须设置为public
- newInstance(args)
- Constructor的newInstance(args)
- 替代Class的newInstance(),反射方式,可以调用无参、有参构造器,且对构造器访问权限没有要求
- clone()
- 不调用构造器,当前类需要实现Cloneable接口,实现clone()
- 反序列化
- 从文件或网络中获取一个对象的二进制流,将二进制流转换为对象
- 第三方库 Objenesis
创建对象的步骤
- 判断对象对应的类是否Loader加载、Linking链接、Initialization初始化
- JVM遇到一条new指令,首先去检查这个指令的参数能否在Metaspace的常量池中定位到一个类的符号引用,
- 检查这个符号引用代表的类的元信息是否存在即该类是否已经加载、解析、初始化
- 如果不存在,在双亲委派模式下,使用当前类加载器以ClassLoader+包名+类名为Key进行查找对应的.class文件。
- 如果没有找到文件,则抛出ClassNotFoundException
- 如果找到文件,则进行类加载,并生成对应的Class类对象
- 如果存在,则继续后续步骤
- 如果不存在,在双亲委派模式下,使用当前类加载器以ClassLoader+包名+类名为Key进行查找对应的.class文件。
- 为对象分配内存
- 如果内存规整
- 指针碰撞
- 如果内存不规整
- 虚拟机需要维护一个列表
- 空闲列表分配
- 如果内存规整
- 处理并发安全问题
- 采用 CAScompare and swap配上失败重试保证更新的原子性 atomic
- 每个线程预先分配一块线程私有的分配缓冲区TLAB.Thread Local Allocation Buffer
- 初始化分配到的空间
- 所有属性设置默认值,保证对象实例字段在不赋值时可以直接使用
- 设置对象的对象头
- 执行
<init>方法进行初始化
计算实体对象占用内存
实例对象内存计算 
数组对象内存计算 
- Head对象头
- _mark: MarkWord存储对象自身运行时数据
- 32位系统 占用4byte
- 64位系统 占用8byte
- _klass: klass指针,指向该类元数据的指针,jvm通过这个指针确定这个对象是哪个类的实例
- 32位系统 占用4byte
- 64位系统
- 不开启指针压缩 占用8byte
- 开启指针压缩 占用4byte
- _length: 数组对象才有,用来记录数组长度。占用4byte
- _mark: MarkWord存储对象自身运行时数据
- Instance Data实例数据
- 对象真正存储的有效信息,各类型字段内容,父类继承和自己定义的
- 继承关系
- 先存放父类中的成员,接着才是子类中的成员,父类要按照8byte规定对齐
- 例如枚举(相当于继承) 有一个String,具体枚举大小=8+4+(4+4)+4=24
- markWord=8,klass=4,父类有一个String=4,父类对齐+4=(4+4)=8,此时大小为20,对齐+4=24
- Padding对齐填充
- HotSpot VM的自动内存管理系统要求对象起始地址必须是8字节的整数倍,最终字节大小要能被8整除。不能被整除时使用 padding 补位到能被8整除的长度。
- 访问未对齐的内存,处理器需要作两次内存访问
- 访问已对齐的内存,处理器仅需要一次内存访问
附录
| 类型 | 字节数(Byte) | 位数(bit) | 取值范围 |
|---|---|---|---|
| byte | 1 | 8 | -2^7 ~ 2^7-1 |
| short | 2 | 16 | -2^15 ~ 2^15-1 |
| int | 4 | 32 | -2^31 ~ 2^31-1 |
| long | 8 | 64 | -2^63 ~ 2^63-1 |
| boolean | 1 | 8 | true和false |
| char | 2 | 16 | unicode编码,前128字节与ASCII兼容字符存储范围在 \u0000~\uFFFF |
| float | 4 | 32 | 3.402823e+38 ~ 1.401298e-45(e+38表示是乘以10的38次方,同样,e-45表示乘以10的负45次方) |
| double | 8 | 64 | 1.797693e+308~ 4.9000000e-324 |
| reference | 4/8 | 32/64 | 引用型数据,32位系统或开启指针压缩的64位系统占用4byte,64位系统不开指针压缩占8byte |
| 对象头 | _mark | _klass | _length |
|---|---|---|---|
| 描述 | MarkWord 存储对象自身运行时数据 | 指向该类元数据的指针,jvm通过这个指针确定这个对象是哪个类的实例 | 数组对象才有,用来记录数组长度 |
| 32位系统 | 4byte | 4byte | 4byte |
| 64位系统 开启指针压缩 | 8byte | 4byte | 4byte |
| 64位系统 不开启指针压缩 | 8byte | 8byte | 4byte |
PC register
The Java Virtual Machine can support many threads of execution at once (JLS §17). Each Java Virtual Machine thread has its own pc (program counter) register.


2.5.1 The pc Register The Java Virtual Machine can support many threads of execution at once (JLS §17).Each Java Virtual Machine thread has its own pc (program counter) register.At any point, each Java Virtual Machine thread is executing the code of a single method, namely the current method (§2.6) for that thread.If that method is not native, the pc register contains the address of the Java Virtual Machine instruction指令 currently being executed.If the method currently being executed by the thread is native, the value of the Java Virtual Machine’s pc register is undefined.The Java Virtual Machine’s pc register is wide enough to hold a returnAddress or a native pointer on the specific具体的 platform.
pc Register 是一块较小的内存空间,它可以看作是当前线程所执行的字节码的行号指示器。在JVM的概念模型里代表所有JVM的统一外观,不同类型的JVM并不一定要完全按照概念模型的定义来进行设计,可能会通过一些更高效率的等价方法去实现它,字节码解释器工作时就是通过改变这个计数器的值来选取下一条需要执行的字节码指令,它是程序控制流的指示器,分支、循环、跳转、异常处理、线程恢复等基础功能都需要依赖这个计数器来完成。
由于JVM的多线程是通过线程轮流切换、分配处理器执行时间的方式来实现的,在任何一个确定的时刻,一个处理器对于多核处理器来说是一个内核都只会执行一条线程中的指令。因此,为了线程切换后能恢复到正确的执行位置,每条线程都需要有一个独立的程序计数器,各线程之间计数器互不影响,独立存储,这类内存区域为“线程私有”的内存。
如果线程正在执行的是一个Java方法,这个计数器记录的是正在执行的JVM字节码指令地址;
如果正在执行的是Native方法,这个计数器值则应为Undefined。
此内存区域是唯一一个在《JVM规范》中没有规定任何OutOfMemoryError情况的区域。
JVM pc Register 并非是广义上的物理寄存器,JVM pc Register是对物理PC寄存器的一种抽象模拟
特性:
- The pc Register用来存储指向下一条指令的地址,也即是将要执行的指令代码。由Execution Engine读取下一条指令
- 是一块很小的内存空间,几乎可以忽略不计,也是运行速度最快的存储区域
- JVM规范中,每个线程都有它自己的程序计数器记录该线程执行到哪个位置,是线程私有的,生命周期与线程的生命周期保持一致
- 任何时间一个线程都只有一个方法在执行即当前方法,The pc Register存储当前线程正在执行的java方法中的将要执行的jvm指令地址
- 当执行native method, The pc Register则是指向Undefined,此处涉及native method stack
- 程序控制流的指示器,分支、循环、跳转、异常处理、线程恢复等基础功能都依赖The pc Register
- 字节码解释器工作时就是通过改变The pc Register的值来选取下一条需要执行的字节码指令
- 唯一一个在《JVM规范》中没有规定任何OutOfMemoryError情况的区域
面试题
- 为什么使用pc Register记录当前线程的执行地址?
- 结合JVM的多线程实现方式,多线程下CPU会在各个线程之间切换,切换时需要知道从哪继续执行
- JVM字节码解释器就需要通过改变pc Register的值来明确下一条应该执行什么样的字节码指令
- PC Register为什么设定为线程私有?
- 结合JVM的多线程实现方式。多线程在一个特定的时间段内只会执行其中某一个线程的方法,CPU不停地做任务切换,必然经常导致线程中断或恢复。为了能够准确记录各线程正在执行的当前字节码指令地址,为每个线程都分配一个pc Register,各个线程独立计算,互不干扰。由于CPU时间片轮限制,众多线程在并发执行过程中,任何一个确定的时刻,一个处理器对于多核处理器来说是一个内核只会执行某一个线程中的一条指令。这导致经常中断或恢复,每个线程在创建后,都会产生自己的pc Register和StackFrame栈帧,pc Register在各个线程之间互不影响
扩展
- CPU时间片:CPU分配给各个程序的时间,每个线程被分配一个时间段,称为该线程的时间片,每个程序根据时间片轮流执行
- 并行:多个CPU核心一起执行,某一时刻有多个线程在执行
- 串行:多个线程一起排队有序执行,某一时刻有一个线程在执行
- 并发:多个线程一起执行时,竞争获取cpu时间片,cpu分配时间片给这些线程,这些线程根据时间片轮流执行,故某一时刻其实只有一个线程在执行
JVM STACK
Java Virtual Machine Stacks
2.5.2. Java Virtual Machine Stacks
Each Java Virtual Machine thread has a private Java Virtual Machine stack, created at the same time as the thread.A Java Virtual Machine stack stores frames (§2.6).A Java Virtual Machine stack is analogous类似的 to the stack of a conventional传统的 language such as C: it holds local variables and partial传统的 results, and plays a part in method invocation调用 and return.Because the Java Virtual Machine stack is never manipulated操作 directly except除…之外 to push and pop frames, frames may be heap allocated分配的.The memory for a Java Virtual Machine stack does not need to be contiguous连续的.
In the First Edition版本 of The Java® Virtual Machine Specification规范, the Java Virtual Machine stack was known as被称为 the Java stack.
This specification规范 permits允许 Java Virtual Machine stacks either to be of a fixed固定的 size or to dynamically动态的 expand扩大 and contract缩小 as required by根据需要 the computation计算.If the Java Virtual Machine stacks are of a fixed size, the size of each Java Virtual Machine stack may be chosen选择 independently独立地 when that stack is created.
A Java Virtual Machine implementation实现 may provide the programmer程序员 or the user control over the initial初始 size of Java Virtual Machine stacks,as well as, in the case of dynamically expanding or contracting Java Virtual Machine stacks, control over the maximum and minimum sizes.
The following exceptional异常的 conditions情况 are associated有关联的 with Java Virtual Machine stacks:
- If the computation计算 in a thread requires a larger Java Virtual Machine stack than is permitted被允许, the Java Virtual Machine throws a StackOverflowError.
- If Java Virtual Machine stacks can be dynamically expanded,
and expansion扩大 is attempted尝试 but insufficient memory内存不足 can be made available to effect实现 the expansion,or if insufficient memory can be made available to create the initial初始 Java Virtual Machine stack for a new thread,the Java Virtual Machine throws an OutOfMemoryError.
不同平台cpu架构不同,不能基于寄存器来设计java指令集。为了实现跨平台,java指令集根据LIFOlast-in-first-outstack设计
- 优点:跨平台、指令集小、编译器容易实现
- 缺点:性能下降、实现同样功能需要更多的指令
与pc register一样,JVM Stack是线程私有的,生命周期与线程相同。JVM Stack 描述的是Java方法执行的线程内存模型:每个方法被执行的时候,JVM都会同步创建一个Stack Frame
Stack Frame用于存储
Local Variables局部变量表,影响stack frame大小Operand Stacks操作数栈,影响stack frame大小Dynamic Linking动态链接,指向运行时常量池的方法引用Method Invocation Completion方法调用结束Normal Method Invocation Completion方法调用正常结束Abrupt Method Invocation Completion方法调用异常结束
jvm Stack 特点:
- 每一个方法被调用直至执行完毕的过程,就对应着一个
Stack Frame在JVM Stack中从入栈到出栈的过程。- 方法执行-入栈
- 方法执行结束-出栈
- jvm Stack 是一种快速有效的分配存储方式,访问速度仅次于The pc Register
- jvm Stack 没有 GC
jvm Stack 可能出现的内存错误;jvm规范允许jvm Stack的大小固定不变或动态扩展
StackoverflowError:jvm Stack的大小固定,每个线程的jvm Stack大小在线程创建时独立设置,如果线程请求分配的jvm Stack大小超过jvm stack允许的最大容量,JVM将抛出StackOverflowErrorOutOfMemmoryError- 动态扩展的jvm stack,尝试扩展时无法申请到足够的内存,JVM将抛出OutOfMemoryError
- 创建新的线程时没有足够的内存去创建对应的jvm stack,JVM将抛出OutOfMemoryError
jvm Stack 是运行时的单位,而 Heap 是存储的单位
jvm Stack 解决程序的运行问题,即程序如何执行。参与方法的调用和返回,每个线程在创建时都会创建自己的jvm Stack,内部保存一个个stack frame,对应一次次的方法调用
Heap 解决数据存储问题,即数据怎么存放,存放到哪。new创建的对象实例都存放在Heap
方法嵌套调用的次数由jvm stack的大小决定
- jvm stack越大,方法嵌套调用次数越多
- 对一个函数来说,参数和局部变量越多,
local variables越大,则其stack frame越大,该函数调用会占用更多的jvm stack空间,导致嵌套调用次数减少 local variables中的局部变量只在当前方法调用中有效- 方法执行时,JVM通过使用
local variables来完成参数值到参数变量列表的传递。 - 方法调用结束后,随着
stack frame的出栈销毁,local variables也会随之销毁
- 方法执行时,JVM通过使用
Stack Frame
Oracle 官方文档
A frame is used to store data and partial部分的 results, as well as to perform执行 dynamiclinking, return values for methods, and dispatch调遣 exceptions.
A new frame is created each time a method is invoked. A frame is destroyed when its method invocation调用 completes, whether或者…(或者) that completion is normal or abrupt (it throws an uncaught未捕获 exception). Frames are allocated分配 from the Java Virtual Machine stack (§2.5.2) of the thread creating the frame. Each frame has its own array of local variables (§2.6.1), its own operand stack (§2.6.2), and a reference to the runtime constant pool (§2.5.5) of the class of the current method.
A frame may be extended扩展 with additional附加的 implementation-specific具体实现 information, such as debugging information.
The sizes of the local variable array and the operand stack are determined确定的 at compile-time编译时期 and are supplied提供 along with随同…一起 the code for the method associated with与…有关 the frame (§4.7.3).Thus因此 the size of the frame data structure depends only on the implementation实现 of the Java Virtual Machine, and the memory for these structures can be allocated分配 simultaneously同时 on method invocation调用.
Only one唯一 frame, the frame for the executing method, is active at any point in a given thread of control. This frame is referred to被称为 as the current frame, and its method is known as被称为 the current method. The class in which the current method is defined定义 is the current class. Operations操作 on local variables and the operand stack are typically通常 with reference to关于 the current frame.
A frame ceases结束 to be current当前帧 if its method invokes another method or if its method completes. When a method is invoked, a new frame is created and becomes current当前帧 when control控制权 transfers转让 to the new method. On method return, the current frame passes沿某方向移动 back the result of its method invocation, if any如果有的话, to the previous先前的 frame. The current frame is then discarded丢弃 as the previous先前的 frame becomes the current当前帧 one.
Note that a frame created by a thread is local to that thread and cannot be referenced引用 by any other thread.
stack frame是一个内存区块,是一个数据集,维系着方法执行过程中的各种数据信息
在一条活动线程中,一个时间点上只会有一个活动的栈帧栈顶栈帧,即当前正在执行的方法的栈帧是有效的,这个栈帧称为current当前栈帧 current frame 对应的方法是current method
定义current method的类是current class Execution Engine执行引擎运行的所有字节码指令只针对current frame进行操作
在a方法中调用b方法:
b方法对应的stack frame会被创建并入栈,成为栈顶栈帧,b方法对应的stack frame成为新的current。
当b方法正常执行完,b方法对应的stack frame出栈,则a方法对应的stack frame重新变为栈顶栈帧,成为新的current
JAVA方法两种返回函数方式stack frame出栈
- 函数正常返回,使用
return指令 - 抛异常未用
try-catch捕获处理
在stack frame中与性能调优有关的主要是local variables
stack frame中允许携带与JVM实现有关的一些附加信息:对程序调试提供支持的信息
Local Variables
Oracle 官方文档
Each frame (§2.6) contains an array of variables known as its local variables.
The length of the local variable array of a frame is determined确定 at compile-time编译时期
and supplied提供 in the binary representation二进制表示法 of a class or interface along with the code for the method associated with与…有关 the frame (§4.7.3).
A single local variable can hold a value of type boolean, byte, char, short, int, float, reference, or returnAddress.
A pair of local variables can hold a value of type long or double.
Local variables are addressed by indexing.
The index of the first local variable is zero.
An integer is considered经过深思熟虑的 to be an index into the local variable array if and only if当且仅当 that integer is between zero and one less than the size of the local variable array.
A value of type long or type double occupies占用 two consecutive连续的 local variables.
Such a value may only be addressed using the lesser index.
For example, a value of type double stored in the local variable array at index n actually occupies占用 the local variables with indices索引 n and n+1;
however, the local variable at index n+1 cannot be loaded from. It can be stored into. However, doing so invalidates使无效 the contents内容 of local variable n.
The Java Virtual Machine does not require n to be even偶数.
In intuitive terms直观地说, values of types long and double need not be 64-bit aligned对齐 in the local variables array.
Implementors实现者 are free to decide决定 the appropriate合适的 way to represent表示 such values using the two local variables reserved保留 for the value.
The Java Virtual Machine uses local variables to pass parameters on method invocation.
On class method invocation, any parameters are passed in consecutive连续的 local variables starting from local variable 0.
On instance method invocation, local variable 0 is always used to pass a reference to the object on which the instance method is being invoked (this in the Java programming language).
Any parameters are subsequently随后 passed in consecutive连续的 local variables starting from local variable 1.
Local Variables是一个Array,存储方法参数和定义在方法体内的局部变量,数据类型包括:编译期可知的各种JVM基本数据类型、reference、returnAddress
JVM基本数据类型:byte、boolean、short、char、int、float、long、double
reference对象引用类型:并不等同于对象本身,可能是一个指向对象起始地址的引用指针,也可能是指向一个代表对象的句柄或者其他与此对象相关的位置
returnAddress:指向一条字节码指令地址
Local Variables建立在线程上是线程的私有数据,因此不存在数据安全问题Local Variables中的存储单位以Slot变量槽来表示。数据从Local Variables Array 的索引0位置开始存放,占用64bit的long和double类型数据会占用两个Slot\;使用时,用其占用的第一个Slot的index,其余的数据只占用一个Slot。
Local Variables所需的内存空间在编译期完成分配,并保存在方法的Code属性的maximum local variables数据项中
当进入一个方法时,这个方法需要在Stack Frame中分配多大的Local Variables空间是完全确定的,
在方法运行期间不会改变Local Variables的大小大小指Slot的数量,
JVM真正使用多大的内存空间来实现一个Slot,由具体的JVM实现自行决定譬如按照一个Slot占用32bit、64bit,或者更多。
当一个实例方法被调用时,方法参数和方法体内部定义的局部变量将会按照声明顺序放置到local variables array。如果current frame是由构造方法或者实例方法创建的,那么该对象引用this将会存放在索引为0的Slot,其余变量按照位置顺序继续排列。静态方法不存在对象引用this,其local variables不会保存this,所以静态方法中不能使用this
如果一个局部变量过了其作用域,那么在其作用域之后申明的新的局部变量就很可能会复用过期局部变量的slot,从而达到节省资源的目的
local variables中的变量也是重要的垃圾回收根结点,只要被local variables中直接或间接引用的对象都不会被回收
Operand Stacks
Oracle 官方文档
Each frame (§2.6) contains a LIFOlast-in-first-out stack known as its operand stack.
The maximum depth of the operand stack of a frame is determined确定 at compile-time编译时期 and is supplied提供 along with the code for the method associated with与…有关 the frame (§4.7.3).
Where it is clear明确的 by context上下文, we will sometimes refer称…(为) to the operand stack of the current frame as simply简单地 the operand stack.
The operand stack is empty when the frame that contains it is created.
The Java Virtual Machine supplies提供 instructions(计算机的)指令 to load constants常量 or values from local variables or fields字段 onto the operand stack.
Other Java Virtual Machine instructions(计算机的)指令 take operands from the operand stack, operate on them, and push the result back onto the operand stack.
The operand stack is also used to prepare把…预备好 parameters to be passed to methods and to receive method results.
For example, the iadd instruction (§iadd) adds two int values together.
It requires that the int values to be added be the top two values of the operand stack, pushed there by previous先前的 instructions.
Both of the int values are popped from the operand stack.They are added, and their sum is pushed back onto the operand stack.
Subcomputations子计算 may be nested嵌套 on the operand stack, resulting in导致 values that can be used by the encompassing涉及 computation计算.
Each entry on the operand stack can hold a value of any Java Virtual Machine type,including a value of type long or type double.
Values from the operand stack must be operated upon在……上 in ways appropriate to适用于 their types.
It is not possible, for example, to push two int values and subsequently随后 treat把…看作 them as a long or to push two float values and subsequently add them with an iadd instruction.
A small number of少数 Java Virtual Machine instructionsthe dup instructions (§dup) and swap (§swap)operate on run-time data areas as raw原始的 values without regard关注 to their specific具体的 types;
these instructions(计算机的)指令 are defined in such a way必须如此 that they cannot be used to modify修改 or break up individual单独的 values.
These restrictions限制规定 on operand stack manipulation操作 are enforced强制性的 through通过 class file verification验证 (§4.10).
At any point in time, an operand stack has an associated相关的 depth, where a value of type long or double contributes添加 two units单位 to the depth and a value of any other type contributes添加 one unit.
《深入理解Java虚拟机》
JVM的解释执行引擎被称为“基于栈operand stack的执行引擎execution engine
在概念模型中,两个不同的Stack frame作为不同方法的jvm stack元素,是完全相互独立的。
但是在大多虚拟机的实现里都会进行一些优化处理,令两个Stack frame出现一部分重叠。
让下面stack frame的部分operand stack与上面stack frame的部分local variables重叠在一起,这样做不仅节约了一些空间,
更重要的是在进行方法调用时就可以直接共用一部分数据,无须进行额外的参数复制传递
operand stack 在方法执行过程中,根据字节码指令,往栈中写入数据或提取数据,即入栈push或出栈pop。某些字节码指令将值压入operand stack,其余的字节码指令将操作数取出operand stack,使用复制、交换、求和后把结果压入operand stack
如果被调用的方法带有返回值,其返回值将会被压入current stack frame的operand stack中,并更新The pc Register中下一条需要执行的字节码指令operand stack中元素的数据类型必须与字节码指令严格匹配,这由编译器在编译期间进行验证,同时在类加载过程中的类检验阶段的数据流分析阶段要再次验证operand stack主要保存计算过程的中间结果,同时作为计算过程中变量临时的存储空间operand stack是JVM execution engine的一个工作区,当一个方法刚开始执行的时候,一个新的stack frame也会随之被创建,这个方法的operand stack是空的(已创建)
每一个operand stack 都会拥有一个明确的栈深度用于存储数值,其所需的最大深度在编译期确定,保存在方法的Code属性中,为max_stack的值,与local variables大小无关operand stack中任何一个元素都是任意的Java数据类型,与local variables的slot类似
32bit的类型占用一个operand stack单位深度64bit的类型占用两个operand stack单位深度
operand stack使用数组实现, 不使用访问数组索引进行数据访问,只能通过标准的入栈push和出栈pop来完成数据访问
Dynamic Linking
Oracle 官方文档
Each frame (§2.6) contains a reference to the run-time constant pool (§2.5.5) for the type of the current method to support dynamic linking of the method code.The class file code for a method refers表示 to methods to be invoked and variables to be accessed访问 via通过 symbolic符号 references. Dynamic linking translates转换 these symbolic method references into concrete具体的 method references, loading classes as necessary to resolve解决 as-yet-undefined尚未定义 symbols, and translates variable accesses访问 into appropriate恰当的 offsets位置 in storage存储 structures associated with与…有关 the run-time location of these variables.
This late binding延迟绑定 of the methods and variables makes使 changes in other classes that a method uses less likely可能的 to break this code.
《深入理解Java虚拟机》每个Stack Frame都包含一个指向run-time constant pool运行时常量池中该Stack Frame所属方法的引用,持有这个引用是为了支持方法调用过程中的Dynamic Linking比如invokedynamic指令。
Java源文件编译为字节码文件时,所有的变量和method references方法引用都作为symbolic reference符号引用保存在class文件的常量池中。字节码中的方法调用指令以class文件的常量池里指向方法的symbolic reference符号引用作为参数。这些symbolic reference符号引用一部分会在类加载阶段或者第一次使用的时候就被转化为concrete具体的 method references,这种转化被称为静态解析。另外一部分将在每一次运行期间都转化为concrete具体的 method references,这部分就称为Dynamic Linking。
Dynamic Linking 通过symbolic reference符号引用指向run-time constant pool运行时常量池中的method references方法引用
方法的调用–多态
JVM 将symbolic reference符号引用 #3、#2…转换为直接引用与方法的绑定机制有关
static linking静态链接- 当一个字节码文件被装载进JVM内部时,如果被调用方法在编译期可知,且运行期保持不变时。将被调用方法的
symbolic reference符号引用转换为直接引用的过程称为static linking静态链接
- 当一个字节码文件被装载进JVM内部时,如果被调用方法在编译期可知,且运行期保持不变时。将被调用方法的
dynamic linking动态链接- 如果被调用方法在编译期无法被确定下来,也就是说只能够在程序运行期将调用方法的
symbolic reference符号引用转换为直接引用。由于这种引用转换过程具备动态性因此也被称为dynamic linking动态链接
- 如果被调用方法在编译期无法被确定下来,也就是说只能够在程序运行期将调用方法的
方法的绑定机制:是一个字段、方法、类在symbolic reference符号引用被替换为直接引用的过程,仅发生一次
early binding早期绑定:被调用的目标方法在编译期可知,且运行期保持不变即可将这个方法与所属的类型进行绑定,因此可以使用static linking静态链接的方式将symbolic reference符号引用转换为直接引用late binding延迟绑定:如果被调用的方法在编译期无法被确定下来只能在程序运行期根据实际的类型,绑定相关的方法,这种绑定方式就是late binding延迟绑定
虚函数:Java中任何一个普通方法其实都具备虚函数的特征,相当于c++语言中的虚函数c++中需要使用关键字virtual来显示定义。如果java程序中不希望某个方法拥有虚函数的特征,使用关键字final修饰不能被重写,编译期确定,不再具备多态性
多态类继承,且重写方法
- 子类对象的多态性前提:
- 类的继承
- 方法的重写
- 面向对象的高级语言,尽管在语法风格上存在差异,但是都支持封装、继承、多态等面向对象特性
- 封装
- 继承
- 多态
- 具备多态性,就具备
early binding和late binding两种绑定方式,可以在编译期确定具体调用哪个方法
- 虚方法
- 具备多态性的方法
- 除了静态方法、私有方法、final方法、实例构造器、父类方法
invokevirtual指令:调用所有虚方法final修饰的方法为非虚方法,也使用invokevirtual指令invokeinterface指令:调用接口方法
- 非虚方法
- 不具备多态性的方法
invokestatic和invokespecial指令调用的方法称为非虚方法,其余的final修饰的方法为非虚方法称为虚方法- 方法在编译期确定具体的调用版本,这个版本在运行时不可变
- 静态方法、私有方法、final方法、实例构造器、父类方法都是非虚方法
invokestatic指令:调用静态方法,ClassLoaderSubSystem.Linking.Resolve阶段解析阶段确定唯一方法版本invokespecial指令:调用<init>方法、私有方法、父类方法,ClassLoaderSubSystem.Linking.Resolve阶段解析阶段确定唯一方法版本
- 动态调用指令
invokedynamic指令:动态解析出需要调用的方法,然后执行。支持由用户确定方法版本。invokevirtual、invokeinterface、invokestatic、invokespecial指令固化在JVM内部,方法的调用执行不可人为干预。
方法重写的本质
- 找到
operand stack栈顶元素所执行的对象的实际类型,记作c当调用一个对象的方法时,会先把该方法的对象压入operand stack,通常为invokevirtual指令 - 如果在类型
c中找到与常量池中描述符、简单名称都相符的方法查找c中有没有该方法,则进行访问权限校验- 如果访问权限校验通过,则返回这个方法的直接引用,查找过程结束。
- 如果访问权限校验不通过,则返回
java.lang.IllegalAccessError异常。
- 如果在类型
c中没找到与常量池中描述符、简单名称都相符的方法查找c中有没有该方法,按照继承关系从下往上依次对c的各个父类进行第2步的搜索和验证 - 如果始终没有找到合适的方法,则抛出
java.lang.AbstractMethodError异常
java.lang.IllegalAccessError异常jar冲突可能会出现: 程序试图访问或修改一个属性或调用一个方法,当这个属性或方法没有权限访问,一般会引起编译器异常,这个错误如果发生在运行时,就说明一个类发生了不兼容的改变。
虚方法表
- 在面向对象编程OOP,频繁的使用到动态分派,若每次动态分派的过程都要重新在类的方法元数据中搜索合适的目标,会影响执行效率
- JVM采用在类的方法区建立一个
virtual method table虚方法表,使用索引表来代替查找。非虚方法不会出现在表中。 - 每个类中都有一个
virtual method table虚方法表,存放着各个方法的实际入口 virtual method table虚方法表在ClassLoaderSubSystem.Linking.resolve阶段将常量池内的符号引用转换为直接引用被创建并开始初始化,类的变量初始值准备完成后,JVM会把该类的方法表也初始化完毕
Method Invocation Completion
《深入理解Java虚拟机》当一个方法开始执行后,只有两种方式退出这个方法。
- 第一种方式是执行引擎遇到任意一个方法返回的字节码指令,这时候可能会有返回值传递给上层的方法调用者调用当前方法的方法称为调用者或主调方法,方法是否有返回值以及返回值的类型将根据遇到何种方法返回的字节码指令来决定,这种退出方法的方式称为Normal Method Invocation Completionsub正常调用完成。
- 另一种退出方式是在方法执行的过程中遇到异常,且这个异常没有在方法体内得到妥善处理。无论是JVM内部产生的异常,还是代码中使用
athrow字节码指令产生的异常,只要在本方法的异常表中没有搜索到匹配的异常处理器,就会导致方法退出,这种退出方法的方式称为Abrupt Method Invocation Completion异常调用完成。一个方法使用Abrupt Method Invocation Completion的方式退出,不会给他的上层调用者提供任何返回值。方法执行过程中抛出异常的异常处理器,存储在一个异常处理表,方便在发生异常的时候找到处理异常的代码。
无论采用何种退出方式,在方法退出后,必须返回到最初方法被调用时的位置,程序才能继续执行,方法返回时可能需要在stack frame种保存一些信息,用来帮助恢复他的上层主调方法的执行状态。一般来说,方法正常退出时,主调方法的pc register的值就可以作为返回地址即调用该方法的指令的下一条指令的地址,stack frame中很可能会保存这个pc register value。而方法异常退出时,返回地址是要通过异常处理器表来确定的,stack frame中一般不会保存这部分信息,异常退出不会给上层调用者生产任何的返回值。
方法退出的过程实际上等同于把当前stack frame 出栈,因此退出时可能基于jvm规范讨论,具体执行哪些操作由具体jvm实现来确定执行的操作有:恢复上层方法的local variables和operand stack,把返回值如果有返回值压入调用者stack frame的operand stack,调整pc register的值以指向方法调用指令后面的一条指令等。
返回字节码指令
ireturn- boolean、byte、char、short、int
lreturn- long
freturn- float
dreturn- double
areturn- 引用类型
return- void 方法、实例初始化方法、类、接口的初始化方法
Normal Method Invocation Completion
Oracle 官方文档
A method invocation completes normally正常地 if that invocation does not cause造成 an exception (§2.10) to be thrown, either directly直接地 from the Java Virtual Machine or as a result of executing执行 an explicit明确的 throw statement语句. If the invocation of the current method completes normally, then a value may be returned to the invoking method. This occurs发生 when the invoked method executes执行 one of the return instructions(计算机的)指令 (§2.11.8), the choice选择 of which must be appropriate合适的 for the type of the value being returned (if any).
The current frame §2.6) is used in this case to restore恢复 the state of the invoker调用者, including its local variables and operand stack, with the program counter of the invoker调用者 appropriately适当地 incremented递增 to skip past跳过 the method invocation instruction(计算机的)指令. Execution执行 then continues normally正常地 in the invoking method’s frame with the returned value (if any) pushed onto the operand stack of that frame.
Abrupt Method Invocation Completion
Oracle 官方文档
A method invocation调用 completes abruptly意外地 if execution执行 of a Java Virtual Machine instruction(计算机的)指令 within the method causes the Java Virtual Machine to throw an exception (§2.10), and that exception is not handled within the method. Execution执行 of an athrow instruction (§athrow) also causes引起 an exception to be explicitly明确地 thrown and, if the exception is not caught抓住 by the current method, results in abrupt意外地 method invocation completion. A method invocation that completes abruptly意外地 never returns a value to its invoker调用者.
附加信息
《深入理解Java虚拟机》JVM规范运行jvm实现增加一些规范里没有描述的信息到stack frame中,例如与调试、性能收集相关的信息,这部分信息完全取决于具体jvm实现。
指令集架构
- 基于栈式架构(JVM)
- 设计和实现更简单,适用于资源受限的系统
- 避开寄存器的分配难题:使用零地址指令方式分配
- 指令流中的指令大部分是零地址指令,其执行过程依赖于操作栈,指令集更小,编译器容易实现
- 不需要硬件支持,可移植性更好,更好实现跨平台
- 基于寄存器架构
- 典型的应用是x86的二进制指令集传统PC以及Android的Davlik虚拟机
- 指令集架构完全依赖硬件,可移植性差
- 性能优秀和执行更高效
- 花费更少的指令去完成一项操作
- 在大部分情况下,基于寄存器架构的指令集往往都以一地址指令、二地址指令和三地址指令为主,而基于栈式架构的指令集却是以零地址指令为主
ToS
栈顶缓存 ToSTop-of-Stack CashingJVM基于栈式架构,使用的零地址指令更加紧凑,完成一项操作的时候必然需要使用更多的入栈和出栈指令,意味着将需要更多的指令分派instruction dispatch次数和内存读写次数
由于操作数是存储在内存中,因此频繁地执行内存读写操作必然会影响执行速度,为了解决此问题,HotSpot JVM的设计者们提出栈顶缓存技术ToS Top-of-Stack Cashing
将栈顶元素全部缓存在物理CPU寄存器中CPU寄存器:指令更少,执行速度快,降低对内存的读写次数,提升execution engine的执行效率。ToS还需要在HotSpot JVM具体进行测试才能运用
拓展
jvm stack 溢出的情况:
Xss10M 设置 jvm stack size
jvm stack固定分配大小,当最后一个stack frame所占内存大于stack的剩余容量即会出现StackOverFlowError
jvm stack动态分配,当尝试扩展的时候无法申请到足够的内存,或者在创建新的线程时没有足够的内存去创建对应的JVM stack,则OutOfMemoryError
调整stack大小,能保证不出现溢出吗?
stack frame不确定,方法嵌套调用深度不确定,故扩大stack size不能100%保证不出现溢出,最多延迟溢出的时间
eg: 递死归
分配stack越大越好吗
- 不是,要综合考虑
- 挤占线程空间
- 挤占其他空
Garbage Collection 是否会涉及到 jvm stack
- 不会涉及jvm stack
方法中定义的局部变量(local variable)是否线程安全?
- 不一定,如果局部变量一直在当前方法内存活,则线程安全\
- 如果局部变量作为参数传入,如果多线程调用此方法,则该局部变量不安全\
- 如果局部变量作为返回值返回,并被其他方法使用时,如果多线程,也不安全
变量分类
- 按照数据类型分类
- 基本数据类型
- 引用数据类型
- 按照在类中声明的位置分类
- 成员变量: 使用前都经历过,默认初始化赋值
- 类变量
static修饰又称为静态变量:linking的prepare阶段会给类变量赋默认值-->Initialization阶段显示赋值静态代码块赋值 - 实例变量:随着对象的创建,会在
heap空间中分配实例变量空间并进行默认赋值
- 类变量
- 局部变量:使用前必须显示赋值,否则编译不通过
- 成员变量: 使用前都经历过,默认初始化赋值
JVM method area
JVM method area
Oracle 官方文档
The Java Virtual Machine has a method area that is shared among all Java Virtual Machine threads. The method area is analogous相似的 to the storage存储 area for compiled编译的 code of a conventional传统的 language or analogous相似的 to the “text” segment片;段; in an operating system process. It stores per-class structures结构 such as the run-time constant常量 pool, field字段 and method data, and the code字节码 for methods and constructors构造器, including the special特殊的 methods (§2.9) used in class and instance实例 initialization初始化 and interface initialization.
The method area is created on virtual machine start-up. Although the method area is logically逻辑上的 part of the heap, simple implementations实现 may choose not to either garbage collect or compact压缩 it. This specification规范 does not mandate强制执行 the location of the method area or the policies策略 used to manage compiled code. The method area may be of a fixed固定的 size or may be expanded扩展 as required by the computation计算 and may be contracted收缩 if a larger method area becomes unnecessary. The memory for the method area does not need to be contiguous连续的.
A Java Virtual Machine implementation may provide the programmer or the user control over the initial size of the method area, as well as, in the case of a varying-size大小动态变化的 method area, control over the maximum and minimum method area size.
The following exceptional异常的 condition情况 is associated相关的 with the method area:
- If memory in the method area cannot be made available to satisfy满足 an allocation分配 request, the Java Virtual Machine throws an
OutOfMemoryError.
Method area 方法区 stack area、heap area、method area交互关系 Person p=new Person();
Person类信息 保存在method areanew Person()对象实例保存在heap area- 如果此行代码在方法内部,则
p是一个reference引用类型保存在stack area的local variables
特点
Method area有一个别名叫Non-Heap非堆Method area是一块独立于heap area之外的内存空间Method area保存类信息Method area线程共享Method area可以设置为固定大小,也可以动态扩展Method area大小决定系统可以保存多少个类,如果系统定义了太多的类,导致方法区溢出,JVM抛出java.lang.OutOfMemoryError: PermGen space/java.lang.OutOfMemoryError: Metaspace- 例子:
- 加载大量的第三方jar包
Tomcat部署的工程过多(30-50个)- 大量动态的生成反射类
- 例子:
Method area生命周期与JVM一致,JVM启动时分配,关闭后释放。
设置method area大小与OOM
JDK7及之前
-XX:PermSize=20.75M设置PermanentGenerationSpace初始值。默认20.75M-XX:MaxPermSize=82M设置PermanentGenerationSpace最大可分配空间。32位机器默认是64M,64位机器默认是82M
JDK8及之后
-XX:MetaspaceSize=21M设置Metaspace元空间初始值,平台不同默认值不同,64位 -server模式windows下默认约为21M-XX:MaxMetaspaceSize=-1设置Metaspace最大可分配空间,-1表示没有限制
如果不指定大小,默认情况下,JVM会耗尽所有的可用系统内存,如果Metaspace发生溢出,jvm会抛出java.lang.OutOfMemoryError: Metaspace
设置初始MetaspaceSize大小,对于一个64bits -server的JVM来说,其默认的-XX:MetaspaceSize值为21MB,初始的高水位线,一旦触及这个水位线FullGC将会被触发并卸载没用的类这些类对应的类加载器不再存活FullGC后这个高水位线将会重置,新的高水位线的值取决于GC后释放了多少Metaspace
- 如果释放的空间不足,在不超过
MaxMetaspaceSize时,适当提高MetaspaceSize值 - 如果释放的空间过多,则适当降低
MetaspaceSize值
如果初始化的高水位线设置过低,上述高水位线调整情况会发生很多次。通过GC的日志可以观察到FullGC多次调用。
为了避免频繁GC,建议将-XX:MetaspaceSize设置为一个相对较高的值
method area内部结构
method area标准的存储内容。后续会变化
- 类型信息
field字段- 方法信息
non-final static变量静态变量static final全局常量run-time constant pool运行时常量池StringTable在运行时常量池内随着JDK变化,StringTable存储位置也会变化JIT即时编译器编译后的代码缓存
类型信息:class类、interface接口、enum枚举、annotation注解等
- 这个类型的完整有效名称包名.类名
- 这个类型
直接父类的完整有效名对于interface或java.lang.Object都没有父类 - 这个类型的修饰符
public、abstract、final的某个子集 - 这个类型
直接接口的一个有序列表
field字段: JVM必须在method area中保存类型信息的所有field的相关信息以及field的声明顺序 field的相关信息包括
field名称field类型field修饰符public、private、protected、static、final、volatile、transient的某个子集
方法信息
- 方法名称
- 方法的返回类型void也是一种类型
- 方法参数的数量和类型有序
- 方法的修饰符
public、private、protected、static、final、synchronized、native、abstract的一个子集 - 方法的
byte codes字节码、Operand Stack、Local Variables及大小abstract和native方法除外 - 异常表
abstract和native除外: 每个异常处理的开始位置、结束位置、代码处理在Program Counter Register中的偏移地址、被捕获的异常类的常量池索引
non-final static变量静态变量/类变量:随着JDK变化,存储位置会变化
- 静态变量和类关联在一起,随着类的加载而加载,他们称为类数据在逻辑上的一部分
- 类变量被类的所有实例共享,即使没有类实例也可以访问
static final全局常量
- 被声明为
final的类变量的处理方法不同,每个全局常量在编译期分配
run-time constant pool运行时常量池
Constant Pool Table是class文件的一部分,用于存放编译期生成的各种字面量与符号引用Constant Pool Table在类加载后存放到Method Area的Runtime Constant Poolrun-time constant pool,在加载类和接口到jvm后,就会创建对应的Runtime Constant PoolJVM为每个已加载的类型类或接口都维护一个Runtime Constant Pool,Runtime Constant Pool中的数据项像数组项一样,是通过索引访问的run-time constant pool中包含多种不同的常量,包括编译期就已经明确的数值字面量,也包括到运行期解析后才能够获得的方法或者字段引用,此时不再是常量池中的符号地址了,这里换为真实地址Runtime Constant Pool,相对于class文件Constant Pool Table的另一重要特征是:具备动态性- 动态举例:
String.intern()public native String intern();如果Runtime Constant Pool中没有该字符串,则在Runtime Constant Pool放一个字符串常量
run-time constant pool类似于传统编程语言中的symbol table符号表,但是它所包含的数据比symbol table要更加丰富一些- 当创建类或接口的
run-time constant pool时,如果构造run-time constant pool所需的内存空间超过了method area所能提供的最大值,则JVM会抛java.lang.OutOfMemoryError异常 JIT即时编译器编译后的代码缓存
字节码文件
一个有效的字节码文件中除了包含类的版本信息、field字段、method、interface等描述信息外,还包含Constant Pool Table常量池表,包括各种字面量和对类型、field、method的符号引用
字节码文件为什么需要Constant Pool Table常量池表
一个Java源文件,编译后产生一个字节码文件。字节码需要数据支持,通常这种数据会很大,以至于不能直接存在字节码里,而是换另一种存储方式存在Constant Pool Table,字节码使用指向Constant Pool Table的符号引用。这样可以大大减小字节码文件的大小
在JVM stack的Dynamic Linking的时候会将符号引用转换为指向run-time constant pool的直接引用 Constant Pool Table,可以看作是一张表,虚拟机指令根据这张表找到要执行的类名、方法名、参数类型、字面量等类型
运行时常量池vs常量池
methad area内部包含run-time constant pool- 字节码文件内部包含
Constant Pool Table ClassLoader SubSystem将字节码文件加载到RuntimeDataArea,其中字节码文件中的Constant Pool Table被加载到methad area后,就是run-time constant pool.
methad area演进细节
jdk7及以前习惯上把methad area称为 Permanent Generation space永久代jdk8开始使用MetaSpace元空间取代Permanent Generation space
本质上methad area和Permanent Generation space并不等价,仅对Hotspot JVM而言两者等价JVM规范对如何实现methad area不做统一要求,BEA的JRockit和IBM的J9中不存在Permanent Generation space的概念Permanent Generation space导致java程序更容易OOM超过-XX:MaxPermSize上限
JDK8完全废弃Permanent Generation space的概念,改用JRockit、J9一样在本地内存中实现MetaSpace来代替MetaSpace的本质和Permanent Generation space类似,都是对JVM规范中method area的实现MeatSpace不在JVM设置的内存中,而是直接使用本地物理内存,可以设置的更大,更不容易OOM PermGenSpace在JVM设置的内存中,所以容易OOM
根据JVM规范,如果methad area无法满足新的内存分配需求时,将抛出OOM
Hotspot中Method area变化
jdk1.6及之前有permanent generation永久代- 永久代保存信息JVM内存
- 类型信息
field字段- 方法信息
non-final static变量静态变量static final全局常量run-time constant pool运行时常量池StringTable在运行时常量池内JIT代码缓存
- 永久代保存信息JVM内存
jdk1.7:有permanent generation,逐步”去永久代“,将StringTable、non-final static变量静态变量从permanent generation移到Heap Area- 永久代保存信息JVM内存
- 类型信息
field字段- 方法信息
static final全局常量run-time constant pool运行时常量池- JIT代码缓存
heap area保存JVM内存non-final static变量静态变量StringTable
- 永久代保存信息JVM内存
jdk1.8及之后:无permanent generationMetaspace直接使用的是物理机内存- 类型信息
field- 方法信息
static final全局常量run-time constant poolJIT代码缓存
heap area保存JVM内存non-final static变量静态变量StringTable
为什么使用Metaspace替换PermanentGenerationSpace
Motivation动机
This is part of the JRockit and Hotspot convergence融合 effort试图. JRockit customers do not need to configure the permanent generation永久代 (since JRockit does not have a permanent generation) and are accustomed 习惯于to not configuring the permanent generation.
设置PermanentGenerationSpace的大小很难确定
某些场景下,动态加载类过多,容易产生Perm区的OOM。比如某个实际Web工程中,因为功能点比较多,在运行过程中要不断动态加载很多类,经常出现致命错误OOM
使用Metaspace和PermGenSpace最大区别在于:Metaspace并不在JVM中,而是使用本地物理机内存,因此默认情况下,Metaspace的大小仅受本地内存限制
对PermanentGenerationSpace调优很困难FullGC
StringTable为什么要调整
JDK7中将StringTable放到heap area中,因为PermGenSpace的回收效率很低,在FullGC的时候才会触发. 而FullGC是Old区空间不足、PermGenSpace不足时才会触发,导致StringTable回收效率不高,而开发中会有大量的字符串被创建,回收效率低会更容易导致PermGenSpace空间不足。放在heap area能即时回收内存.
non-final static变量放在哪里
new出的实例对象都在heap area
对象引用存放位置
- 非静态属性放
heap area - 方法内的局部变量,在
stack frame的local variables内 - 静态属性,在
java.lang.Class对象内大Class对象
jvm规范定义的概念模型,所有Class相关的信息都应该存放在methad area中,但methad area如何实现jvm规范并未做出规定. 这就成了一件允许不同jvm自己灵活把握的事情JDK7及其以后版本的Hotspot jvm选择把non-final static变量静态变量引用与类型与大Class对象存放在一起,存储于heap area
methad area GC
主要回收两部分
run-time constant pool中废弃的常量- 字面量:如文本字符串、被声明为
final的常量值等 - 符号引用
- 类和接口的全限定名
field的名称和描述符method的名称和描述符
- 字面量:如文本字符串、被声明为
- 不再使用的类型
- 回收的条件
- 该类所有的实例都已经被回收,也就是
heap area中不存在该类及任何派生子类的实例 - 加载该类的类加载器已经被回收,这个条件除非是经过精心设计的可替换类加载器的场景,如
OSGi、JSP的重加载等,否则通常很难达成 - 该类对应的
java.lang.Class对象没有在任何地方被引用,无法在任何地方通过反射访问该类的方法
- 该类所有的实例都已经被回收,也就是
JVM被允许对满足上述三个条件的无用类进行回收,这里说的仅仅是被允许,而并不是和对象一样,没有引用就必然会回收,关于是否要对类型进行回收- Hotspot提供了
-Xnoclassgc参数进行控制 - 可以使用如下参数查看类加载和卸载信息
-verbose:class-XX:+TraceClass-Loading-XX:+TraceClassUnLoading
- 在大量使用
反射、动态代理、CGLib等字节码框架,动态生成JSP以及OSGi这类频繁自定义类加载器的场景中,通常都需要JVM具备类型卸载的能力,以保证不会对method area造成过大的内存压力
- 回收的条件
Hotspot对run-time constant pool的回收策略很明确,只要run-time constant pool中的常量没有被任何地方引用,就可以被回收. 回收废弃常量与回收heap area中java对象非常类似
面试题
- 百度
- 三面:说一下
JVM内存模型,有哪些区?分别是干什么的?- 分代
- 新生代:分配对象空间的位置
Eden区:第二分配位置TLAB: 小块线程私有,第一分配位置
- 2个
Survivor区: 两块大小相同的区域自适应内存分配可能大小不同
- 老年代:生命周期较长或者超大对象分配
- 元空间:
- 类型信息
field- 方法信息
static final全局常量run-time constant poolJIT代码缓存+
- 新生代:分配对象空间的位置
- 分代
- 三面:说一下
- 蚂蚁金服
Java8的内存分代改进:元空间直接使用物理内存,取消permGen永久代JVM内存分哪几个区,每个区的作用是什么?- 一面:
JVM内存分布/内存结构,栈和堆的区别,堆的结构,为什么两个survivor区stack area线程私有,heap area线程共享, 两个survivor区,碎片整理,复制算法,优化GC
- 二面:
Eden区和survivor区的比例分配-XX:SurvivorRatio=88:1:1Eden过大,survivor小,MinorGC作用会被削弱,可能生命周期较小的对象更大概率晋升到OldEden过小,MinorGC次数会增加,影响应用效率
- 小米
- JVM内存分区,为什么要有新生代和老年代?
- 优化
GC性能 - 不分代,所有对象放一起,每次GC都要全部检查一遍
STW - 分代,新对象都在一起,优先
MinorGC新对象,不需要经常FullGC
- 优化
- JVM内存分区,为什么要有新生代和老年代?
- 字节跳动
- 二面:java的内存分区
- 二面:讲一讲JVM运行时数据库区
- 什么时候对象会进入老年代
- 达到阈值,从
Survivor from区晋升到Old区 Survivor区中某一年龄的对象总大小超过Survivor空间的一半,不需要等达到阈值,大于等于年龄的对象一起晋升到Old区- 大对象,
Eden区放不下,直接放在Old
- 达到阈值,从
- 京东
- JVM内存结构,Eden和Survivor比例
- JVM内存为什么要分成新生代,老年代,持久代,新生代中为什么要分为
Eden区和Survivor
- 天猫
- 一面:JVM内存模型以及分区,需要详细到每个区放什么
- 一面:JVM的内存模型,java8做了什么修改
- 拼多多
- JVM内存分哪几个区,每个区的作用是什么
- 美团
- java内存分配
- jvm的永久代中会发生垃圾回收?
- 一面:jvm内存分区,为什么要有新生代和老年代
JVM heap area
JVM heap area
The Java Virtual Machine has a heap that is shared among all Java Virtual Machine threads. The heap is the run-time data area from which memory for all class instances and arrays is allocated分配.
The heap is created on virtual machine start-up. Heap storage存储 for objects is reclaimed回收的 by an automatic storage management system (known as a garbage collector); objects are never explicitly显示地 deallocated取消分配. The Java Virtual Machine assumes假定 no particular特别的 type of automatic storage management system, and the storage management technique技术 may be chosen according相应的 to the implementor’s实现者 system requirements系统需求. The heap may be of a fixed固定的 size or may be expanded扩展 as required by the computation计算 and may be contracted收缩 if a larger heap becomes unnecessary. The memory for the heap does not need to be contiguous连续的.
A Java Virtual Machine implementation may provide the programmer or the user control over the initial size of the heap, as well as, if the heap can be dynamically expanded or contracted, control over the maximum and minimum heap size.
The following exceptional异常的 condition情况 is associated相关的 with the heap:
- If a computation requires more heap than can be made available by the automatic storage management system, the Java Virtual Machine throws an
OutOfMemoryError.
概述
- 一个
JVM进程只存在一个heap area,是java内存管理的核心区域 heap area在JVM启动时即被创建,其空间大小也随即确定heap area size是可以调节的,是JVM管理的最大一块内存空间jvm规范规定heap area可以处于物理上不连续的内存空间中,但在逻辑上它应该被视为连续的- 所有线程共享
heap area. 在这里还可以划分线程私有的缓冲区TLABThread local allocation buffer - 数组和对象实例可能永远不会存储在
jvm stack上,因为stack frame中保存指向对象或者数组在堆中的位置的引用 - 在方法结束后,
heap area中对象实例不会马上被移除,仅仅在垃圾收集的时候才会被移除 heap area是Garbage Collection执行垃圾回收的重点区域
总结
YoungGenerationSpace是对象诞生、成长、消亡的区域,一个对象在这里产生、应用,最后被垃圾回收器收集、结束生命TenureGenerationSpace放置长生命周期的对象,通常都是从Survivor区筛选拷贝过来的Java实例对象- 特殊情况
- 普通的对象优先尝试分配在TLABThread local allocation buffer上
- 对象较大
JVM试图直接分配在Eden区 - 对象太大无法在
Yong区找到足够长的连续空闲空间,JVM直接分配到Old区
- 特殊情况
MinorGC只发生在Young区,发生频率比MajorGC高很多,效率也比MajorGC高10倍以上- 当
GC发生在Old区则称为MajorGC或FullGC
分代思想
- 经研究,不同对象的生命周期不同,70%~99%的对象是临时对象
- 新生代: 由
Eden、两块大小相同的Survivor区s0区、s1区或from区、to区.to区总是空的构成 - 老年代: 存放新生代中经历多次
GC仍存活的对象
- 新生代: 由
- 不分代完全可以
分代的唯一理由就是优化GC性能。如果没有分代,将所有的对象实例都放在一块,GC时寻找哪些对象实例没有被使用,此时需要对所有区域进行扫描,STWstop the world时间相对分代策略会变长。
很对对象实例都是朝生夕死。
如果分代,把新创建的对象实例放到某一地方,GC时先把这块存储新创建对象实例的区域进行回收,STW时间相对不分代的扫描全部区域少很多。
JVM中的java实例对象可以被划分为两类
- 生命周期较短的瞬时对象,这类对象创建和消亡都非常迅速
- 生命周期非常长,在某些极端的情况下还能够与
JVM的生命周期保持一致
现代垃圾收集器大部分都基于分代收集理论设计
Young== 新生区 == 新生代 == 年轻代Old== 养老区 == 老年区 == 老年代method area== 永久区 == 永久代
| heap area 逻辑上分为三部分 | java7及之前 | java8及之后 |
|---|---|---|
Young | Yong Generation Space 新生区 Young/New | 同左 |
Eden区 | 同左 | |
Survivor区只有一个存放数据,当jvm计算容量时只会考虑一个,所以Runtime.getRuntime().totalMemory()和Runtime.getRuntime().maxMemory()的值会少一个survivor区的大小 | 同左 | |
Survivor from区 | 同左 | |
Survivor to区 | 同左 | |
Old | Tenure Generation Space 养老区 Old/Tenure | 同左 |
Method Area | Permanent Space 永久区 Perm | Meta Space 元空间 Meta |
新生代
在Hotspot中Eden空间和另外两个Survivor空间默认占比是8:1:1 ;通过-XX:SurvivorRatio=8调整比例默认为8,但是实际比例是6:1:1 -XX:+UseAdaptiveSizePolicy默认开启了自适应内存分配策略,显式设置为8才会生效
几乎所有的Java实例对象都是在Eden区被new出来
绝大部分的Java实例对象的销毁都在新生代进行 IBM公司的专门研究表明,新生代中80%的对象都是朝生夕死
可以使用选项-Xmn设置新生代最大内存大小。这个参数一般使用默认值就可以了
老年代
[todo]
对象分配内存过程

new的对象优先尝试放Eden区,Eden区可能已有对象- 如果
Eden区剩余空间放得下,则直接在Eden区为对象分配内存 - 如果
Eden区剩余空间放不下,则触发Minor GCYGC,YGC会将Eden区和From区清空- 将
Eden区和From区内的不再被其他对象所引用的对象进行销毁。 - 将
Eden区和From区内幸存的对象,移动到To区,并且标识移动次数加1次 - 此时
Eden区为空,再次判断Eden区是否放得下- 放得下则放
Eden区 - 放不下则尝试放
Old区一般是超大对象- 放得下,直接将对象放置到
Old区 - 放不下,则触发
Major GC,回收一次Old区,再进行判断Old区是否放的下- 放得下则直接将对象放置到
Old区 - 放不下则
OOM
- 放得下则直接将对象放置到
- 放得下,直接将对象放置到
- 放得下则放
- 将
Survivor 0区和Survivor 1区- 当
JVM进程第一次触发YGC。将Eden区内的不再被其他对象所引用的对象进行销毁。 - 将
Eden区所有幸存对象,尝试移到Survivor 0区会将Eden区清空- 当
Survivor 0区空间放得下则放在Survivor 0区,移动次数加1 - 幸存对象太大放不下,则直接晋升老年代,放到
Old区,移动次数加1
- 当
- 当
Eden区和Survivor 0或Survivor 1区有数据时触发YGC。此时JVM将Eden区和Survivor 0区此时Survivor 0区会称为From区内不再被其他对象所引用的对象进行销毁。此时的From区要根据实际情况来定,此处只是用Survivor 0区作为例子说明- 尝试将幸存的对象移动到
Survivor 1区此时也叫To区。- 当
From区幸存对象阈值等于设置的值- 则执行
Promotion晋升到老年代Old区,移动次数加1
- 则执行
- 当From区幸存对象阈值小于设置的值
To区放得下则放到To区,移动次数加1To区放不下直接放Old区,移动次数加1此时Old区正常设置参数肯定放的下,因为Young空间一般都比Old空间小
- 当
- 尝试将幸存的对象移动到
- 之后就是重复3步
- 当
注意:
当Eden区满时才会触发YGC,Survivor 0或Survivor 1区满不会触发YGC YGC回收Eden区和From区YGC后会清空Eden区和From区 Survivor 0区和Survivor 1区大小1:1,肯定会有一个为空。为了使用复制算法,目的是解决碎片化问题 Survivor 0区和Survivor 1区:复制之后有交换,谁空谁时To区 Garbage Collection频繁在Young区收集,很少在Old区收集,几乎不在Perm和Meta收集
对象可能直接分配在Old区 Eden区和To区满了,对象即使没达到阈值Promotion,也可能直接晋升到Old区
内存分配策略
对象晋升规则Promotion:
- 如果对象在
Eden出生并经过第一次MinorGC后仍存活,并且能被Survivor容纳,将被移动到Survivor空间,并将对象年龄设为1 - 对象在
Survivor区中每熬过一次MinorGC年龄就+1岁,当它的年龄增加到一定程度时默认15岁,每个JVM每个GC都有所不同,就会晋升Promotion到老年代
对象晋升PromotionOld的年龄阈值,可以通过-XX:MaxTenuringThreshold来设置
针对不同年龄段的对象分配原则:
- 优先分配到
Eden - 大对象需要连续的内存空间,更高概率触发
GC直接分配到Old.尽量避免程序中出现过多的大对象 - 长期存活的对象分配到
Old经过多次YGC仍存活,达到阈值则晋升到老年代 - 动态对象年龄判断
- 如果
Survivor区中相同年龄的所有对象大小的综合大于Survivor空间的一半,年龄大于或等于该年龄的对象可以直接进入Old无须达到MaxTenuringThreshold设置的年龄
- 如果
- 空间分配担保
-XX:HandlePromotionFailure
空间分配担保
在发生MinorGC之前,jvm会检查Old区最大可用的连续空间是否大于Young区所有对象的总空间
- 如果大于则此次
MinorGC是安全的 - 如果小于则
jvm会查看-XX:HandlePromotionFailure设置值是否运行担保失败- 如果
-xx:HandlePromotionFailure=true会继续检查Old区最大可用连续空间是否大于历次晋升Old区的对象的平均大小- 大于,则尝试进行一次
MinorGC,但这次MinorGC是有风险的 - 小于,则改为进行一次
MajorGC
- 大于,则尝试进行一次
- 如果
-xx:HandlePromotionFailure=false则改为进行一次MajorGC
- 如果
在JDK6 Update24之后,HandlePromotionFailure参数不会再影响到JVM的空间分配担保策略,虽然OpenJDK源码中仍定义了HandlePromotionFailure参数,但是在代码中已经不会再使用它. 规则变更为
Old区的连续空间大于Young区对象总大小进行MinorGCOld区的连续空间大于历次晋升的平均大小进行MinorGC- 否则进行
MajorGC
heap area是分配对象存储位置的唯一选择
随着JIT编译器的发展与逃逸分析Escape Analysis技术逐渐成熟,栈上分配、标量替换优化技术将会导致一些微妙变化,所有对象都分配到heap area上也渐渐变得不那么绝对
在JVM中,对象是在heap area中分配内存,但是如果经过逃逸分析Escape Analysis后发现一个对象并没有逃逸出方法的话,那么就可能被优化成栈上分配, 这样无需在heap area上分配内存,也不需要GC,这也是常见的堆外存储技术。
例如:
基于OpenJDK深度定制的TaoBaoVM其中创新的GCIHGC invisible看不见的 heap技术实现off-heap.
将生命周期较长的实例对象从heap area中迁移到heap area外,并且GC不能管理GCIH内部的实例对象,以此达到降低GC的回收频率和提升GC的回收效率的目的
Escape Analysis
逃逸分析技术不成熟历史
- 关于逃逸分析的论文在
1999年就已经发表,但直到JDK1.6才有实现,而且这项技术至今也不是十分成熟 - 原因是:无法保证逃逸分析的性能一定高于逃逸分析的消耗
- 虽然不成熟,但是他是
JIT编译器优化技术中一个十分重要的手段 - 有些观点认为,通过逃逸分析
JVM会在stack area上分配不会逃逸的对象,这在理论上是可行的,但是实际上取决于JVM设计者的选择。Oracle Hotspot JVM并未这么做,逃逸分析的相关官方文档已经说明,所以可以明确所有的对象实例都是创建在heap area上
- 目前很多书籍还是基于
JDK7以前的版本,JDK已经发生很大变化,intern字符串缓存和静态变量曾经都被分配在Permanent Space永久代上- 而
Permanent Space永久代已经被Meta Space元空间取代 - 但是
intern字符串缓存和静态变量并不是转移到Meta Space元空间,而是直接在heap area上分配,所以这一点同样符合:所有对象实例都是分配在heap area
概述
- 使用逃逸分析手段将本该分配到
heap area上的对象分配到stack - 有效减少Java程序中同步负载和内存
heap area分配压力的跨函数全局数据流分析算法 - 通过逃逸分析,
hotSpot编译器能够分析出一个新的对象的引用的使用范围从而决定是否要将这个对象分配到heap area上 - 逃逸分析的基本行为就是分析对象动态作用域
- 当一个对象在方法中被定义后,对象只在方法内部使用,则认为没有发生逃逸
- 当一个对象在方法中被定义后,它被外部方法所引用,则认为发生逃逸。例如作为调用参数传递到其他地方中。
- 没有发生逃逸的对象,则可以分配到
stack上,随着方法执行的结束,该对象随stack frame一起被移除,不需要GC就释放内存 JDK6u23后,HotSpot中默认就已经开启了逃逸分析- 如果使用的是较早的版本
-XX:+DoEscapeAnalysis开启逃逸分析-XX:+PrintEscapeAnalysis查看逃逸分析的筛选结果
结论: 开发中能使用局部变量的,就不要在方法外定义
代码优化:
- 栈上分配:将
heap area分配转化为stack分配,如果一个对象在子程序中被分配,使指向该对象的指针永远不会逃逸,对象可能是stack分配的候选,而不是heap分配 - 锁消除同步省略:如果一个对象被发现只能从一个线程被访问到,那么对于这个对象的操作可以不考虑同步
- 标量替换:有的对象如果不需要作为一个连续的内存结构保存也可以被访问,那么对象的一部分或全部可以不存储在内存,而是存储在
CPU寄存器中
栈上分配
JIT编译器在编译期根据逃逸分析的结果发现如果一个对象并没有逃逸出方法,就可能被优化成栈上分配- 分配完成后,继续在该线程的
jvm stack内执行,最后线程结束,jvm stack被回收,局部变量对象也被回收,这样就不需要GC
锁消除
锁消除同步省略
线程同步的代价相当高,同步的后果是降低并发性和性能
动态编译同步块的时候,JIT编译器可以借助逃逸分析来判断同步块所使用的锁对象是否只能够被一个线程访问而没有被发布到其他线程
如果没有被发布到其他线程,JIT编译器在编译这个同步块的时候就会取消这部分代码的同步,从而提高并发性和性能。这个过程就叫同步省略,也称为锁消除
标量替换
标量Scalar :一个无法再分解成更小的数据的数据。Java中的原始数据类型就是标量Scalar
聚合量Aggregate :可以分解的数据。java中的普通类对象就是聚合量Aggregate,因为可以分解成其他聚合量Aggregate和标量Scalar
JIT编译阶段,如果经过逃逸分析,一个对象不会被外界访问的话未发生逃逸,就会把这个对象拆解成若干个其中包含的若干个成员变量来代替。这个过程就是标量替换
- 标量替换可以大大减少
heap area内存的占用,因为一旦不需要创建对象,那么就不再需要分配heap area内存 - 标量替换为栈上分配提供了很好的基础
-XX:+EliminateAllocations开启标量替换默认开启,允许将对象打散分配在jvm stack上
TLAB
Thread Local Allocation Buffer
Thread Local Allocation Buffer。OpenJDK衍生出来的JVM都提供了TLAB的设计。
从内存模型而不是GC角度,对Eden区域继续进行划分,JVM为每个线程分配了一个私有缓存区域,它包含在Eden空间内。
多线程同时分配内存时,使用TLAB可以避免一系列的非线程安全问题,同时还能够提升内存分配吞吐量,因此我们可以将这种内存分配方式称为快速分配策略。
不是所有的对象实例都能够在TLAB中成功分配内存,但JVM确实将TLAB作为内存分配的首选。
在程序中,可以通过选项 -XX:+UseTLAB 设置开启 TLAB 空间。默认开启。
默认情况下,TLAB空间的内存非常小仅占整个Eden区的1%,-XX:TLABWasteTargetPercent设置TLAB空间所占用Eden空间的百分比大小。
一旦对象在TLAB空间分配内存失败时,JVM会尝试通过加锁机制确保数据操作的原子性,从而直接在Eden空间中分配内存。
为什么有 TLAB
Heap Area是线程共享区域,任何线程都可以访问到堆区中的共享数据- 由于对象实例的创建在
JVM中非常频繁,因此在并发环境下从Heap Area中划分内存空间是线程不安全的 - 为避免多个线程操作同一地址,需要使用加锁等机制,会影响内存分配速度
指针碰撞
todo
OutOfMemory
java.lang.OutOfMemoryError
要解决 OOM 异常或者 heap space 异常,一般首先通过 Eclipse Memory Analyzer内存映像分析工具 对 dump出来的堆转储快照 进行分析.重点是确认内存中的对象是否是必要的,也就是要先分清到底是 memory leak内存泄漏还是 memory overflow内存溢出
memory leak- 可进一步通过工具查看泄漏对象到
GC Roots的引用链。找到泄漏对象是通过怎样的路径与GC Roots相关联并导致垃圾收集器无法自动回收他们。 - 掌握了泄漏对象的类型信息,以及
GC Roots引用链的信息,就可以比较准确地定位泄漏代码的位置
- 可进一步通过工具查看泄漏对象到
memory overflow- 不存在
memory leak,即内存中的对象确实都还必须存活,那就应当检查jvm heap options堆参数-Xms和-Xmx与机器物理内存对比看是否还可以调大,从代码上检查是否存在某些对象生命周期过长、持有状态时间过长的情况,尝试减少程序运行期的内存消耗。
- 不存在
Primitive Types
基础数据类型
Java
数据类型所在内存
- 2^10=1024
- 1 KB=1024 Byte = 2^10 Byte
| 类型 | 字节数(Byte) | 位数(bit) | 取值范围 |
|---|---|---|---|
| byte | 1 | 8 | -2^7 ~ 2^7-1 |
| short | 2 | 16 | -2^15 ~ 2^15-1 |
| int | 4 | 32 | -2^31 ~ 2^31-1 |
| long | 8 | 64 | -2^63 ~ 2^63-1 |
| boolean | 1 | 8 | true和false |
| char | 2 | 16 | unicode编码,前128字节与ASCII兼容字符存储范围在 \u0000~\uFFFF |
| float | 4 | 32 | 3.402823e+38 ~ 1.401298e-45(e+38表示是乘以10的38次方,同样,e-45表示乘以10的负45次方) |
| double | 8 | 64 | 1.797693e+308~ 4.9000000e-324 |
| reference | 4/8 | 32/64 | 引用型数据,32位系统或开启指针压缩的64位系统占用4字节,64位系统不开指针压缩占8字节 |
浮点型(科学计数法) 进制转换参考
| 浮点型 | 符号位 | 指数 | 尾数 | 内存占用 |
|---|---|---|---|---|
| float | 1 bit | 8 bite | 23 bit | 32 bit / 4 Byte |
| double | 1 bit | 11 bite | 52 bit | 64 bit / 8 Byte |
boolean
虽然定义了 boolean 但是 jvm 并没有任何供 boolean 值专用的字节码指令。
Java 表达式操作的 boolean 在编译后都使用 JVM 中的 int 来代替。
4 字节 boolean 数组被编码为 JVM 的 byte 数组,数组中的每个元素占 8 bit = 1 字节。
boolean 使用 int 32 bit 原因是,对于 32 位 CPU 来说具有高效存取的特点
具体情况要看 JVM 实现是否符合规范,1 字节、4 字节都有可能。实质是运算效率和存储空间的博弈
Garbage Collection
Garbage Collection

GC是垃圾回收线程,与之对应的是用户线程. 收集垃圾时STWStop The World,进行检索垃圾,会导致用户线程暂停,影响应用。JVM在进行GC时,并非每次都对三个内存Young、Old、method area区域一起回收,大部分时候回收指Young区
针对Hotspot JVM实现,GC按照回收区域分为两大类型
- 部分收集
partial GC:不是完整收集整个heap area的垃圾收集- 新生代收集
Minor GC/Young GC: 只是Young区Eden区、s0或s1的垃圾收集 - 老年代收集
Major GC/Old GC: 只是Old区的垃圾收集- 目前只有 Concurrent并发Mark Sweep
CMSCollector会有单独收集老年代的行为 - 注意,很多时候
Major GC会和Full GC混淆使用,需要具体分辨是Old区回收还是整堆回收
- 目前只有 Concurrent并发Mark Sweep
- 混合收集
Mixed GC:收集整个新生代以及部分老年代的垃圾收集- 目前只有Garbage-First
G1Garbage Collector.会有这种行为
- 目前只有Garbage-First
- 新生代收集
- 整堆收集
Full GC: 收集整个heap area和method area的垃圾收集
调优就是减少GC出现次数. 主要调优Major GC和Full GC
Minor GC
- 当
Eden区满触发 Survivor区满不会引发MinorGC- 每次
MinorGC会清理Young区Eden区、s0或s1 MinorGC非常频繁- 回收速度快
- 会引发
STWStop The World,暂停其他用户线程,等待垃圾回收结束,用户线程才恢复运行
Major GC
- 对象从
Old区消失时,则发生了Major GC或Full GC - 出现
Major GC经常会伴随至少一次的MinorGC但非绝对,在Parallel Scavenge收集器的收集策略里直接进行MajorGC的策略选择过程- 当
Old区不足时,会先尝试触发MinorGC,如果之后空间还不足,则触发MajorGC
- 当
Major GC比Minor GC慢10倍以上,STW的时间更长Major GC后内存还不足,会抛出OOM异常
Full GC
- 触发机制
- 调用
System.gc()时,系统建议执行Full GC,但是不必然执行 Old区空间不足method area空间不足- 通过
Minor GC后晋升Old区的对象平均大小,大于Old区的可用内存 - 由
Eden区和Survivor Form区向Survivor To区复制时,对象大小大于Survivor To区可用内存,则把该对象转存到Old区,且Old区的可用内存小于该对象大小
- 调用
- 说明:
Full GC是开发或调优中尽量要避免的,这样STW时间会短一些
Classloader
Class Loader Subsystem
Class Loader Subsystem类加载子系统负责从文件系统或者网络中加载class文件,class文件在文件开头有特定的文件标识。ClassLoader只负责class文件的加载,能否运行由Execution Engine决定。
加载的类信息存放于Method Area方法区,Method Area中还会存放run-time constant pool运行时常量池信息final,字符串字面量和数字常量这部分常量信息是class文件中常量池部分的内存映射
加载过程
类加载特性和机制
Loading
- 通过一个类的全限定名全类名获取定义此类的二进制字节流
- 将这个字节流所代表的静态存储结构转化为
Method Area的运行时数据结构 - 在内存中创建一个代表这个类的
java.lang.Class对象,作为访问这个类的数据的访问入口 - 加载
.class文件方式- 从本地文件系统直接加载
- 通过网络获取,典型场景
Web Applet - 从压缩包中读取,
jar包,war包基础 - 运行时计算生成,动态代理技术
- 由其他文件生成,
JSP应用 - 从专有数据库中提前
.class文件,比较少见 - 从加密文件中获取,防止反编译的保护措施
ClassLoader
JVM规范:所有派生于抽象类java.lang.ClassLoader的ClassLoader都划分为User-Defined ClassLoader自定义类加载器
JVM支持两种 ClassLoader
Bootstrap ClassLoader引导类加载器,c和c++实现,嵌套在jvm内部User-Defined ClassLoader自定义类加载器,java实现,派生于抽象类java.lang.ClassLoader
常见类加载器:
 sun.misc.Launcher
 sun.misc.Launcher$AppClassLoader
 sun.misc.Launcher$ExtClassLoader

 java.net.URLClassLoader
 java.security.SecureClassLoader
 java.lang.ClassLoader
 URLClassLoader extends SecureClassLoader
 SecureClassLoader extends ClassLoader
ClassLoader systemClassLoader=ClassLoader.getSystemClassLoader();//sun.misc.Launcher$AppClassLoader 系统类加载器java实现
ClassLoader extClassLoader = systemClassLoader.getParent();//sun.misc.Launcher$ExtClassLoader 扩展类加载器java实现
ClassLoader bootstrapClassloader = extClassLoader.getParent();//null 引导类加载器(由c和c++实现)
各种类加载器不是上下层关系,也不是父子类的继承关系,是包含关系,类似a文件夹里有b和c这种包含关系
Bootstrap ClassLoader引导类加载器:c和c++实现,嵌套在jvm内部- 加载
java核心库JAVA_HOME/jre/lib/rt.jar、resources.jar或sun.boot.class.path路径下的内容用于提供JVM自身需要的类 - 没有
parent父类加载器。 - 加载
ExtClassLoader扩展类加载器和AppClassLoader系统类加载器,并指定他们的parent父类加载器 - 处于安全考虑,
Bootstrap ClassLoader只加载包名为java、javax、sun等开头的类
User-Defined ClassLoader自定义类加载器ExtClassLoader扩展类加载器。ClassLoader extClassLoader = systemClassLoader.getParent();- java实现。实现位置
sun.misc.Launcher内静态内部类static class ExtClassLoader extends URLClassLoader parent父类加载器为Bootstrap ClassLoader- 从
java.ext.dirs系统属性所指定的目录中加载类库 - 从JDK的安装目录
jre/lib/ext子目录(扩展目录)下加载类库,如果用户创建的jar放在此目录下,也会自动由ExtClassLoader加载
- java实现。实现位置
SystemClassLoader系统类加载器或称为应用程序类加载器AppClassLoader。ClassLoader systemClassLoader=ClassLoader.getSystemClassLoader();- java实现。实现位置
sun.misc.Launcher内静态内部类static class AppClassLoader extends URLClassLoader parent父类加载器为ExtClassLoader扩展类加载器- 负责加载环境变量
classpath或系统属性java.class.path指定路径下的类库 - 程序中的默认类加载器,一般java应用的类都是由其来完成加载
- 通过
CLassLoader.getSystemClassLoader()可以获取到该类加载器
- java实现。实现位置
User Defined Class Loader用户自定义类加载器- java日常应用程序开发中,类加载几乎是由
Bootstrap ClassLoader、ExtClassLoader、AppClassLoader3种类加载器相互配合执行的,在必要时,还可以自主实现类加载器,来定制类的加载方式 - 自定义类加载器功能:
- 隔离加载类
- 引入多个框架或中间件时,防止同名同路径的类冲突,通过自定义类加载器仲裁,防止冲突
- 修改类加载的方式
- 需要时加载、动态加载
- 扩展加载源
- 扩展class字节码文件的来源方式。本地文件系统、网络、数据库等
- 防止源码泄漏
- 通过自定义类加载器加载加密过的class字节码。分发加密class字节码文件,从而防止反编译。
- 隔离加载类
- 自定义类加载器实现:
- 开发人员可以通过继承抽象类
java.lang.Classloader类的方式实现自己的类加载器 JDK1.2之前,在自定义类加载器时,总会去继承ClassLoader类并重写loadClass方法,来实现自定义的类加载器JDK1.2之后,不再建议用户去重写loadClass方法,建议把自定义的类加载逻辑写在findClass方法中- 在编写自定义类加载器时,如果没有太过于复杂的需求,可以直接继承
URLClassLoader类,这样就可以避免自己去编写findClass方法及其获取字节码流的方式,使自定义类加载器编写更简洁
- 开发人员可以通过继承抽象类
- java日常应用程序开发中,类加载几乎是由
Linking
Verify
- 确保
class文件的字节流中包含的信息符合当前jvm要求,保证被加载类的正确性,保证不会危害jvm自身安全 - 验证方式
- 文件格式验证
- 元数据验证
- 字节码验证
- 符号引用验证
Prepare
- 为类变量分配内存并且设置该类变量的默认初始值
static int iClass=1;此时赋默认初始值iClass=0 - 不包含用
final修饰的static静态常量,因为final在编译时分配,prepare阶段会显示初始化 - 这里不会为实例变量分配初始化,类变量会分配在
Method Area,而实例变量随着对象一起分配到Heap Area
Resolve
- 将
class文件的常量池内的symbolic reference符号引用转换为直接引用的过程。virtual method table虚方法表创建并开始初始化 - 事实上,
Resolve解析操作往往会伴随JVM在执行完Initialization初始化之后再执行 symbolic reference符号引用就是一组符号来描述所应用的目标,symbolic reference符号引用的字面量形式明确定义在jvm规范的class文件格式中。 直接引用就是直接指向目标的指针、相对偏移量或一个间接定位到目标的句柄Resolve解析主要针对类、接口、字段、类方法、接口方法、方法类型等。对应class文件的常量池CONSTANT_Class_infoCONSTANT_Fieldref_infoCONSTANT_Methodref_info
Initialization
Initialization初始化阶段就是执行<clinit>()类构造器方法不是类的构造器的过程当有静态变量赋值,静态代码块赋值时才会有clinit<clinit>()类构造器方法不需要定义,是javac编译器自动收集类中的所有类静态变量的赋值动作和静态代码块中的语句合并而来<clinit>()类构造器方法中指令按语句在源文件中出现的顺序执行<clinit>()类构造器方法不同于类的构造器,类的构造器在jvm视角下是<init>()- 若A类具有父类B类,
jvm会保证B类的<clinit>()执行完毕后,A类的<clinit>()立即执行 jvm必须保证一个类的<clinit>()方法在多线程下被同步加锁。类只会被加载一次,并放置到method areaJDK8为metadata
双亲委派机制
JVM对class文件采用的是按需加载的方式,当需要使用该类时才会将它的class文件加载到内存,生成Class对象
JVM采用双亲委派机制,即把加载类的请求交给parent父类加载器处理,是一种任务委派模式


工作原理
- 如果一个类加载器A收到了类加载的请求,并不会立即去执行加载,而是把这个请求委托给
parent父类加载器B加载 - 如果该
parent父类加载器B还存在parent父类加载器C,则类加载器C继续向上委托,直到请求到达顶层的BootstrapClassloader - 如果
parent父类加载器X可以完成类加载任务,则成功加载返回。如果parent父类加载器X不能完成加载任务,子加载器才会尝试自己去加载
优势:
- 避免重复加载类
- 保护程序安全,防止核心API被随意篡改:
- 自定义
java.lang.String.main():Error: Main method not found in class java.lang.String - 自定义类
java.lang.MyBougainvillea:Exception in thread "main" java.lang.SecurityException: Prohibited package name: java.lang
- 自定义
- 类隔离说明:
A1,A2类 由ExtClassLoader加载;B1,B2类 由AppClassLoader加载。- B1 可以访问 A1 A2 B2
- B2 可以访问 A1 A2 B1
- A1 可以访问 A2
- A2 可以访问 A1
沙箱安全机制
- 自定义
java.lang.String类,加载自定义String类的时候根据双亲委派原则会率先使用BootstrapClassLoader加载 - 此时加载的是
jdk自带的rt.jar包中java\lang\String.class报错信息说没有main方法是因为rt.jar下的String类没有main方法 - 这样保证对
java核心源代码的保护这就是沙箱安全机制
类的主动使用和被动使用
判断JVM中两个Class对象是否为同一个类
- 类的完整类名必须一致,包括包名
- 加载这个类的
ClassLoader指ClassLoader实例对象必须相同 在JVM中即使这两个类对象Class对象来源同一个class文件,被同一个jvm所加载,但只要加载他们的ClassLoader实例对象不同,那么这两个类对象Class对象也是不相等==的
JVM必须知道一个类型是由BootstrapClassLoader加载还是由用户类加载器加载
如果一个类型是由用户类加载器加载,那么JVM会将这个用户类加载器的一个reference引用作为类型信息的一部分保存在Method Area中
Dynamic Linking动态链接解析一个类型到另一个类型的reference引用的时候,JVM需要保证这两个类型的类加载器是相同的
主动使用
- 类会执行
Initialization阶段- 创建类的实例
- 访问某一个类或接口的静态变量或者对静态变量赋值
- 调用类的静态方法
- 反射:
Class.forName("org.bougainvillea.jvm.Demo") - 初始化一个类的子类加载一个类的时候其父类会先初始化
JVM启动时被标明为启动类的类JDK7开始提供的动态语言支持java.lang.invoke.MethodHandle实例的解析结果REF_getStatic、REF_putStatic、REF_invokeStatic句柄对应的类没有初始化则初始化
被动使用
- 类加载阶段不会执行 Initialization 阶段。比如:静态内部类。
- 除了主动使用的七种情况,其他使用java类的方式都被看作是对类的被动使用,都不会导致类的初始化。
jvm 监控工具
JDK 自带工具
如果 java 进程关闭了默认开启的UsePerfData参数-XX:-UsePerfData,那么jps命令和jstat命令无法探知该Java进程
jps
java process status
显示指定系统内所有的 hotspot 进程,用于查询正在运行的 jvm 进程
对于本地虚拟机进程来说,进程的本地虚拟机id与操作系统的进程id是一致的,是唯一的
jps -q # 只显示LVMID(local virtual machine id)即本地虚拟机唯一id,不显示主类的名称,只有进程号
jps -l # 输出应用程序主类的全类名 如果进程执行的是jar包,则输出jar完整路径
jps -m # 输出虚拟机进程启动时传递给主类main()的参数
jps -v # 列出虚拟机进程启动时的jvm参数
jps -V # 列出虚拟机进程启动时的jvm参数
jps -v > jps.txt # 将信息内容写入到当前目录下的jps.txt内

# 除了-q,-mlvV可以混合使用 jps -lv,jps -lvm

# [caddy@blackbox ~]$ jps -help
# usage: jps [-help]
# jps [-q] [-mlvV] [<hostid>]
#
# Definitions:
# <hostid>:      <hostname>[:<port>]
jstat
# 常用
jstat -help
jstat -compiler 2304
jstat -printcompilation 2304
jstat -gc 2304
jstat -class -t -h 3 2304 1s 10
JVM statistics monitoring tool 查看jvm统计信息
相对于监控某一时刻的信息jmap,jstat可以持续监控
监视jvm各种运行状态信息,可以显示本地或远程jvm进程中的类装载、内存、垃圾收集、JIT编译等运行数据
常用于检测GC以及memory leak
经验:
-t参数:比较java进程的启动时间以及总GC时间(GCT列),或者两次测量的间隔时间以及总GC时间的增量,来得出GC时间占运行时间的比例,如果该比例超过20%说明堆压力较大,超过90%则说明堆里几乎没有可用空间,随时都可能OOM。- memory leak:长时间运行的java程序中,可以运行jstat命令连续获取多行性能数据,并取这几行数据中OU列(已占用的老年代内存)的最小值。每个一段较长的时间重复一次1操作,获取多组OU最小值,如果这些值呈现上涨趋势,则说明该java程序的老年代内存已使用量在不断上涨,这意味着无法回收的对象在不断增加,因此很可能存在内存泄漏。
<option>类装载相关的-class显示 ClassLoader 的相关信息,类的装载、卸载数量、总空间、类装载所消耗的时间等
- GC 相关
-gc显示与GC相关的堆信息,包括Eden区、s0、s1、Old区、永久代等的容量、已用空间、GC时间合计等信息-gccapacity显示内容与-gc基本相同,但输出主要关注java堆各个区域使用到的最大、最小空间-gcutil显示内容与-gc基本相同,但输出主要关注已使用空间占总空间的百分比-gccause与-gcutil功能一样但是会额外输出导致最后一次或当前正在发生的GC产生的原因-gcnew显示新生代GC状况-gcnewcapacity显示内容与-gcnew基本相同,输出主要关注使用到的最大、最小空间-gcold显示老年代GC状况-gcoldcapacity显示内容与-gcold基本相同,输出主要关注使用到的最大、最小空间-gcpermcapacity显示永久代使用到的最大、最小空间
- JIT相关
-compiler显示JIT编译器编译过的方法、耗时等信息-printcompilation输出已经被JIT编译的方法
GC信息输出指标含义 jstat -gc
- 新生代相关
SOCs0 区总大小 字节ByteS1Cs1 区总大小 字节ByteS0Us0 区已使用大小 字节ByteS1Us1 区已使用大小ECEden 区总大小EUEden 区已使用大小
- 老年代相关
OCOld 区总大小OUOld 区已使用大小
- 方法区相关
MC方法区总大小MU方法区已使用大小CCSC压缩类空间的大小CCSU压缩类空间已使用的大小
- 其他
YGC从应用程序启动到采样时 youngGC 次数YGCT从应用程序启动到采样时 youngGC 消耗的时间 秒FGC从应用程序启动到采样时 fullGC 次数FGCT从应用程序启动到采样时 fullGC 消耗的时间GCT从应用程序启动到采样时 GC 总时间
[caddy@blackbox ~]$ jstat -help
Usage: jstat -help|-options
       jstat -<option> [-t] [-h<lines>] <vmid> [<interval> [<count>]]
        [-t] 显示程序的运行时间单位秒
        [-h<lines>] 周期性数据输出时,输出多少行数据后输出一个表头信息
        <vmid> jvm进程id
        <interval> 查询间隔 单位默认ms 查询一次
        <count> 查询的总次数
Definitions:
  <option>      An option reported by the -options option
  <vmid>        Virtual Machine Identifier. A vmid takes the following form:
                     <lvmid>[@<hostname>[:<port>]]
                Where <lvmid> is the local vm identifier for the target
                Java virtual machine, typically a process id; <hostname> is
                the name of the host running the target Java virtual machine;
                and <port> is the port number for the rmiregistry on the
                target host. See the jvmstat documentation for a more complete
                description of the Virtual Machine Identifier.
  <lines>       Number of samples between header lines.
  <interval>    Sampling interval. The following forms are allowed:
                    <n>["ms"|"s"]
                Where <n> is an integer and the suffix specifies the units as
                milliseconds("ms") or seconds("s"). The default units are "ms".
  <count>       Number of samples to take before terminating.
  -J<flag>      Pass <flag> directly to the runtime system.
[caddy@blackbox ~]$ jstat -class -t -h 3 2304 1s 10
Timestamp       Loaded  Bytes  Unloaded  Bytes     Time
         3358.8  61697 126063.3     1952  2050.0      30.14
         3359.8  61697 126063.3     1952  2050.0      30.14
         3360.8  61697 126063.3     1952  2050.0      30.14
Timestamp       Loaded  Bytes  Unloaded  Bytes     Time
         3361.8  61697 126063.3     1952  2050.0      30.14
[caddy@blackbox ~]$ jstat -compiler 2304
Compiled Failed Invalid   Time   FailedType FailedMethod
   66470      5       0   226.91          1 com/intellij/psi/util/PsiTreeUtilKt walkUpToCommonParent
[caddy@blackbox ~]$ jstat -printcompilation 2304
Compiled  Size  Type Method
   66470      5    1 com/intellij/remoteServer/configuration/deployment/DeploymentSourceType getId
[caddy@blackbox ~]$ jstat -gc 2304
 S0C    S1C    S0U    S1U      EC       EU        OC         OU       MC     MU    CCSC   CCSU   YGC     YGCT    FGC    FGCT     GCT
85184.0 85184.0  0.0   2291.8 681600.0 672369.2 1245184.0   358924.7  407152.0 385765.5 55076.0 47651.3    107    1.022   0      0.000    1.022
jinfo
configuration info for java 查看jvm配置参数信息,也可以调整虚拟机配置参数
# 常用
jinfo -help
jinfo -sysprops 7379
jinfo -flags 7880
jinfo -flag PrintGCDetails 8320
jinfo -flag +PrintGCDetails 8320 # 开启 PrintGCDetails
jinfo -flag MaxHeapFreeRatio 8320
jinfo -flag MaxHeapFreeRatio=10 8320 # 设置 MaxHeapFreeRatio=10
java -XX:+PrintFlagsFinal -version | grep manageable
jinfo -flag UseTLAB 3164
jinfo -flag NewRatio 3164
jinfo -flag SurvivorRatio 3164
- 查看
jinfo -sysprops PID可以查看由System.getProperties()取得的参数jinfo -flags PID查看曾赋过值的一些参数- jinfo -flag 具体参数 PID 查看某个java进程的具体参数的值
- 修改 (只有被标记为manageable的参数可以使用jinfo -flag 修改)
- 查看被标记为manageable的参数
java -XX:+PrintFlagsFinal -version | grep manageable - boolean类型
jinfo -flag +/-具体参数 PID
- 非boolean类型
jinfo -flag 具体参数=具体参数值 PID
- 查看被标记为manageable的参数
- 拓展
java -XX:+PrintFlagsInitial查看所有JVM参数启动的初始值java -XX:+PrintFlagsFinal查看所有JVM参数的最终值java -XX:+PrintCommandLineFlags查看那些已经被用户或者JVM设置过的详细的XX参数的名称和值
[caddy@blackbox ~]$ jinfo -help
Usage:
    jinfo [option] <pid>
        (to connect to running process)
    jinfo [option] <executable <core>
        (to connect to a core file)
    jinfo [option] [server_id@]<remote server IP or hostname>
        (to connect to remote debug server)

where <option> is one of:
    -flag <name>         to print the value of the named VM flag
    -flag [+|-]<name>    to enable or disable the named VM flag
    -flag <name>=<value> to set the named VM flag to the given value
    -flags               to print VM flags
    -sysprops            to print Java system properties
    <no option>          to print both of the above
    -h | -help           to print this help message
[caddy@blackbox ~]$ sudo jinfo -sysprops 7379
Attaching to process ID 7379, please wait...
Debugger attached successfully.
Server compiler detected.
JVM version is 25.241-b07
java.runtime.name = Java(TM) SE Runtime Environment
java.vm.version = 25.241-b07......
[caddy@blackbox ~]$ sudo jinfo -flags 7880
Attaching to process ID 7880, please wait...
Debugger attached successfully.
Server compiler detected.
JVM version is 25.241-b07
Non-default VM flags: -XX:CICompilerCount=4 -XX:InitialHeapSize=629145600 -XX:MaxHeapSize=629145600 -XX:MaxNewSize=209715200 -XX:MinHeapDeltaBytes=524288 -XX:NewSize=209715200 -XX:OldSize=419430400 -XX:SurvivorRatio=8 -XX:+UseCompressedClassPointers -XX:+UseCompressedOops -XX:+UseFastUnorderedTimeStamps -XX:+UseParallelGC
Command line:  -XX:SurvivorRatio=8 -XX:SurvivorRatio=8 -Xms600M -Xmx600M -Dfile.encoding=UTF-8 -Duser.country=US -Duser.language=en -Duser.variant
[caddy@blackbox ~]$ jinfo -flag PrintGCDetails 8320
-XX:-PrintGCDetails
[caddy@blackbox ~]$ jinfo -flag +PrintGCDetails 8320
[caddy@blackbox ~]$ jinfo -flag PrintGCDetails 8320
-XX:+PrintGCDetails
[caddy@blackbox ~]$ jinfo -flag MaxHeapFreeRatio 8320
-XX:MaxHeapFreeRatio=100
[caddy@blackbox ~]$ jinfo -flag MaxHeapFreeRatio=10 8320
[caddy@blackbox ~]$ jinfo -flag MaxHeapFreeRatio 8320
-XX:MaxHeapFreeRatio=10
[caddy@blackbox ~]$ java -XX:+PrintFlagsFinal -version | grep manageable
     intx CMSAbortablePrecleanWaitMillis            = 100                                 {manageable}
     intx CMSTriggerInterval                        = -1                                  {manageable}
     intx CMSWaitDuration                           = 2000                                {manageable}
     bool HeapDumpAfterFullGC                       = false                               {manageable}
     bool HeapDumpBeforeFullGC                      = false                               {manageable}
     bool HeapDumpOnOutOfMemoryError                = false                               {manageable}
    ccstr HeapDumpPath                              =                                     {manageable}
    uintx MaxHeapFreeRatio                          = 100                                 {manageable}
    uintx MinHeapFreeRatio                          = 0                                   {manageable}
     bool PrintClassHistogram                       = false                               {manageable}
     bool PrintClassHistogramAfterFullGC            = false                               {manageable}
     bool PrintClassHistogramBeforeFullGC           = false                               {manageable}
     bool PrintConcurrentLocks                      = false                               {manageable}
     bool PrintGC                                   = false                               {manageable}
     bool PrintGCDateStamps                         = false                               {manageable}
     bool PrintGCDetails                            = false                               {manageable}
     bool PrintGCID                                 = false                               {manageable}
     bool PrintGCTimeStamps                         = false                               {manageable}
java version "1.8.0_241"
Java(TM) SE Runtime Environment (build 1.8.0_241-b07)
Java HotSpot(TM) 64-Bit Server VM (build 25.241-b07, mixed mode)
C:\>jps
4448
2164 Jps
8324 GradleDaemon
3164 EdenSurvivortest

C:\>jinfo -flag UseTLAB 3164
-XX:+UseTLAB

C:\>jinfo -flag NewRatio 3164
-XX:NewRatio=2

C:\>jinfo -flag SurvivorRatio 3164
-XX:SurvivorRatio=8
jmap
# 常用
jmap -h
jmap -dump:format=b,file=/home/caddy/a.hprof PID # format=b 使导出文件符合dump读取规范
jmap -dump:live,format=b,file=/home/caddy/b.hprof PID

# 自动生成dump文件,jvm命令行参数(当OOM时,导出应用程序的当前heap dump)
-XX:+HeapDumpOnOutOfMemoryError -XX:HeapDumpPath=/home/caddy/c.hprof

jmap -heap 10603
jmap -heap 10603 > /home/caddy/a.txt
jmap -histo 10603
jmap -histo 10603 > /home/caddy/b.txt
JVM memory map
相较于jstat可以连续监控,jmap只是某一时刻的监控信息
获取dump文件(堆转储快照文件,二进制文件)
获取目标java进程内存相关信息,包括java堆各个区域的使用情况、堆中对象的统计信息、类加载信息等
基本 <option>
-dump生成dump文件-dump:live只保存 heap 中存活的对象(dump文件会小一些,推荐使用加live)
-heap输出整个堆空间的详细信息,包括GC的使用、堆配置信息,以及内存的使用信息等-histo输出堆中对象的统计信息,包括类、实例数量和合计容量-histo:live只统计堆中的存活对象
-permstat仅限 linux 和 solaris 平台,以 ClassLoader 为统计口径输出永久代的内存状态信息-finalizerinfo仅限 linux 和 solaris 平台,显示在 F-Queue 中等待 Finalizer 线程执行 finalize方法的对象-F仅限 linux 和 solaris 平台,当虚拟机进程堆-dump选项没有任何响应时,使用此选项 强制 执行生成dump文件
heap dump堆转储文件,指一个java进程在某个时间点的内存快照,保存信息如下
- All Objects
- All Classes
- GCRoots
- Thread Stack & Local variables
使用自动生成dump文件时,通常在写 heap dump 前会出发一次 FUllGC 所以heap dump文件里保存的都是FullGC后留下的对象信息。
注意:生成dump文件比较耗时。
说明:
由于 jmap 将访问堆中的所有对象,为了保证在此过程中不被应用线程干扰,jmap 需要借助安全点机制,让所有线程停留在不改变堆中数据的状态,由jmap导出的堆快照必定是安全点位置的,这可能导致基于该 heap dump 的分析结果存在偏差。
比如:某些对象的生命周期在两个安全点之间,那么 :live 选项将无法探知到这些对象,
此外,如果某个线程长时间无法跑到安全点,jmap 将一直等下去。
jstat 则不同,GC会主动将 jstat 所需要的摘要数据保存在固定位置中,而 jstat 只需直接读取即可,实时读取
[caddy@blackbox ~]$ jmap -h
Usage:
    jmap [option] <pid>
        (to connect to running process)
    jmap [option] <executable <core>
        (to connect to a core file)
    jmap [option] [server_id@]<remote server IP or hostname>
        (to connect to remote debug server)

where <option> is one of:
    <none>               to print same info as Solaris pmap
    -heap                to print java heap summary
    -histo[:live]        to print histogram of java object heap; if the "live"
                         suboption is specified, only count live objects
    -clstats             to print class loader statistics
    -finalizerinfo       to print information on objects awaiting finalization
    -dump:<dump-options> to dump java heap in hprof binary format
                         dump-options:
                           live         dump only live objects; if not specified,
                                        all objects in the heap are dumped.
                           format=b     binary format
                           file=<file>  dump heap to <file>
                         Example: jmap -dump:live,format=b,file=heap.bin <pid>
    -F                   force. Use with -dump:<dump-options> <pid> or -histo
                         to force a heap dump or histogram when <pid> does not
                         respond. The "live" suboption is not supported
                         in this mode.
    -h | -help           to print this help message
    -J<flag>             to pass <flag> directly to the runtime system
[caddy@blackbox ~]$ jmap -dump:live,format=b,file=/home/caddy/b.hprof 10390
Dumping heap to /home/caddy/b.hprof ...
Heap dump file created
[caddy@blackbox ~]$ sudo jmap -heap 10603
Attaching to process ID 10603, please wait...
Debugger attached successfully.
Server compiler detected.
JVM version is 25.241-b07

using thread-local object allocation.
Parallel GC with 10 thread(s)

Heap Configuration:
   MinHeapFreeRatio         = 0
   MaxHeapFreeRatio         = 100
   MaxHeapSize              = 8417968128 (8028.0MB)
   NewSize                  = 175112192 (167.0MB)
   MaxNewSize               = 2805989376 (2676.0MB)
   OldSize                  = 351272960 (335.0MB)
   NewRatio                 = 2
   SurvivorRatio            = 8
   MetaspaceSize            = 21807104 (20.796875MB)
   CompressedClassSpaceSize = 1073741824 (1024.0MB)
   MaxMetaspaceSize         = 17592186044415 MB
   G1HeapRegionSize         = 0 (0.0MB)

Heap Usage:
PS Young Generation
Eden Space:
   capacity = 132120576 (126.0MB)
   used     = 2642424 (2.5200119018554688MB)
   free     = 129478152 (123.47998809814453MB)
   2.0000094459170388% used
From Space:
   capacity = 21495808 (20.5MB)
   used     = 0 (0.0MB)
   free     = 21495808 (20.5MB)
   0.0% used
To Space:
   capacity = 21495808 (20.5MB)
   used     = 0 (0.0MB)
   free     = 21495808 (20.5MB)
   0.0% used
PS Old Generation
   capacity = 351272960 (335.0MB)
   used     = 0 (0.0MB)
   free     = 351272960 (335.0MB)
   0.0% used
[caddy@blackbox ~]$ jmap -histo 10946

 num     #instances         #bytes  class name
----------------------------------------------
   1:           401        4437040  [I
   2:          1715         188168  [C
   3:          4652         148864  java.util.Random
   4:          4656         111744  java.util.concurrent.atomic.AtomicLong
   5:           534         101664  [Ljava.lang.Object;
   6:          4652          74432  org.bougainvillea.java.jvm.runtime.heap.Picture
jhat
# 常用
jhat -help
jhat c.hprof
jhat -port 6565 c.hprof
JVM heap analysis tool 与 jmap 配合使用,分析heap dump文件。jhat 内置一个微型的 http/html 服务器,端口默认 7000,生成dump文件的分析结果后,用户可以在浏览器中查看分析结果。支持OQL查询 http://127.0.0.1:7000/oql/
select s from java.lang.String s where s.value.length >1000
jhat在jdk9 jdk10已经被删除,官方推荐使用 VisualVM代替。
jhat <option>参数:-port 6565 设置jhat http server 端口
[caddy@blackbox ~]$ jhat -help
Usage:  jhat [-stack <bool>] [-refs <bool>] [-port <port>] [-baseline <file>] [-debug <int>] [-version] [-h|-help] <file>

	-J<flag>          Pass <flag> directly to the runtime system. For
			  example, -J-mx512m to use a maximum heap size of 512MB
	-stack false:     Turn off tracking object allocation call stack.
	-refs false:      Turn off tracking of references to objects
	-port <port>:     Set the port for the HTTP server.  Defaults to 7000
	-exclude <file>:  Specify a file that lists data members that should
			  be excluded from the reachableFrom query.
	-baseline <file>: Specify a baseline object dump.  Objects in
			  both heap dumps with the same ID and same class will
			  be marked as not being "new".
	-debug <int>:     Set debug level.
			    0:  No debug output
			    1:  Debug hprof file parsing
			    2:  Debug hprof file parsing, no server
	-version          Report version number
	-h|-help          Print this help and exit
	<file>            The file to read

For a dump file that contains multiple heap dumps,
you may specify which dump in the file
by appending "#<number>" to the file name, i.e. "foo.hprof#3".

All boolean options default to "true"
[caddy@blackbox ~]$ jhat c.hprof
Reading from c.hprof...
Dump file created Sun Feb 28 16:34:20 CST 2021
Snapshot read, resolving...
Resolving 4169 objects...
Chasing references, expect 0 dots
Eliminating duplicate references
Snapshot resolved.
Started HTTP server on port 7000
Server is ready.
[caddy@blackbox ~]$ jhat -port 6565 c.hprof
Reading from c.hprof...
Dump file created Sun Feb 28 16:34:20 CST 2021
Snapshot read, resolving...
Resolving 4169 objects...
Chasing references, expect 0 dots
Eliminating duplicate references
Snapshot resolved.
Started HTTP server on port 6565
Server is ready.
jstack
JVM stack trace 虚拟机堆栈跟踪(生成JVM某一线程当前时刻的线程快照)
作用:
定位线程出现长时间停顿的原因:线程间死锁、死循环、请求外部资源导致的长时间等待等问题。
当线程出现停顿时,就可以使用 jstack 现实各个线程调用的堆栈情况。
在thread dump中留意下面几种状态
- Deadlock 死锁 (重点关注)
- Waiting on condition 等待资源 (重点关注)
- Waiting on monitor entry 等待获取同步监视器 (重点关注)
- Blocked 阻塞 (重点关注)
- Runnable 执行中
- Suspended 暂停
- Object.wait() 或 TIMED_WAITING
- 停止 Parked
[caddy@blackbox ~]$ jstack -help
Usage:
    jstack [-l] <pid>
        (to connect to running process)
    jstack -F [-m] [-l] <pid>
        (to connect to a hung process)
    jstack [-m] [-l] <executable> <core>
        (to connect to a core file)
    jstack [-m] [-l] [server_id@]<remote server IP or hostname>
        (to connect to a remote debug server)

Options:
    -F  to force a thread dump. Use when jstack <pid> does not respond (process is hung) 当正常输出的请求不被响应时,强制输出线程堆栈
    -m  to print both java and native frames (mixed mode)                                如果调用到本地方法的话,可以现实c/c++的堆栈
    -l  long listing. Prints additional information about locks                          除堆栈外,显示关于锁的附加信息
    -h or -help to print this help message
[caddy@blackbox ~]$ jstack 12393
2021-02-28 17:20:04
Full thread dump Java HotSpot(TM) 64-Bit Server VM (25.241-b07 mixed mode):

"Attach Listener" #10 daemon prio=9 os_prio=0 tid=0x00007f06dc001000 nid=0x30b3 waiting on condition [0x0000000000000000]
   java.lang.Thread.State: RUNNABLE

"Service Thread" #9 daemon prio=9 os_prio=0 tid=0x00007f073c0d8000 nid=0x3082 runnable [0x0000000000000000]
   java.lang.Thread.State: RUNNABLE

"C1 CompilerThread3" #8 daemon prio=9 os_prio=0 tid=0x00007f073c0cd000 nid=0x3081 waiting on condition [0x0000000000000000]
   java.lang.Thread.State: RUNNABLE

"C2 CompilerThread2" #7 daemon prio=9 os_prio=0 tid=0x00007f073c0cb000 nid=0x3080 waiting on condition [0x0000000000000000]
   java.lang.Thread.State: RUNNABLE

"C2 CompilerThread1" #6 daemon prio=9 os_prio=0 tid=0x00007f073c0c9800 nid=0x307f waiting on condition [0x0000000000000000]
   java.lang.Thread.State: RUNNABLE

"C2 CompilerThread0" #5 daemon prio=9 os_prio=0 tid=0x00007f073c0c6800 nid=0x307e waiting on condition [0x0000000000000000]
   java.lang.Thread.State: RUNNABLE

"Signal Dispatcher" #4 daemon prio=9 os_prio=0 tid=0x00007f073c0c5000 nid=0x307d runnable [0x0000000000000000]
   java.lang.Thread.State: RUNNABLE

"Finalizer" #3 daemon prio=8 os_prio=0 tid=0x00007f073c094000 nid=0x307c in Object.wait() [0x00007f06fd4e6000]
   java.lang.Thread.State: WAITING (on object monitor)
	at java.lang.Object.wait(Native Method)
	- waiting on <0x0000000718c08ee0> (a java.lang.ref.ReferenceQueue$Lock)
	at java.lang.ref.ReferenceQueue.remove(ReferenceQueue.java:144)
	- locked <0x0000000718c08ee0> (a java.lang.ref.ReferenceQueue$Lock)
	at java.lang.ref.ReferenceQueue.remove(ReferenceQueue.java:165)
	at java.lang.ref.Finalizer$FinalizerThread.run(Finalizer.java:216)

"Reference Handler" #2 daemon prio=10 os_prio=0 tid=0x00007f073c08f800 nid=0x307b in Object.wait() [0x00007f06fd5e7000]
   java.lang.Thread.State: WAITING (on object monitor)
	at java.lang.Object.wait(Native Method)
	- waiting on <0x0000000718c06c00> (a java.lang.ref.Reference$Lock)
	at java.lang.Object.wait(Object.java:502)
	at java.lang.ref.Reference.tryHandlePending(Reference.java:191)
	- locked <0x0000000718c06c00> (a java.lang.ref.Reference$Lock)
	at java.lang.ref.Reference$ReferenceHandler.run(Reference.java:153)

"main" #1 prio=5 os_prio=0 tid=0x00007f073c00c000 nid=0x306f waiting on condition [0x00007f0742f2a000]
   java.lang.Thread.State: TIMED_WAITING (sleeping)
	at java.lang.Thread.sleep(Native Method)
	at org.bougainvillea.java.jvm.runtime.heap.OOMTest.main(OOMTest.java:19)

"VM Thread" os_prio=0 tid=0x00007f073c086000 nid=0x307a runnable

"GC task thread#0 (ParallelGC)" os_prio=0 tid=0x00007f073c021000 nid=0x3070 runnable

"GC task thread#1 (ParallelGC)" os_prio=0 tid=0x00007f073c023000 nid=0x3071 runnable

"GC task thread#2 (ParallelGC)" os_prio=0 tid=0x00007f073c024800 nid=0x3072 runnable

"GC task thread#3 (ParallelGC)" os_prio=0 tid=0x00007f073c026800 nid=0x3073 runnable

"GC task thread#4 (ParallelGC)" os_prio=0 tid=0x00007f073c028000 nid=0x3074 runnable

"GC task thread#5 (ParallelGC)" os_prio=0 tid=0x00007f073c02a000 nid=0x3075 runnable

"GC task thread#6 (ParallelGC)" os_prio=0 tid=0x00007f073c02b800 nid=0x3076 runnable

"GC task thread#7 (ParallelGC)" os_prio=0 tid=0x00007f073c02d800 nid=0x3077 runnable

"GC task thread#8 (ParallelGC)" os_prio=0 tid=0x00007f073c02f000 nid=0x3078 runnable

"GC task thread#9 (ParallelGC)" os_prio=0 tid=0x00007f073c031000 nid=0x3079 runnable

"VM Periodic Task Thread" os_prio=0 tid=0x00007f073c0db000 nid=0x3083 waiting on condition

JNI global references: 5
jcmd
# 常用
jcmd 2304 help
jcmd -h
jcmd 2304 VM.flags
# 显示命令参数
jcmd -l # 或 jps -lm
jcmd # 或 jps -l
jdk7 以后,新增命令行工具 jcmd
多功能命令行工具,可以用来实现除 jstat 之外所有命令的功能
jcmd 拥有 jmap 的大部分功能,并且 Oracle 推荐使用 jcmd 替代 jmap jcmd 等价于 jps -l
jcmd PID help 查看该 PID 支持哪些 jcmd 命令 jcmd PID 指令 使用指令
[caddy@blackbox ~]$ jcmd -h
Usage: jcmd <pid | main class> <command ...|PerfCounter.print|-f file>
   or: jcmd -l
   or: jcmd -h

  command must be a valid jcmd command for the selected jvm.
  Use the command "help" to see which commands are available.
  If the pid is 0, commands will be sent to all Java processes.
  The main class argument will be used to match (either partially
  or fully) the class used to start Java.
  If no options are given, lists Java processes (same as -p).

  PerfCounter.print display the counters exposed by this process
  -f  read and execute commands from the file
  -l  list JVM processes on the local machine  列出所有JVM进程
  -h  this help
[caddy@blackbox ~]$ jps -lm
2304 com.intellij.idea.Main
8245 org.gradle.launcher.daemon.bootstrap.GradleDaemon 6.7
12726 sun.tools.jps.Jps -lm
[caddy@blackbox ~]$ jcmd
2304 com.intellij.idea.Main
8245 org.gradle.launcher.daemon.bootstrap.GradleDaemon 6.7
12748 sun.tools.jcmd.JCmd
[caddy@blackbox ~]$ jcmd -l
2304 com.intellij.idea.Main
12866 sun.tools.jcmd.JCmd -l
8245 org.gradle.launcher.daemon.bootstrap.GradleDaemon 6.7
[caddy@blackbox ~]$ jcmd 2304 help
2304:
The following commands are available:
Compiler.CodeHeap_Analytics
Compiler.codecache
Compiler.codelist
Compiler.directives_add
Compiler.directives_clear
Compiler.directives_print
Compiler.directives_remove
Compiler.queue
GC.class_histogram
GC.class_stats
GC.finalizer_info
GC.heap_dump
GC.heap_info
GC.run
GC.run_finalization
JFR.check
JFR.configure
JFR.dump
JFR.start
JFR.stop
JVMTI.agent_load
JVMTI.data_dump
ManagementAgent.start
ManagementAgent.start_local
ManagementAgent.status
ManagementAgent.stop
Thread.print
VM.class_hierarchy
VM.classloader_stats
VM.classloaders
VM.command_line
VM.dynlibs
VM.flags
VM.info
VM.log
VM.metaspace
VM.native_memory
VM.print_touched_methods
VM.set_flag
VM.stringtable
VM.symboltable
VM.system_properties
VM.systemdictionary
VM.uptime
VM.version
help

For more information about a specific command use 'help <command>'.
[caddy@blackbox ~]$ jcmd 2304 VM.flags
2304:
-XX:CICompilerCount=2 -XX:ErrorFile=/home/caddy/java_error_in_idea_%p.log -XX:+HeapDumpOnOutOfMemoryError -XX:HeapDumpPath=/home/caddy/java_error_in_idea_.hprof -XX:InitialHeapSize=2147483648 -XX:MaxHeapSize=4294967296 -XX:MaxNewSize=872415232 -XX:MaxTenuringThreshold=6 -XX:MinHeapDeltaBytes=196608 -XX:NewSize=872415232 -XX:NonNMethodCodeHeapSize=5825164 -XX:NonProfiledCodeHeapSize=259231418 -XX:OldSize=1275068416 -XX:-OmitStackTraceInFastThrow -XX:ProfiledCodeHeapSize=259231418 -XX:ReservedCodeCacheSize=524288000 -XX:+SegmentedCodeCache -XX:SoftRefLRUPolicyMSPerMB=50 -XX:+UseCompressedClassPointers -XX:+UseCompressedOops -XX:+UseConcMarkSweepGC
jstatd
远程主机信息收集。jps、jstat等支持远程计算机的监控,为了启用远程监控,需要配合使用jstatd工具。jstatd是一个 RMI 服务端程序,它的作用相当于代理服务器,建立本地计算机与远程监控工具的通信,jstatd服务器将本机的java应用程序信息传递到远程计算机。
javap 反编译
# 将内容写入到当前目录下的 test.txt 文件内。-p 表示输出 private 权限修饰符的属性
javap -v -p MetaspaceOOMTest.class > test.txt
example
运行时加命令行参数 -XX:+PrintGCDetails 运行时打印内存详细信息
Heap
 PSYoungGen      total 179200K, used 6144K [0x00000000f3800000, 0x0000000100000000, 0x0000000100000000)
  eden space 153600K, 4% used [0x00000000f3800000,0x00000000f3e00188,0x00000000fce00000)
  from space 25600K, 0% used [0x00000000fe700000,0x00000000fe700000,0x0000000100000000)
  to   space 25600K, 0% used [0x00000000fce00000,0x00000000fce00000,0x00000000fe700000)
 ParOldGen       total 409600K, used 0K [0x00000000da800000, 0x00000000f3800000, 0x00000000f3800000)
  object space 409600K, 0% used [0x00000000da800000,0x00000000da800000,0x00000000f3800000)
 Metaspace       used 2637K, capacity 4486K, committed 4864K, reserved 1056768K
  class space    used 281K, capacity 386K, committed 512K, reserved 1048576K
Jconsole
jvisualvm
jdk1.8.0_191/bin/jvisualvm.exe
- 当配置Path java环境变量可以直接输入jvisualvm启动
- 工具-插件-Virtual GC
MemoryAnalyzer
# wget 外国语大学国内源
wget https://mirrors.bfsu.edu.cn/eclipse/mat/1.11.0/rcp/MemoryAnalyzer-1.11.0.20201202-linux.gtk.x86_64.zip
# link
ln -s /opt/mat/MemoryAnalyzer /usr/local/bin/mat
Jprofiler
Arthas
- https://github.com/alibaba/arthas
- https://arthas.aliyun.com/zh-cn/
- https://arthas.aliyun.com/doc/quick-start.html
- 全量安装最新版本
# 下载arthas-boot.jar
curl -O https://arthas.aliyun.com/arthas-boot.jar
# java -jar的方式启动:
java -jar arthas-boot.jar
# 打印帮助信息
java -jar arthas-boot.jar -h
# 使用 aliyun 镜像加速
java -jar arthas-boot.jar --repo-mirror aliyun --use-http

# Arthas 支持在 Linux/Unix/Mac 等平台上一键安装,请复制以下内容,并粘贴到命令行中,敲 回车 执行即可:
curl -L https://arthas.aliyun.com/install.sh | sh
Java Flight Recorder
- 取样对象需要启动参数
-XX:+UnlockCommercialFeatures-XX:+FlightRecorder
GCViewer
GC Easy
jhsdb
jmeter
wget https://mirrors.bfsu.edu.cn/apache/jmeter/binaries/apache-jmeter-5.4.1.tgz
ln -s /opt/apache-jmeter-5.4.1/bin/jmeter /usr/local/bin/jmeter
the Archive Tool
https://dev.java/learn/jvm/tools/core/jar/
-c, --create创建档案-v, --verbose在标准输出中生成详细输出-f, --file=FILE档案文件名。省略时, 基于操作 使用 stdin 或 stdout-e, --main-class=CLASSNAME捆绑到模块化或可执行 jar 档案的独立应用程序 的应用程序入口点-C DIR更改为指定的目录并包含 以下文件
demo
# 需要手动创建目录
mkdir -p out/mods

# -c, --create               创建档案
# -v, --verbose              在标准输出中生成详细输出
# -f, --file=FILE            档案文件名。省略时, 基于操作 使用 stdin 或 stdout
# -e, --main-class=CLASSNAME 捆绑到模块化或可执行 jar 档案的独立应用程序 的应用程序入口点
# -C DIR                     更改为指定的目录并包含 以下文件
jar -cvfe out/mods/App.jar org.bougainvilleas.svc.cli.Client -C out/cli .
jar -cvf out/mods/api.jar -C out/api .
jar --help
[caddy@vbox ~]$ java -version
java version "17.0.2" 2022-01-18 LTS
Java(TM) SE Runtime Environment (build 17.0.2+8-LTS-86)
Java HotSpot(TM) 64-Bit Server VM (build 17.0.2+8-LTS-86, mixed mode, sharing)

[caddy@vbox ~]$ jar --help
Usage: jar [OPTION...] [ [--release VERSION] [-C dir] files] ...
jar creates an archive for classes and resources, and can manipulate or
restore individual classes or resources from an archive.

 Examples:
 # Create an archive called classes.jar with two class files:
 jar --create --file classes.jar Foo.class Bar.class
 # Create an archive using an existing manifest, with all the files in foo/:
 jar --create --file classes.jar --manifest mymanifest -C foo/ .
 # Create a modular jar archive, where the module descriptor is located in
 # classes/module-info.class:
 jar --create --file foo.jar --main-class com.foo.Main --module-version 1.0
     -C foo/ classes resources
 # Update an existing non-modular jar to a modular jar:
 jar --update --file foo.jar --main-class com.foo.Main --module-version 1.0
     -C foo/ module-info.class
 # Create a multi-release jar, placing some files in the META-INF/versions/9 directory:
 jar --create --file mr.jar -C foo classes --release 9 -C foo9 classes

To shorten or simplify the jar command, you can specify arguments in a separate
text file and pass it to the jar command with the at sign (@) as a prefix.

 Examples:
 # Read additional options and list of class files from the file classes.list
 jar --create --file my.jar @classes.list


 Main operation mode:

  -c, --create               Create the archive
  -i, --generate-index=FILE  Generate index information for the specified jar
                             archives
  -t, --list                 List the table of contents for the archive
  -u, --update               Update an existing jar archive
  -x, --extract              Extract named (or all) files from the archive
  -d, --describe-module      Print the module descriptor, or automatic module name
      --validate             Validate the contents of the jar archive. This option
                             will validate that the API exported by a multi-release
                             jar archive is consistent across all different release
                             versions.

 Operation modifiers valid in any mode:

  -C DIR                     Change to the specified directory and include the
                             following file
  -f, --file=FILE            The archive file name. When omitted, either stdin or
                             stdout is used based on the operation
      --release VERSION      Places all following files in a versioned directory
                             of the jar (i.e. META-INF/versions/VERSION/)
  -v, --verbose              Generate verbose output on standard output

 Operation modifiers valid only in create and update mode:

  -e, --main-class=CLASSNAME The application entry point for stand-alone
                             applications bundled into a modular, or executable,
                             jar archive
  -m, --manifest=FILE        Include the manifest information from the given
                             manifest file
  -M, --no-manifest          Do not create a manifest file for the entries
      --module-version=VERSION    The module version, when creating a modular
                             jar, or updating a non-modular jar
      --hash-modules=PATTERN Compute and record the hashes of modules
                             matched by the given pattern and that depend upon
                             directly or indirectly on a modular jar being
                             created or a non-modular jar being updated
  -p, --module-path          Location of module dependence for generating
                             the hash

 Operation modifiers valid only in create, update, and generate-index mode:

  -0, --no-compress          Store only; use no ZIP compression

 Other options:

  -?, -h, --help[:compat]    Give this, or optionally the compatibility, help
      --help-extra           Give help on extra options
      --version              Print program version

 An archive is a modular jar if a module descriptor, 'module-info.class', is
 located in the root of the given directories, or the root of the jar archive
 itself. The following operations are only valid when creating a modular jar,
 or updating an existing non-modular jar: '--module-version',
 '--hash-modules', and '--module-path'.

 Mandatory or optional arguments to long options are also mandatory or optional
 for any corresponding short options.
Jlink Assemble and Optimize a Set of Modules
https://dev.java/learn/jvm/tools/core/jlink/
-v, --verbose启用详细跟踪--compress=<0|1|2>Enable compression of resources:- Level 0: No compression
- Level 1: Constant string
- sharing Level 2: ZIP
-p, --module-path <path>Module path.--add-modules <mod>[,<mod>...]- Root modules to resolve in addition to the initial modules.
<mod>can also be ALL-MODULE-PATH.
--launcher <name>=<module>[/<mainclass>]- Add a launcher command of the given name for the module and the main class if specified
- 如果 创建 jar 包时
jar -cvfe out/mods/App.jar org.bougainvilleas.svc.cli.Client -C out/cli . - 使用 -e 指定 main class
org.bougainvilleas.svc.cli.Client --launcher <name>=<module>[/<mainclass>]可以省略[/<mainclass>]
--output <path>Location of output path
demo
# 需要手动创建 目录
mkdir -p out/jlink

# 单模块
jlink -v --compress=0 -p out/mods/:$JAVA_HOME/jmods --add-modules cli --launcher app=cli --output out/jlink/image
jlink -v --compress=1 -p out/mods/:$JAVA_HOME/jmods --add-modules cli --launcher app=cli --output out/jlink/image
jlink -v --compress=2 -p out/mods/:$JAVA_HOME/jmods --add-modules cli --launcher app=cli --output out/jlink/image

# 多模块
jlink -v -p out/mods/:$JAVA_HOME/jmods --add-modules cli,svc --launcher app=cli --output out/jlink/image
jlink –help
[caddy@vbox ~]$ java -version
java version "17.0.2" 2022-01-18 LTS
Java(TM) SE Runtime Environment (build 17.0.2+8-LTS-86)
Java HotSpot(TM) 64-Bit Server VM (build 17.0.2+8-LTS-86, mixed mode, sharing)

[caddy@vbox ~]$ jlink --help
Usage: jlink <options> --module-path <modulepath> --add-modules <module>[,<module>...]
Possible options include:
      --add-modules <mod>[,<mod>...]    Root modules to resolve in addition to the
                                        initial modules. <mod> can also be ALL-MODULE-PATH.
      --bind-services                   Link in service provider modules and
                                        their dependences
  -c, --compress=<0|1|2>                Enable compression of resources:
                                          Level 0: No compression
                                          Level 1: Constant string sharing
                                          Level 2: ZIP
      --disable-plugin <pluginname>     Disable the plugin mentioned
      --endian <little|big>             Byte order of generated jimage
                                        (default:native)
  -h, --help, -?                        Print this help message
      --ignore-signing-information      Suppress a fatal error when signed
                                        modular JARs are linked in the image.
                                        The signature related files of the
                                        signed modular JARs are not copied to
                                        the runtime image.
      --launcher <name>=<module>[/<mainclass>]
                                        Add a launcher command of the given
                                        name for the module and the main class
                                        if specified
      --limit-modules <mod>[,<mod>...]  Limit the universe of observable
                                        modules
      --list-plugins                    List available plugins
  -p, --module-path <path>              Module path.
                                        If not specified, the JDKs jmods directory
                                        will be used, if it exists. If specified,
                                        but it does not contain the java.base module,
                                        the JDKs jmods directory will be added,
                                        if it exists.
      --no-header-files                 Exclude include header files
      --no-man-pages                    Exclude man pages
      --output <path>                   Location of output path
      --save-opts <filename>            Save jlink options in the given file
  -G, --strip-debug                     Strip debug information
      --suggest-providers [<name>,...]  Suggest providers that implement the
                                        given service types from the module path
  -v, --verbose                         Enable verbose tracing
      --version                         Version information
      @<filename>                       Read options from file
The Java Shell Tool
https://dev.java/learn/jshell-tool/
jdk9 及以上版本才有此工具 可以用来测试简单的java语句
jdk-17\bin\jshell- 帮助
/?/help
NIO example
jshell> void server(){}
|  已创建 方法 server()

jshell> /edit server
# 启动server
jshell> server()

# 新开一个jshell 启动client
jshell> client("你好")
server
import java.io.IOException;
import java.net.InetSocketAddress;
import java.nio.ByteBuffer;
import java.nio.channels.*;
import java.nio.charset.StandardCharsets;
import java.util.Iterator;
import java.util.Set;

void server()
{
    try (
            ServerSocketChannel serverSocketChannel = ServerSocketChannel.open();
            Selector selector = Selector.open();
    )
    {
        bind 端口
        serverSocketChannel.socket().bind(new InetSocketAddress(6666));
        设置非阻塞
        serverSocketChannel.configureBlocking(false);
        把serverSocketChannel注册到selector,关心OP_ACCEPT连接事件
        serverSocketChannel.register(selector, SelectionKey.OP_ACCEPT);
        while (true)
        {
            等待2秒,如果没事件返回
            if (selector.select(2000) == 0)
            {
                System.err.println("服务器等待2秒无连接");
                continue;
            }
            Set<SelectionKey> selectionKeys = selector.selectedKeys();
            Iterator<SelectionKey> keyIterator = selectionKeys.iterator();
            while (keyIterator.hasNext())
            {
                获取SelectionKey--事件
                SelectionKey selectionKey = keyIterator.next();
                System.err.println("有事件发生" + selectionKey.hashCode());
                连接事件发生才会生成socketChannel
                if (selectionKey.isAcceptable())
                {
                    此处已经确认知道发生了连接事件,所以accept不会阻塞
                    SocketChannel socketChannel = serverSocketChannel.accept();
                    将客户端socketchannel设置为非阻塞
                    socketChannel.configureBlocking(false);
                    声明接收数据的buffer
                    ByteBuffer byteBuffer = ByteBuffer.allocate(1024);
                    将生成的socketchannel注册到selector,设置为OP_READ事件,绑定buffer
                    socketChannel.register(selector, SelectionKey.OP_READ, byteBuffer);
                }
                读事件发生
                if (selectionKey.isReadable())
                {
                    通过事件selectionKey反向获取channel
                    SocketChannel channel = (SocketChannel) selectionKey.channel();
                    获取绑定的buffer
                    ByteBuffer buffer = (ByteBuffer) selectionKey.attachment();
                    /**
                     将buffer数据读取到channel,
                     大多数情况是返回一个大于等于0的值,表示将多少数据读入byteBuffer缓冲区
                     然而,当客户端   正常    断开连接的时候,它就会返回-1。
                     虽然这个断开连接信号也是可读数据(会使得isReadable()为true),
                     但是
                     这个信号无法被读入byteBuffer,
                     也就是说一旦返回-1,那么无论再继续读多少次都是-1,
                     会引发可读事件isReadable(),会一直死循环读取buffer
                     */
                    int read = channel.read(buffer);
                    if (read == -1)
                    {//-1标识读完数据可以关闭通道,一次网络连接中断
                        注销事件,会将key从selector中移除
                        selectionKey.channel();
                        关闭通道
                        channel.close();
                    }
                    else
                    {
                        System.err.println(new String(buffer.array(), StandardCharsets.UTF_8));
                    }
                }
                keyIterator.remove();
            }
        }
    }
    catch (IOException e)
    {
        e.printStackTrace();
    }
}
client
import java.io.IOException;
import java.net.InetSocketAddress;
import java.nio.ByteBuffer;
import java.nio.channels.SocketChannel;
import java.nio.charset.StandardCharsets;

void client(String msg)
{
    try (
            SocketChannel socketChannel = SocketChannel.open();
    )
    {
        InetSocketAddress address = new InetSocketAddress("127.0.0.1", 6666);
        socketChannel.configureBlocking(false);
        if (!socketChannel.connect(address))
        {
            while (!socketChannel.finishConnect())
            {
                System.err.println("连接需要时间,客户端不会阻塞,可以做其他工作");
            }
        }
        ByteBuffer wrap = ByteBuffer.wrap(msg.getBytes(StandardCharsets.UTF_8));
        socketChannel.write(wrap);
            System.in.read();
    }
    catch (IOException e)
    {
        e.printStackTrace();
    }
}
visualvm
VisualVM is a visual tool integrating commandline JDK tools and lightweight profiling capabilities.\n Designed for both development and production time use.
jdk1.8.0_191/bin/jvisualvm.exe
当配置Path java环境变量可以直接输入jvisualvm启动。
插件:工具-插件-Virtual GC
java8之后 jdk不再附带 VisualVM
下载页面
github
运行参数配置文件
visualvm/etc/visualvm.conf
例如配置jdkhome:visualvm_jdkhome="C:\Program Files\Java\jdk-17.0.2"
运行文件
visualvm/bin/visualvm
jre docker image
JRE Docker imagejre docker 基础镜像
jre7
server-jre not jre
jce
curl -L -C - -b "oraclelicense=accept-securebackup-cookie" https://download.oracle.com/otn-pub/java/jce/7/UnlimitedJCEPolicyJDK7.zip -o jce_policy-7.zip
浏览器 download 需要登陆
glibc
curl -SL https://github.com/sgerrand/alpine-pkg-glibc/releases/download/2.34-r0/glibc-2.34-r0.apk -o glibc-2.34-r0.apk
curl -SL https://github.com/sgerrand/alpine-pkg-glibc/releases/download/2.34-r0/glibc-bin-2.34-r0.apk -o glibc-bin-2.34-r0.apk
curl -SL https://github.com/sgerrand/alpine-pkg-glibc/releases/download/2.34-r0/glibc-i18n-2.34-r0.apk -o glibc-i18n-2.34-r0.apk
Dockerfile
FROM alpine:3.15 as jre7

MAINTAINER aiclr <aiclr@qq.com>

WORKDIR app

ARG SERVER_JRE_PKG=server-jre-7u60-linux-x64.tar.gz
ARG SERVER_JRE=jdk1.7.0_60
ARG GLIBC=glibc-2.34-r0.apk
ARG GLIBC_BIN=glibc-bin-2.34-r0.apk
ARG GLIBC_I18N=glibc-i18n-2.34-r0.apk
ARG RSA_PUB=sgerrand.rsa.pub
COPY ${SERVER_JRE_PKG} ${GLIBC} ${GLIBC_BIN} ${GLIBC_I18N} ${RSA_PUB} /tmp/

RUN set -ex && \
    tar xzf /tmp/${SERVER_JRE_PKG} -C /opt && \
    find /opt/${SERVER_JRE} -maxdepth 1 -mindepth 1 | grep -v jre | xargs rm -rf && \
    sed -i 's/#networkaddress.cache.ttl=-1/networkaddress.cache.ttl=10/g' /opt/${SERVER_JRE}/jre/lib/security/java.security && \
    ln -s /opt/${SERVER_JRE}/jre/bin /opt/${SERVER_JRE}/bin && \
    ln -s /opt/${SERVER_JRE} /opt/jdk && \
    rm -rf /opt/jdk/jre/plugin \
           /opt/jdk/jre/bin/javaws \
           /opt/jdk/jre/bin/orbd \
           /opt/jdk/jre/bin/pack200 \
           /opt/jdk/jre/bin/policytool \
           /opt/jdk/jre/bin/rmid \
           /opt/jdk/jre/bin/rmiregistry \
           /opt/jdk/jre/bin/servertool \
           /opt/jdk/jre/bin/tnameserv \
           /opt/jdk/jre/bin/unpack200 \
           /opt/jdk/jre/lib/javaws.jar \
           /opt/jdk/jre/lib/deploy* \
           /opt/jdk/jre/lib/desktop \
           /opt/jdk/jre/lib/*javafx* \
           /opt/jdk/jre/lib/*jfx* \
           /opt/jdk/jre/lib/amd64/libdecora_sse.so \
           /opt/jdk/jre/lib/amd64/libprism_*.so \
           /opt/jdk/jre/lib/amd64/libfxplugins.so \
           /opt/jdk/jre/lib/amd64/libglass.so \
           /opt/jdk/jre/lib/amd64/libgstreamer-lite.so \
           /opt/jdk/jre/lib/amd64/libjavafx*.so \
           /opt/jdk/jre/lib/amd64/libjfx*.so \
           /opt/jdk/jre/lib/ext/jfxrt.jar \
           /opt/jdk/jre/lib/oblique-fonts \
           /opt/jdk/jre/lib/plugin.jar && \
    tar czf jre.tar.gz /opt/${SERVER_JRE} /opt/jdk /tmp/${GLIBC} /tmp/${GLIBC_BIN} /tmp/${GLIBC_I18N} && \
    rm -rf /tmp/* /opt/${SERVER_JRE} /opt/jdk /var/cache/apk/* /root/.cache

FROM alpine:3.15

MAINTAINER aiclr <aiclr@qq.com>

ARG SERVER_JRE=jdk1.7.0_60
ARG ALPINE_REPO=https://mirrors.bfsu.edu.cn/alpine/v3.15/main/
ARG LANGUAGE=en_US
ARG CHARCODE=UTF-8
ARG JRE=jre.tar.gz
ARG RSA_PUB=sgerrand.rsa.pub

ENV TZ=Asia/Shanghai \
    LANG=en_US.UTF-8 \
    ZONE=Asia/Shanghai \
    JAVA_HOME=/opt/jdk \
    PATH=${PATH}:/opt/jdk/bin \
    ACTIVE=${ACTIVE}:pro

COPY --from=jre7 app/${JRE} /tmp/

RUN set -ex && \
    tar xzf /tmp/${JRE} -C /tmp && \
    mv /tmp/tmp/${RSA_PUB} /etc/apk/keys/${RSA_PUB} && \
    sed -i 's/dl-cdn.alpinelinux.org/mirrors.bfsu.edu.cn/g' /etc/apk/repositories && \
    apk -U upgrade && \
    apk add --no-cache tzdata libstdc++ curl java-cacerts lsof && \
    cp -v /usr/share/zoneinfo/${ZONE} /etc/localtime && \
    echo "${ZONE}" >> /etc/timezone && \
    echo 'hosts: files mdns4_minimal [NOTFOUND=return] dns mdns4' >> /etc/nsswitch.conf && \
    apk add --allow-untrusted /tmp/tmp/*.apk && \
    /usr/glibc-compat/bin/localedef -i ${LANGUAGE} -f ${CHARCODE} ${LANG} && \
    /usr/glibc-compat/sbin/ldconfig /lib /usr/glibc-compat/lib && \
    mv /tmp/opt/${SERVER_JRE} /opt/ && \
    mv /tmp/opt/jdk /opt/ && \
    ln -sf /etc/ssl/certs/java/cacerts ${JAVA_HOME}/jre/lib/security/cacerts && \
    apk del glibc-i18n && \
    rm -rf /var/cache/apk/* /root/.cache /tmp/* /etc/apk/keys/${RSA_PUB}
build
#!/bin/bash

image_name="server-jre"
version="7u60-alpine"

echo -e "\n==> begin delete all containers of " $image_name
docker rm $(docker stop $(docker ps -a | grep $image_name | awk '{print $1}'))

echo -e "\n==> begin delete all images of " $image_name
docker rmi -f $(docker images | grep $image_name | awk '{print $3}')

echo -e "\n==> begin build your images of " $image_name
docker build -f Dockerfile -t $image_name:$version .

echo -e "\n==> begin to package your image to tar file"
docker save $image_name:$version > ./$image_name-$version.tar
jre8
server-jre not jre
jce
curl -L -C - -b "oraclelicense=accept-securebackup-cookie" https://download.oracle.com/otn-pub/java/jce/8/jce_policy-8.zip -o jce_policy-8.zip
浏览器 download 需要登陆
glibc
curl -SL https://github.com/sgerrand/alpine-pkg-glibc/releases/download/2.34-r0/glibc-2.34-r0.apk -o glibc-2.34-r0.apk
curl -SL https://github.com/sgerrand/alpine-pkg-glibc/releases/download/2.34-r0/glibc-bin-2.34-r0.apk -o glibc-bin-2.34-r0.apk
curl -SL https://github.com/sgerrand/alpine-pkg-glibc/releases/download/2.34-r0/glibc-i18n-2.34-r0.apk -o glibc-i18n-2.34-r0.apk
Dockerfile
FROM alpine:3.15 as jre8

MAINTAINER aiclr <aiclr@qq.com>

WORKDIR app

ARG SERVER_JRE_PKG=server-jre-8u311-linux-x64.tar.gz
ARG SERVER_JRE=jdk1.8.0_311
ARG JCE=jce_policy-8.zip
ARG GLIBC=glibc-2.34-r0.apk
ARG GLIBC_BIN=glibc-bin-2.34-r0.apk
ARG GLIBC_I18N=glibc-i18n-2.34-r0.apk
COPY ${SERVER_JRE_PKG} ${JCE} ${GLIBC} ${GLIBC_BIN} ${GLIBC_I18N} /tmp/

RUN set -ex && \
    tar xzf /tmp/${SERVER_JRE_PKG} -C /opt && \
    find /opt/${SERVER_JRE} -maxdepth 1 -mindepth 1 | grep -v jre | xargs rm -rf && \
    unzip /tmp/${JCE} -d /tmp && \
    cp -v /tmp/UnlimitedJCEPolicyJDK8/*.jar /opt/${SERVER_JRE}/jre/lib/security/ && \
    sed -i 's/#networkaddress.cache.ttl=-1/networkaddress.cache.ttl=10/g' /opt/${SERVER_JRE}/jre/lib/security/java.security && \
    ln -s /opt/${SERVER_JRE}/jre/bin /opt/${SERVER_JRE}/bin && \
    ln -s /opt/${SERVER_JRE} /opt/jdk && \
    rm -rf /opt/jdk/jre/plugin \
           /opt/jdk/jre/bin/javaws \
           /opt/jdk/jre/bin/orbd \
           /opt/jdk/jre/bin/pack200 \
           /opt/jdk/jre/bin/policytool \
           /opt/jdk/jre/bin/rmid \
           /opt/jdk/jre/bin/rmiregistry \
           /opt/jdk/jre/bin/servertool \
           /opt/jdk/jre/bin/tnameserv \
           /opt/jdk/jre/bin/unpack200 \
           /opt/jdk/jre/lib/javaws.jar \
           /opt/jdk/jre/lib/deploy* \
           /opt/jdk/jre/lib/desktop \
           /opt/jdk/jre/lib/*javafx* \
           /opt/jdk/jre/lib/*jfx* \
           /opt/jdk/jre/lib/amd64/libdecora_sse.so \
           /opt/jdk/jre/lib/amd64/libprism_*.so \
           /opt/jdk/jre/lib/amd64/libfxplugins.so \
           /opt/jdk/jre/lib/amd64/libglass.so \
           /opt/jdk/jre/lib/amd64/libgstreamer-lite.so \
           /opt/jdk/jre/lib/amd64/libjavafx*.so \
           /opt/jdk/jre/lib/amd64/libjfx*.so \
           /opt/jdk/jre/lib/ext/jfxrt.jar \
           /opt/jdk/jre/lib/oblique-fonts \
           /opt/jdk/jre/lib/plugin.jar && \
    tar czf jre.tar.gz /opt/${SERVER_JRE} /opt/jdk /tmp/${GLIBC} /tmp/${GLIBC_BIN} /tmp/${GLIBC_I18N} && \
    rm -rf /tmp/* /opt/${SERVER_JRE} /opt/jdk /var/cache/apk/* /root/.cache

FROM alpine:3.15

MAINTAINER aiclr <aiclr@qq.com>

ARG SERVER_JRE=jdk1.8.0_311
ARG ALPINE_REPO=https://mirrors.bfsu.edu.cn/alpine/v3.15/main/
ARG LANGUAGE=en_US
ARG CHARCODE=UTF-8
ARG JRE=jre.tar.gz

ENV TZ=Asia/Shanghai \
    LANG=en_US.UTF-8 \
    ZONE=Asia/Shanghai \
    JAVA_HOME=/opt/jdk \
    PATH=${PATH}:/opt/jdk/bin \
    ACTIVE=${ACTIVE}:pro

COPY --from=jre8 app/${JRE} /tmp/

RUN set -ex && \
    tar xzf /tmp/${JRE} -C /tmp && \
    sed -i 's/dl-cdn.alpinelinux.org/mirrors.bfsu.edu.cn/g' /etc/apk/repositories && \
    apk -U upgrade && \
    apk add --no-cache tzdata libstdc++ curl java-cacerts lsof && \
    cp -v /usr/share/zoneinfo/${ZONE} /etc/localtime && \
    echo "${ZONE}" >> /etc/timezone && \
    echo 'hosts: files mdns4_minimal [NOTFOUND=return] dns mdns4' >> /etc/nsswitch.conf && \
    apk add --allow-untrusted /tmp/tmp/*.apk && \
    /usr/glibc-compat/bin/localedef -i ${LANGUAGE} -f ${CHARCODE} ${LANG} && \
    /usr/glibc-compat/sbin/ldconfig /lib /usr/glibc-compat/lib && \
    mv /tmp/opt/${SERVER_JRE} /opt/ && \
    mv /tmp/opt/jdk /opt/ && \
    ln -sf /etc/ssl/certs/java/cacerts ${JAVA_HOME}/jre/lib/security/cacerts && \
    apk del glibc-i18n && \
    rm -rf /var/cache/apk/* /root/.cache /tmp/*
build
#!/bin/bash
image_name="server-jre"
version="8u311-alpine"

echo -e "\n==> begin delete all containers of " $image_name
docker rm $(docker stop $(docker ps -a | grep $image_name | awk '{print $1}'))

echo -e "\n==> begin delete all images of " $image_name
docker rmi -f $(docker images | grep $image_name | awk '{print $3}')

echo -e "\n==> begin build your images of " $image_name
docker build -f Dockerfile -t $image_name:$version .

echo -e "\n==> begin to package your image to tar file"
docker save $image_name:$version > ./$image_name-$version.tar
java
Oracle Java is the #1 programming language and development platform. It reduces costs, shortens development timeframes, drives innovation, and improves application services. With millions of developers running more than 60 billion Java Virtual Machines worldwide, Java continues to be the development platform of choice for enterprises and developers.
注意
# windows 错误: 编码 GBK 的不可映射字符。
## 添加编译参数指定字符集编码 `-encoding UTF-8`
javac -encoding UTF-8 -d out/single --module-source-path single -m helloworld
# `--module-source-path src` 从 src 目录下检索java 模块,但是需要整个模块代码目录在src下才能正常编译
javac -d out --module-source-path src -m helloworld

# IDE 项目目录、gradle、maven 有自己的代码目录规范,编译时不是采用 `--module-source-path` 应该是编译全部 java 文件进行编译
javac -d out/helloworld src/helloworld/org/bougainvilleas/ilj/HelloWorld.java src/helloworld/module-info.java
目录
ilj
└── src
    └── helloworld
        ├── module-info.java
        └── cn
            └── aiclr
                └── ilj
                    └── HelloWorld.java
module-info.java
module helloworld{}
HelloWorld.java 注意包类路径
package cn.aiclr.ilj;

public class HelloWorld {

    public static void main(String[] args) {
        System.err.println("Hello modular world");
    }

}
编译
# java9 之前
javac -d out \
src/cn/aiclr/ilj/A.java \
src/cn/aiclr/ilj/B.java

# java9 及以后 会添加反映模块名称的 helloworld 目录  out/helloworld
# 将module-info.java 作为额外源文件进行编译
javac -d out/helloworld \
src/helloworld/cn/aiclr/ilj/HelloWorld.java \
src/helloworld/module-info.java

# --module-source-path src 在 src 下检索 模块 helloworld
javac -d out --module-source-path src -m helloworld
运行 classes
# 运行 模块 classes --module-path = -p   --module = -m
java --module-path out \
--module helloworld/cn.aiclr.ilj.HelloWorld

java -p out \
-m helloworld/cn.aiclr.ilj.HelloWorld
打包
需要先建立 mods 目录
mkdir mods

jar -cvfe mods/helloworld.jar \
cn.aiclr.ilj.HelloWorld \
-C out/helloworld .
运行 jar
# 运行 module jar (构建jar时 指定了入口点 cn.aiclr.ilj.Helloworld)
java -p mods -m helloworld

# --show-module-resolution 跟踪模块系统采取的操作
java --show-module-resolution -p mods -m helloworld

# --limit-modules java.base 阻止通过服务绑定解析其他平台模块
java --show-module-resolution --limit-modules java.base \
-p mods -m helloworld
jlink 创建仅包含运行应用程序所需模块的运行时 image
jlink 不执行自动服务绑定即:不会根据 uses 子句自动将服务提供者包含在映像中
java.base 具有大量uses子句,所有这些服务类型的提供者位于其他各种平台模块中
默认绑定所有这些服务将会增大映像的大小,不会根据 uses 子句自动将服务提供者包含在映像中
# --module-path mods/:$JAVA_HOME/jmods 构造一个模块路径
# 包含 mods 目录(helloworld 模块位置)
# 包含要链接到 image 中的平台模块的JDK安装目录
# 与 javac java 不同 必须将平台模块显示添加到 jlink 模块路径中
#
# --add-modules helloworld
# 表示 helloworld 是需要在运行时 image 中运行的根模块
#
# --launcher 定义了一个入口点来直接运行 image 中的模块
# --output 表示运行时 image 的目录名称
jlink --module-path mods/:$JAVA_HOME/jmods \
--add-modules helloworld \
--launcher hello=helloworld \
--output helloworld-image

# 查看
tree helloworld-image

# helloworld-image/
# ├── bin
# │   ├── hello
# │   ├── java
# │   └── keytool
# ├── conf
# ├── include
# ├── legal
# │   └── java.base
# ├── lib
# ├── man
# └── release
运行
tree helloworld-image/bin/

# helloworld-image/bin/
# ├── hello #直接启动 helloworld 模块的可执行脚本
# ├── java # 仅能解析 helloworld 及其依赖项的 java runtime
# └── keytool

# 运行
./helloworld-image/bin/hello

./helloworld-image/bin/java --list-modules
多模块
src
├── hello
│   ├── module-info.java
│   └── cn
│       └── aiclr
│           └── hello
│               └── HelloWorld.java
└── hi
    ├── module-info.java
    └── cn
        └── aiclr
            └── hi
                └── HI.java
 hello 依赖 hi 模块
 cat src/hi/module-info.java
module hi
{
    exports cn.aiclr.hi;
}
 cat src/hello/module-info.java
module hello
{
    requires hi;
}

cat src/hi/cn/aiclr/hi/HI.java
package cn.aiclr.hi;

public class HI {

    public static String say() {
       return "hi";
    }

}
cat src/hello/cn/aiclr/hello/HelloWorld.java
package cn.aiclr.hello;

import cn.aiclr.hi.HI;

public class HelloWorld {

    public static void main(String[] args) {
        System.err.println(HI.say());
    }

}
编译多模块
# --module-source-path src 在 src 下 检索 模块

# 编译 hello
# hello 依赖 hi 也会编译 hi
javac -d out --module-source-path src -m hello

# 编译 hi 不会编译 hello
javac -d out --module-source-path src -m hi
运行 classes
# module path 需要包含运行所需的所有模块
java -p out -m hello/cn.aiclr.hello.HelloWorld

# unix module path 使用 : 号分割
java -p out/hello:out/hi -m hello/cn.aiclr.hello.HelloWorld

# windows module path 使用 ; 号分割 注意不要使用 powershell
java -p out/hello;out/hi -m hello/cn.aiclr.hello.HelloWorld
打包
分模块打包 放到同一目录下
tree out
# out/
# ├── hello
# │   ├── module-info.class
# │   └── cn
# │       └── aiclr
# │           └── hello
# │               └── HelloWorld.class
# └── hi
#     ├── module-info.class
#     └── cn
#         └── aiclr
#             └── hi
#                 └── HI.class

# -e, --main-class=CLASSNAME jar名不用与模块名保持一致
jar -cvfe mods/hello.jar cn.aiclr.hello -C out/hello .

jar -cvf mods/hi.jar -C out/hi .
运行
jar包 放到同一目录下
tree mods
# mods/
# ├── hello.jar
# └── hi.jar

java -p mods -m hello
jlink
# -p --module-path mods/:$JAVA_HOME/jmods 构造一个模块路径
# 包含 mods 目录(helloworld 模块位置)
# 包含要链接到 image 中的平台模块的JDK安装目录
# 与 javac java 不同 必须将平台模块显示添加到 jlink 模块路径中
#
# --add-modules hello
# 表示 hello 是需要在运行时 image 中运行的根模块
# 会 自动将其 requires 的模块添加到 images
#
# --launcher 定义了一个入口点来直接运行 image 中的模块
# --output 表示运行时 image 的目录名称

jlink -p mods/:$JAVA_HOME/jmods \
--add-modules hello \
--launcher hello=hello \
--output sayHi

tree sayHi
# sayHi/
# ├── bin
# │   ├── hello
# │   ├── java
# │   └── keytool
# ├── conf
# ├── include
# ├── legal
# ├── lib
# ├── man
# └── release

# 运行
./sayHi/bin/hello
java proxy
静态代理、动态代理、cglib代理
代理模式
Proxy是一种设计模式,提供对目标对象另外的访问方式;即通过代理对象访问目标对象。可以在目标对象实现的基础上,增强额外的功能操作,即扩展目标对象的功能。
编程思想:不要随意修改别人已经写好的代码或者方法,如果需要修改,可以通过代理的方式来扩展该方法
代理模式的关键点:代理对象与目标对象,代理对象是对目标对象的扩展,并会调用目标对象
静态代理
 不修改目标对象,对目标的功能进行扩展
 代理对象需要与目标对象实现一样的接口,所以会有很多代理类,类太多。一旦接口增加,目标对象和代理对象都要维护

/** 公共接口 */
public interface IUserServ
{
    void save();
}

/** 目标业务类 */
public class UserServiceImpl implements IUserServ
{

    @Override
    public void save()
    {
        System.err.println("userServiceImpl");
    }
}

/** 代理类 */
public class UserServiceProxy implements IUserServ
{

    private IUserServ target;

    public UserServiceProxy(IUserServ iUserServ)
    {
        this.target = iUserServ;
    }

    @Override
    public void save()
    {
        System.err.println("start...");
        target.save();
        System.err.println("end...");

    }
}

/** 测试 */
public class DemoApplicationTests
{
    @Test
    public void testStaticProxy()
    {
        UserServiceImpl userService = new UserServiceImpl();
        UserServiceProxy userServiceProxy = new UserServiceProxy(userService);
        userServiceProxy.save();
    }
}
动态代理
不需要手动编写一个代理对象,不需要编写与目标对象相同的方法,这个过程在运行时的内存中动态生成代理对象
字节码对象级别的代理对象
jdk的API中存在一个Proxy,其中存在一个生成动态代理的方法 newProxyInstance
static Object newProxyInstance(ClassLoader loader,Class<?>[] interfaces,InvocationHandler h)
- 返回值Object就是代理对象
- 参数
- loader:代表与目标对象相同的类加载器
- 目标对象.getClass().getClassLoader()
- interfaces:代表与目标对象实现的所有的接口字节码对象数组
- h:具体的代理的操作,InvocationHandler 接口
- loader:代表与目标对象相同的类加载器
JDK 动态代理
JDK的Proxy方式实现的动态代理,目标对象必须有接口,没有接口不能实现jdk动态代理
public interface IUserServ
{
    void save();
}

目标类
public class UserServiceImpl implements IUserServ
{

    @Override
    public void save()
    {
        System.err.println("userServiceImpl");
    }
}

测试
public class DemoApplicationTests
{

    UserServiceImpl userService = new UserServiceImpl();

    @Test
    public void testDynamicProxy()
    {
        IUserServ proxy = (IUserServ) Proxy.newProxyInstance(
                userService.getClass().getClassLoader(),
                userService.getClass().getInterfaces(),
                new InvocationHandler()
                {
                    @Override
                    public Object invoke(Object proxy, Method method, Object[] args) throws Throwable
                    {
                        Object invoke = method.invoke(userService, args);
                        return null;
                    }
                }
        );
        proxy.save();
    }
}
cglib
import net.sf.cglib.proxy.Enhancer;
import net.sf.cglib.proxy.MethodInterceptor;
import net.sf.cglib.proxy.MethodProxy;

import java.lang.reflect.Method;

/**
 * 被代理类
 */
public class Teacher
{

    public String teach()
    {
        System.err.println("Teacher is running");
        return "嘿嘿";
    }

    /**
     * 无法使用对象调用static方法
     */
     public static String teach2()
     {
         System.err.println(" static Teacher is running");
         return "static";
     }

    /**
     * final 无法被代理
     * @return
     */
     public final String teach3()
     {
         System.err.println(" final Teacher is running");
         return "final";
     }
}

/**
 * cglib 代理
 */
class ProxyFactory implements MethodInterceptor
{

    维护一个目标对象
    Object target;

    构造器传入目标对象
    public ProxyFactory(Object target)
    {
        this.target = target;
    }

    返回一个代理对象 target对象的代理对象
    public Object getProxyInstance()
    {
        1. 创建一个工具类
        Enhancer enhancer = new Enhancer();
        2. 设置父类
        enhancer.setSuperclass(target.getClass());
        3. 设置回调函数
        enhancer.setCallback(this);
        4. 创建子类对象,即代理对象
        return enhancer.create();
    }

    /**
     *
     * @param o 被代理类
     * @param method 被代理的方法,
     * @param objects 被代理的方法的参数
     * @param methodProxy
     * @return 返回的是代理模式修饰后的被代理方法返回值
     * @throws Throwable
     * 重写intercept方法,会调用目标对象的方法
     */
    @Override
    public Object intercept(Object o, Method method, Object[] objects, MethodProxy methodProxy) throws Throwable
    {
        System.err.println("cglib代理模式--前");
        Object invoke = method.invoke(target, objects);
        System.err.println("cglib代理模式--后");
        return invoke;
    }
}

/**
 * proxy 代理模式
 */
public class Client
{
    public static void main(String[] args)
    {
        Teacher teacher = new Teacher();
        ProxyFactory proxyFactory = new ProxyFactory(teacher);
        Teacher proxyInstance = (Teacher) proxyFactory.getProxyInstance();

         System.err.println(proxyInstance);
        System.err.println(proxyInstance.getClass());
        System.err.println(proxyInstance.teach());
         System.err.println(proxyInstance.teach2());
         System.err.println(proxyInstance.teach3());
    }
}
c
C 语言
cmake
operators
| symbol | function |
|---|---|
| a + b | addition |
| a - b | subtraction |
| a * b | multiplication |
| a / b | division |
| a % b | modulo(remainder of a/b) |
| a & b | bitwise AND |
| a | b | bitwise OR |
| a ^ b | bitwise XOR |
a << b | bit shift left |
a >> b | bit shift right |
| ~a | bitwise按位 1’s complement补码 |
| !a | logical NOT |
| a++ | increment a by one |
| a– | decrement a by one |
| ++a | increment a by one |
| –a | decrement a by one |
| a += b | increment a by b |
| a -= b | decrement a by b |
| a *= b | multiply a by b |
| a /= b | divide a by b |
| a %= b | a = remainder of a/b |
| a &= b | bitwise AND a with b |
| a |= b | bitwise OR a with b |
| a ^=b | bitwise XOR a with b |
| a <<= b | bit shift a left by b |
| a >>= b | bit shift a right by b |
| == | is equal to |
| != | is not equal to |
| > | is greater than |
| < | is less than |
| >= | is greater than or equal to |
| <= | is less than or equal to |
the difference between a++ and ++a is that if they are used in a test. such as if(a++) and if(++a)
a++tests the value and increments it++aincrements the value first and then tests the incremented value
format specifiers
| specifier | format/type |
|---|---|
| %c | alphanumeric含有字母和数字的; 字母与数字并用的 character/char |
| %d | signed decimal value/int |
| %i | 与%d类似,但是scanf("%i",&a)时会将输入的012作为8进制,0x12作为十六进制 参考 |
| %ld | signed decimal value/long int |
| %u | unsigned decimal value/int |
| %lu | unsigned decimal value/long int |
| %o | octal八进制 value/int |
| %lo | octal value/long int |
| %x,%X | hexadecimal十六进制 value/int |
| %lx,%lX | hexadecimal value/long int |
| %f | floating-point浮点 value/float |
| %e,%E | exponential指数的 value/float 浮点数,e记数法 |
| %g,%G | 根据值的不同,自动选择%f或%e. %e格式用于指数小于-4或者大于或者等于精度时 |
| %a,%A | C99 float/浮点数,十六进制 p/P计数法 |
| %s | text string/char pointer |
| %p | pointer 指针 |
| %% | 打印% |
| %zd | C99新增的%zd/size_t,如果编译器不支持%zd 请将其改成 %u或%lu,参考 |
格式字符和修饰符
- 标记:
-、+、空格、#、0 数字:最小字段宽度%2d.数字: 精度%.2fh: 和整型转换说明一起使用,表示short int或unsigned short int类型hh: 和整型转换说明一起使用,表示short char或unsigned char类型的值j: 和整型转换说明一起使用,表示intmax_t或uintmax_t类型的值,这些类型定义在stdint.h中-负号修饰符:待打印项左对齐。即,从字段的左侧开始打印该项+正号修饰符:有符号值 若为正数,则在值前面显示正号,若为负数,则在值前面显示负号- 空格:有符号值若为正,则在值前面显示一个前导空格(不显示任何符号),若为负,则在值前面显示负号并覆盖一个前导空格
#:把结果转换为另一种形式八进制、十六进制%#o以0开头,八进制%#x以0x开头 小写十六进制%#X以0X开头 大写十六进制- 对于浮点数,
#保证即使后面没有任何数字,也打印一个小数点字符。 %g和%G使用%#g、%#G防止结果后面的0被删除
0:零对于数值格式,前导0代替空格填充字段宽度,对于整数格式,如果出现-标记或指定精度,忽略0标记- 例子:
%2d100 = ‘100’、1 = ’ 1’ 右对齐输出宽度为2的字符,不足的位置使用空格填充,字段宽度2可以自动扩大以符合要输出的整数长度%02d100 = ‘100’、1 = ‘01’ 右对齐输出宽度为2的字符,不足的位置使用填充,字段宽度自动扩大%-2d100 = ‘100’、1 = ’1 ’ 左对齐输出宽度为2的字符,不足的位置使用空格填充,字段宽度自动扩大% d100 = ’ 100’、-100 = ‘-100’%x31 = 1f%X31 = 1F%#x31 = 0x1f%#X31 = 0X1F%4.2f3852.99 = 3852.99%3.1f3852.99 = 3853.0 四舍五入 整数位自动扩大
variable types
depending on platform, int can be either a short int(16bits) or a long int(32bits);on Raspbian树莓派,as per the table above, int is a long(32bits)integer value.数据类型大小查看参考
| name | description | size(bytes) |
|---|---|---|
| char | single alphanumeric含有字母和数字的; 字母与数字并用的 character | 1 |
| signed char | signed 8-bit integer(-128-127) | 1 |
| unsigned char | unsigned 8-bit integer(0-255) | 1 |
| short,signed short | signed 16-bit integer(-32768-32767) | 2 |
| unsigned short | unsigned 16-bit integer(0-65535) | 2 |
| int,signed int | signed 32-bit integer(-2147483648-2147483647) | 4 |
| unsigned int | unsigned 32-bit integer(0-4294967295) | 4 |
| long,signed long | signed 32-bit integer(-2147483648-2147483647) | 4 |
| unsigned long | unsigned 32-bit integer(0-4294967295) | 4 |
| float | floating-point value(+/- 3.402823x1038) | 4 |
| double | double-precision floating-point value()+/-10308 | 8 |
pointer
| 符号 | 含义 |
|---|---|
* | 表示一个指针 |
() | 表示一个函数 |
[] | 表示一个数组 |
int board[8][9];: 声明一个包含8个含有9个int元素数组的数组- 先看
[8]: board 是一个包含8个元素的数组 - 再看
[9]: 每个元素是包含一个含有9个元素的数组 - 最后
int: 含有9个元素的数组元素类型为int
- 先看
int **ptr;: 声明一个指向int的指针的指针int * risks[10];: 声明一个内含10个元素的数组,元素是指向int的指针,指针数组- 先看
[10], risks 包含10个元素的数组 - 再看
*数组元素类型为 指针 - 最后
int指针为 指向int的指针
- 先看
int (* rusks)[10];: 声明一个指向数组的指针,被指向的数组内含10个int类型的值,数组指针- 先看
(* rusks), risks 是指针 - 再看
[10]指针指向含有10个元素的数组 - 最后
int数组元素为int
- 先看
int * oof[3][4];: 声明一个3X4的二维数组,每个元素都是指向int的指针,二维指针数组- 先看
[3][4]off是包含3个含有4个元素数组的数组 *含有4个元素的数组的元素为指针int指针指向int
- 先看
int (* uuf)[3][4];: 声明一个指向3X4二维数组的指针,被指向的二维数组内含有int类型值,二维数组指针- 先看
(* uuf)uuf是个指针 [3][4]指针指向一个包含3个含有4个元素数组的数组int含有4个元素数组的元素类型为int
- 先看
int (* uof[3])[4];: 声明一个内含 3 个指针元素的数组指针数组,其中每个指针元素都指向一个内含4个int类型元素的数组- 先看
(* uof[3]): 含有三个指针的指针数组- 先看
[3]uof 是含有三个元素的数组 - 再看
*元素类型为指针
- 先看
- 再看
[4]指针数组内的指针元素指向一个含有4个元素的数组 - 最后
int含有4个元素数组的元素类型为int
- 先看
char * fump(int);: 返回字符指针的函数- 先看
*返回指针 - 再看
char返回的指针指向 char 类型
- 先看
char (* frump)(int);: 指向函数的指针,该函数的返回类型为char- 先看
(* frump)frump 是个指针 - 再看
(int)指针指向函数 - 最后
char函数返回数据类型为 char
- 先看
char (*flump[3])(int);: 内含3个指针的数组,每个指针都指向返回类型为char的函数- 先看
(* flump[3])- 先看
[3]含有三个元素的数组 - 再看
*数组元素类型是 指针
- 先看
- 再看
(int)指针指向函数 - 最后
char函数返回类型 char
- 先看
gcc
-D等于xxx.c定义的#define PI=3.14. 例如:gcc -DPI=3.14 xxx.c -o xxx-v输出预处理,汇编,编译,链接的详细信息gcc -v xxx.c -o xxx-Wall输出警告信息gcc -Wall xxx.c -o xxx-Werror产生警告时停止编译gcc -Werror xxx.c -o xxx-std指定语言标准gcc -std=c90 xxx.c -o xxx-O代码优化选项,值在0~3,default=1, 例如:gcc -O2 xxx.c -o xxx0表示不优化3表示最高优化代码运行速度最快,但是编译时间和代码体积会受到影响
-E预处理gcc -E xxx.c -o xxx.i-S汇编gcc -S xxx.i -o xxx.s-c编译gcc -c xxx.s -o xxx.o- linking链接
gcc xxx.o -o xxx -I指定头文件包含目录: b.c的头文件b.hgcc -I /home/caddy/c/cpp/h xxx.c /home/caddy/c/cpp/s/b.c -o xxx-L指定库文件目录gcc -L /home/caddy/c/lib -static -ladd xxx.c -o xxx- 假定在
/home/caddy/c/lib目录下有共享库libadd.so静态库libadd.a,gcc默认共享库优先 -static选项表示共享库、静态库同时存在,优先使用静态库。- 此外:linux下的库文件命名有一个约定,库文件以
lib开头,因为所有的库文件都遵循这个约定,所以使用-l选项指定链接的库文件名时可以省去lib三个字母。
- 假定在
-shared创建共享库gcc -fPIC -shared xx.c -o libxx.so-shared:
Produce生成 a shared object which can then be linked with other objects to form构成 an executable可执行的. Not all systems support this option. For predictable可预测的 results, you must also specify明确规定 the same set of options used for compilation (-fpic,-fPIC, or model suboptions) when you specify this linker适用 option.[1]-fPIC:
If supported for the target machine, emit发出 ; 射出 ; position-independent位置无关 code, suitable适用 for dynamic linking and avoiding防止 any limit on the size of the global offset table适用. This option makes a difference on AArch64, m68k, PowerPC and SPARC.
Position-independent code requires special support, and therefore works only on certain某些 machines. When this flag is set, the macros宏指令 “pic” and “PIC” are defined to 2.
ar归档工具创建库文件ar crv ../lib/static/libfoo.a xx.o xx.oar创建一个归档文件libfoo.a,并将目标文件xx.o xx.o添加进去。ar工具将若干个单独的文件归并到一个大的文件中以创建归档文件或集合。ar可以创建任何类型文件的归档文件,是一个通用工具
ranlib xxx.a为函数库生成内容表ranlib libfoo.aar tv列出归档的内容ar tv libfoo.aar x解压所有归档目标文件ar x libfoo.aar dv删除归档内的某一目标文件ar dv libfoo.a xx.o
gdb
# install
pacman -S gdb
# cgdb 更强大的调试工具 暂未学习到
# pacman -Syu cgdb
# gcc -g 表示调试
gcc -g debug.c -o debug.out
# 启动
gdb debug.out
# 不打印gdb版本信息
gdb -q debug.out
- 查看源码
list简写l,默认每次显示 10 行,按回车键继续看余下的。list n显示当前文件以行号 n 为中心的前后 10 行代码list 函数名显示函数名所在函数的源代码list不带参数,将接着上一次的 list 命令,输出下边的内容
- 运行程序
run简写r,运行程序直到遇到结束或者遇到断点等待下一个命令。 - 设置断点
break简写bb 18在第 18 行设置断点b fn1 if a>b条件断点设置b func在函数func()入口处设置断点delete断点编号 n 删除第 n 号断点disable断点编号 n 暂停第 n 号断点enable断点编号 n 开启第 n 号断点clear行号 n 清楚第 n 行的断点delete breakpoints清除所有断点info breakpoints或info b:显示断点信息Num:断点编号Disp:断点执行一次之后是否有效keep:有效dis:无效
Enb: 当前断点是否有效y:有效n:无效
Address: 内存地址What: 位置
- 启动后单步执行
continue简写cstepstep into 简写sreturn简写ret从当前函数返回next简写nuntil运行程序直到退出循环体until+行号运行至某行finish运行程序直到当前函数完成返回,并打印函数返回时的堆栈地址和返回值及参数值等信息call函数(参数) 调用程序中可见的函数,并传递参数,如call gdb_test(55)
- 打印表达式
print 表达式表达式可以是任何C语言的有效表达式,包括数字、变量甚至是函数调用print a显示 aprint ++a将 a 中的值加 1,并显示print gdb_test(22)将以整数 22 作为参数调用gdb_test()函数print gdb_test(a)将以变量 a 作为参数调用gdb_test()函数
display在单步运行时,在每次单步进行指令后,紧接着输出被设置的表达式及值。watch设置监视点,一旦被监视的表达式的值改变,gdb 将强行终止正在被调试的程序。whatis查询变量或函数info function查询函数info locals显示当前对战页的所有变量- 查看运行信息
where/bt当前运行的堆栈列表bt backtrace显示当前调用堆栈up/down改变堆栈显示的深度set args参数指定运行时的参数show args查看设置好的参数info program查看程序是否在运行、进程号、被暂停的原因
- 分割窗口
layout一边查看代码,一边调试layout src显示源代码窗口layout asm显示反汇编窗口layout regs显示源代码/反汇编和CPU寄存器窗口layout split显示源代码和反汇编窗口Ctrl+L刷新窗口
- 退出gdb
quit简写q
lib
静态库
ld会先搜索gcc命令中-L指定的目录- 再搜索GCC的环境变量:
LIBRARY_PATH - 再搜索目录
/lib、/usr/lib、/usr/local/lib
共享库
- 编译目标代码时
-L指定的目录 - 环境变量
LD_LIBRARY_PATH - 配置文件
/etc/ld.so.conf中指定的共享库搜索路径 - 默认的共享库路径
/lib、/usr/lib
keyword
关键字和保留标识符,关键字是C语言的词汇,不能用他们作为标识符。
粗体表示 C90 标准新增的关键字,斜体表示的 C99 标准新增的关键字,粗斜体表示的是 C11 标准新增的关键字
| auto | extern | short | while |
| break | float | signed | _Alignas |
| case | for | sizeof | _Alignof |
| char | goto | static | _Atomic |
| const | if | struct | _Bool |
| continue | inline | switch | _Complex |
| defaut | int | typedef | _Generic |
| do | long | union | _Imaginary |
| double | register | unsigned | _Noreturn |
| else | restrict | void | _Static_assert |
| enum | return | volatile | _Thread_local |
Golang
An open-source programming language supported by Google
command
init 初始化
go mod init example.com/greetings
run 运行不会生成二进制文件
go run hello.go
# or
go run .
test 在有单元测试的module中运行
go test
# -v flag to get verbose
go test -v
build 打包
# 在当前目录打包可执行二进制文件
go build
install 安装
# 安装二进制文件到 `~/go/bin/` 目录下
go install
dependency
配置国内加速镜像
查看全部配置
go env
# 查看部分配置
go env | grep GOPROXY
配置
# 官方
go env -w GOPROXY=https://goproxy.io,direct
# 七牛
go env -w GOPROXY=https://goproxy.cn,direct
# 阿里云
go env -w GOPROXY=https://mirrors.aliyun.com/goproxy/,direct
多个地址
# 逗号分割时,第一个URL return HTTP 404 or 410.将尝试第二个
go env -w GOPROXY=https://goproxy.cn,direct,https://mirrors.aliyun.com/goproxy
# 管道符号分割时,将尝试下一个URL,不管HTTP error code
go env -w GOPROXY=https://goproxy.cn,direct|https://mirrors.aliyun.com/goproxy
查看指定依赖
go list -m example.com/greetings
go list -m example.com/greetings@version
go list -m example.com/greetings@gitbranch
go list -m example.com/greetings@gitcommitcode
# 列出所有依赖模块信息,当前使用版本以及最新版本
go list -m -u all
# 列出指定依赖模块信息,当前使用版本以及最新版本
go list -m -u example.com/greetings
添加指定依赖
go get example.com/greetings
go get example.com/greetings@version
go get example.com/greetings@gitbranch
go get example.com/greetings@gitcommitcode
将依赖指向本地文件系统
go mod edit -replace=example.com/greetings=../greetings
go mod edit -replace=example.com/greetings@version=../greetings
整理项目
会移除未使用的 modules 会自动添加 go.mod 中构建包所需的 modules
go mod tidy
移除依赖 @none
go get example.com/theirmodule@none
清空模块缓存
# 模块缓存位置 `$GOPATH/pkg/mod` 查看 GOPATH
go env | grep GOPATH
go clean --modcache
Intelilj Idea
The Leading Java and Kotlin IDE
shortcut keys
Ctrl W expand扩大 the code selection
Ctrl Shift W shrink收缩 the code selection
Ctrl / comment注释 lines
Ctrl Shift / comment blocks code
Ctrl D duplicate复制 lines
Ctrl Y delete lines
Alt Shift down move the current line down
Alt Shift up move the current line up
Ctrl Shift down move the whole method down
Ctrl Shift up move the whole method up
Ctrl - collapse折叠 a code fragment片段
Ctrl = expand展开 a code region
Ctrl Shift - collapse all regions in the file
Ctrl Shift = expand all available regions
Ctrl Alt T surround包围 the selected code fragment片段 with some template code
Ctrl Shift Delete unwrap打开。。。包装
Alt J select the symbol符号 at the caret脱字号;补注号
Alt Shift J to deselect the last occurrence出现
Ctrl Alt Shift J select all occurrence出现 in the file
Find Ctrl F and replace Ctrl R
- Press
Ctrl Fto display the search bar. In the Find in Files dialog, you can switch to replace by pressingCtrl Shift R. - Press
Ctrl Rto add another field where you can type the replace string. PressCtrl Shift Fto hide the Replace with field and switch to regular search.
Show usages Ctrl Alt F7 (Edit | Find Usages | Show Usages) . To jump to a usage, select it from the list and press Enter.
Show file structure Ctrl F12
- You can quickly navigate导航 within the current file with
Ctrl F12(Navigate | File Structure). - File structure shows the list of members of the current class. To navigate to an element, select it and press
EnterorF4. - To easily locate定位 an item in the list, start typing its name
ImageMagick
ImageMagick is a free and open-source software suite for displaying, converting, and editing raster image and vector image files. It can read and write over 200 image file formats.
ImageMagick Commands
- identify – Print the details of imagces, that IM sees
- Convert – Convert and Modify Images
- Mogrify – in-place batch processing
- -quality value – JPEG/MIFF/PNG compression level
转换格式
将 nikon.NEF 转换为 png 格式图片
convert -verbose nef/nikon.NEF jpg/nikon.png
将 nef/KUN_34.NEF* 批量转换为 jpg 格式图片,保存到 jpg 目录下
mogrify -verbose -path jpg -format jpg nef/KUN_*.NEF
转换大小
将 lock.PNG 压缩为 1920x1080 大小的 lock1080.PNG图片
magick -verbose lock.PNG -resize 1920x1080 lock1080.PNG
批量压缩
mogrify -verbose -path jpg1080 -resize 1920x1080 jpg/KUN_35*.jpg
ico
convert -resize 128x -gravity center -crop 128x128+0+0 bougainvilleas.png -background transparent bougainvilleas.ico
mpd
MPD (music player daemon) is an audio player that has a server-client architecture. It plays audio files, organizes playlists and maintains a music database, all while using very few resources. In order to interface with it, a separate client is needed.
mpv 服务端
# mpd server
# mpc client
pacman -S mpd mpc

# Configuration source
mkdir ~/.config/mpd
mkdir ~/.config/mpd/playlists
cp /usr/share/doc/mpd/mpdconf.example ~/.config/mpd/mpd.conf

# not root
# --user Connect to user service manager
systemctl --user enable mpd
systemctl --user start mpd

# mpc 客户端状态
mpc status

# 刷新 mpd 数据库
mpc update

# 查看所有歌曲
mpc listall

# mpc add <tab> 添加 歌曲 或 文件夹 到 播放列表
mpc add <tab>

# 播放
mpc play

# 音量 0-100
mpc volume 50

# repeat 循环开关
mpc repeat

# random 随即开关
mpc random

# single 单曲开关
mpc single
mpd.conf
# 歌曲保持目录
music_directory		"~/samba/audio/music"
# 播放列表
playlist_directory		"~/.config/mpd/playlists"
# mpc update 后根据歌曲目录自动生成的数据库
db_file			"~/.config/mpd/database"
# systemd journal 记录日志
log_file			"syslog"
# 音频输出 根据安装的 包确定 自用 pipewire
audio_output {
	type		"pipewire"
	name		"PipeWire Sound Server"
}
mpv
mpv is a media player based on MPlayer and the now unmaintained mplayer2. It supports a wide variety of video file formats, audio and video codecs, and subtitle types. A detailed (although admittedly incomplete) list of differences between mpv and the aforementioned players can be found here.
# Configuration source
cp -r /usr/share/doc/mpv/ ~/.config/

# use
mpv xxx.mp4
Vim
Vim is a terminal text editor. It is an extended version of vi with additional features, including syntax highlighting, a comprehensive help system, native scripting (Vim script), a visual mode for text selection, comparison of files (vimdiff(1)), and tools with restricted capabilities such as rview(1) and rvim(1).
Vim stands for Vi IMproved. Most of Vim was made by Bram Moolenaar, but only through the help of many others.
MODE
:set showmode
- normal mode
- insert mode
- visual mode
- visual line mode
- visual block mode
normal mode i -> insert mode <Esc> -> normal mode
normal mode v -> visual mode <Esc> -> normal mode
normal mode V -> visual line mode <Esc> -> normal mode
normal mode CTRL-V -> visual block mode <Esc> -> normal mode
normal mode R -> replace mode <Esc> -> normal mode
| editing commands | |||
|---|---|---|---|
| a | append 拼接到光标位置 | i | insert 插入到光标位置 |
| A | 光标行尾拼接 | I | 光标行首插入 |
| o | 光标下方新增一行 | O | 光标上方新增一行 |
| s | 删除光标所在字符 | S | 删除光标所在行 |
undo & redo
| undo & redo | |
|---|---|
| u | undoes the last edit |
| CTRL-R | (redo) to reverse the preceding command.undoes the undo |
| U | (undo line) undoes all the changes made on the last line that was edited |
Getting out
ZZcommand writes the file and exits:wqwrite and quit:wwrite:qquit:q!fource quit without write
Moving around
| moving | |||
|---|---|---|---|
w | to move the cursor forward to the start of the next word | b | to move the cursor backward to the start of the previous word |
e | to move the cursor forward to the end of the next word | ge | to move the cursor backward to the end of the previous word |
0 | to move the cursor to the very first character of the line | $ | to move the cursor to the end of a line |
^ | to move the cursor to the first non-blank character of the line | ||
| one of the most useful movement commands | single-character search command | ||
fx | searches forward in the line for the single character x | Fx | the backward version of fx command |
tx | works like the fx command, except it stops one character before the searched character. | Tx | the backward version of tx command |
% | 括号()[]{}匹配跳转 | ||
| G | 跳转到末行 | nG | 跳转到n行 |
| gg | 跳转到首行 | ||
| H | 移动光标到当前页的第一行 | ||
| M | 移动光标到当前页的中间行 | ||
| L | 移动光标到当前页的最后一行 | ||
| to scroll one line at a time | 一次滚动一行 | ||
CTRL-E | scroll up | CTRL-Y | scroll down |
| To scroll a whole screen at a time | 一次滚动一屏 | ||
CTRL-F | To scroll forward | CTRL-B | To scroll backward |
zz | To see the context of the line with the cursor | 将光标所在行滚动到屏幕中间位置 | |
zt | put the cursor line at the top | ||
zb | put the cursor line at the bottom | ||
| simple searches | |||
* | 从上往下搜索光标所在单词 | # | 从下往上搜索光标所在单词 |
/include | n 从上往下搜索 include | N 从下往上搜索 include | |
3/include | goes to the third match of include | ||
?include | n 从下往上搜索 include | N 从上往下搜索 include | |
4?include | goes the the fouth match of include | ||
.*[]^%/\?~$ | 特殊字符需要使用 \ 转义 | ||
<\ | only matches at the begining of a word | \> | only matches the end of a word |
/the\> | 搜索 the 结尾的单词 | /<\the | 搜索 the 开头的单词 |
/<\the\> | 仅搜索 the | ||
/the$ | 以 the 开头的行 | /^the | 以 the 结尾的行 |
/^the$ | 仅有 the 的行,前后不能有空格等其他字符 | ||
c.m | com、cam、cum等 | the\. | 转义点 搜索 the. |
| named marks | |||
ma | marks the place under the cursor as mark a | :marks | 查看所有marks;最多设置26个marks a到z |
| `a | 反引号移动到 a mark 所在位置 | ’a | 单引号 移动到 a mark所在行的开头 |
:set ignorecase | 搜索时忽略大小写 | :set noignorecase | 搜索时不忽略大小写 |
:set hlsearch | 高亮显示搜索结果 | :set nohlsearch | 关闭高亮 |
:nohlsearch | only remove the highlight | does not reset the option |
        This is a line with example text
          x-->-->->----------------->
             w  w w    3w

        This is a line with example text
        <----<--<-<---------<--x
           b   b b    2b      b

        This is a line with example text
           <----<----x---->------------>
           2ge   ge     e       2e

                  ^
             <-----------x
        .....This is a line with example text
        <----------------x   x-------------->
                0                  $

        To err is human.  To really foul up you need a computer.
        ---------->--------------->
            fh           fy

        To err is human.  To really foul up you need a computer.
                  --------------------->
                           3fl

        To err is human.  To really foul up you need a computer.
                  <---------------------
                            Fh

        To err is human.  To really foul up you need a computer.
                   <------------  ------------->
                        Th              tn

                            %
                         <----->
                if (a == (b * c) / d)
                   <---------------->
                            %

            |   first line of a file   ^
            |   text text text text    |
            |   text text text text    |  gg
        7G  |   text text text text    |
            |   text text text text
            |   text text text text
            V   text text text text    |
                text text text text    |  G
                text text text text    |
                last line of a file    V

                        +---------------------------+
                H -->   | text sample text          |
                        | sample text               |
                        | text sample text          |
                        | sample text               |
                M -->   | text sample text          |
                        | sample text               |
                        | text sample text          |
                        | sample text               |
                L -->   | text sample text          |
                        +---------------------------+

                                       +----------------+
                                       | some text      |
                                       | some text      |
                                       | some text      |
        +---------------+              | some text      |
        | some text     |  CTRL-U  --> |                |
        |               |              | 123456         |
        | 123456        |              +----------------+
        | 7890          |
        |               |              +----------------+
        | example       |  CTRL-D -->  | 7890           |
        +---------------+              |                |
                                       | example        |
                                       | example        |
                                       | example        |
                                       | example        |
                                       +----------------+

        +------------------+             +------------------+
        | earlier text     |             | earlier text     |
        | earlier text     |             | earlier text     |
        | earlier text     |             | earlier text     |
        | earlier text     |   zz  -->   | line with cursor |
        | earlier text     |             | later text       |
        | earlier text     |             | later text       |
        | line with cursor |             | later text       |
        +------------------+             +------------------+

        /the

        the solder holding one of the chips melted and the
        xxx                       xxx                  xxx

       /the$

        the solder holding one of the chips melted and the
                                                       xxx

       /^the

        the solder holding one of the chips melted and the
        xxx

        c.m

        We use a computer that became the cummin winter.
                 xxx             xxx      xxx

        ter.

        We use a computer that became the cummin winter.
                      xxxx                          xxxx

        ter\.

        We use a computer that became the cummin winter.
                                                    xxxx

             |  example text   ^             |
        33G  |  example text   |  CTRL-O     | CTRL-I
             |  example text   |             |
             V  line 33 text   ^             V
             |  example text   |             |
       /^The |  example text   |  CTRL-O     | CTRL-I
             V  There you are  |             V
                example text

        '       The cursor position before doing a jump
        "       The cursor position when last editing the file
        [       Start of the last change
        ]       End of the last change
编辑
| 编辑 | |||
|---|---|---|---|
d | delete 删除指令(剪切) | x=dl | x 是 dl 的快捷指令 |
dw | 从光标位置开始删除一个单词(包括单词后面的空格,不包括光标前内容) | 2d4w | 执行两次,删除4个单词 |
de | 从光标位置开始删除一个单词(不包括单词后面的空格,不包括光标前内容) | d2e | 执行一次,删除两个单词 |
d$=D | 从光标位置开始删除到行尾 | d^ | 从光标位置开始删除到行首 |
dh=X | dj | dk | dl=x |
dd | 删除光标所在行 | ||
df> | d 删除到 f> 搜索 ***>***的位置 | ||
c | change 修改指令(开启 Insert mode) | ||
c2wbe | c change 操作符 | 2w 移除两个单词,并开启Insert mode | be 输入内容 |
cw | 同 d, 会开启 Insert mode | 2c2w | |
ce | 同 d, 会开启 Insert mode | c2e | |
c$ | 同 d, 会开启 Insert mode | c^ | 同 d, 会开启 Insert mode |
cc=S | 删除光标所在行并开启 Insert mode | ||
cis | 删除光标所在句子(不包括句子末尾的空格) | cas | 删除光标所在句子(包括句子末尾的空格) |
ch | cj | ck | cl=s |
r | replace 替换指令 | 等待输入,替换光标位置的字符,不会切换到 Insert mode | |
rT | 将光标位置替换为 T | clT<Esc> or sT<Esc> | 功能同 rT |
5rx | 从光标位置开始,将五个字符替换为 x | ||
r<Enter> | 将光标位置替换为换行 | 4r<Enter> | 将光标位置开始的四个字符,替换为换行 |
. | 重复执行变更指令 | ||
p | paste 粘贴指令 | xp | 快速转换光标字符与其后字符的位置 |
y | yank 复制指令 | ||
yw | 同 d | y2w | |
ye | 同 d | y2e | |
y$ | 同 d | y^ | 同 d |
yy | 复制光标所在行 | ||
yh | yj | yk | yl |
"*yy | 复制到 * 号粘贴板 | "*p | 从 * 粘贴板粘贴 |
"+yy | 复制到 + 号粘贴板 | "+p | 从 + 粘贴板粘贴 |
* | 寄存器,与系统粘贴板交互 | + | 寄存器与系统粘贴板交互 |
        To err is human. To really foul up you need a computer.
                         ------------------>
                                 d4w

        To err is human. you need a computer.
###
        To err is human. you need a computer.
                        -------->
                           d2e

        To err is human. a computer.
###
        To err is human. a computer.
                       ------------>
                            d$

        To err is human
###
        To err is human
           ------->
             c2wbe<Esc>

        To be human
###
        c       the change operator
        2w      move two words (they are deleted and Insert mode started)
        be      insert this text
        <Esc>   back to Normal mode
###
        x  stands for  dl  (delete character under the cursor)
        X  stands for  dh  (delete character left of the cursor)
        D  stands for  d$  (delete to end of the line)
        C  stands for  c$  (change to end of the line)
        s  stands for  cl  (change one character)
        S  stands for  cc  (change a whole line)
###
        there is somerhing grong here
        rT           rt    rw

        There is something wrong here
###
        There is something wrong here
                           5rx

        There is something xxxxx here
###
                              To <B>generate</B> a table of <B>contents
        f<   find first <     --->
        df>  delete to >         -->
        f<   find next <           --------->
        .    repeat df>                     --->
        f<   find next <                       ------------->
        .    repeat df>                                     -->
###
        /four<Enter>    find the first string "four"
        cwfive<Esc>     change the word to "five"
        n               find the next "four"
        .               repeat the change to "five"
        n               find the next "four"
        .               repeat the change
                        etc.
###
        teh     th     the
         x       p
###
x       delete character under the cursor (short for "dl")
X       delete character before the cursor (short for "dh")
D       delete from cursor to end of line (short for "d$")
dw      delete from cursor to next start of word
db      delete from cursor to previous start of word
diw     delete word under the cursor (excluding white space)
daw     delete word under the cursor (including white space)
dG      delete until the end of the file
dgg     delete until the start of the file
| vim | |||
|---|---|---|---|
| 按边界*操作 | |||
| yi* | 复制边界内内容 | yi“ | 复制双引号内的内容 |
| ya* | 复制边界以及内容 | ya{ | 复制双引号及其内的内容 |
| di* | 删除边界内内容 | di“ | 删除双引号内的内容 |
| da* | 删除边界以及内容 | da{ | 删除双引号及其内的内容 |
| ci* | 删除边界内内容,并切换为i模式 | ci“ | - |
| ca* | 删除边界以及内容,并切换为i模式 | ca{ | - |
| - | |||
| copy & cut | |||
| ggyG | 复制全部 | gg“+yG | 复制全部到系统粘贴板 |
| :7,10y | 复制[7,10]行 | 不支持指定粘贴板 | |
| :7,10 copy 12 | 相当于先复制[7,10]行,然后在第12行按p | :7,10 co 12 | 相当于先复制[7,10]行,然后在第12行按p |
| :7,10d | 剪切[7,10]行 | 不支持指定粘贴板 | |
| :7,10 move 12 | 相当于先剪切[7,10]行,然后在第12行按p | :7,10 m 12 | 相当于先剪切[7,10]行,然后在第12行按p |
| yy | 复制行 | yy、y1y | 复制光标所在行 |
| yw | 复制单词 | yw、y1w | 复制光标及其后的1个单词 |
| dd | 剪切行 | dd、d1d | 剪切光标所在行 |
| dw | 剪切单词 | dw、d1w | 剪切光标及其后的1个单词 |
| p | 在当前行下方粘贴内容 | P | 在当前行上一行粘贴内容 |
| - | |||
| :reg | 查看所有粘贴板中内容 | ||
| “+y | 将内容复制到系统粘贴板 | ||
| “+p | 粘贴系统粘贴板中的内容 | ||
| - | |||
| :s/old/new | 将当前行第一个old替换成new | ||
| :s/old/new/g | 当前行所有old替换成new | ||
| :%s/old/new | 所有行第一个old替换成new | ||
| :%s/old/new/g | 所有old替换成new | ||
| - | |||
| visual model | |||
| v | 切换到visual model | ||
| ggvG | 全选 | ||
| vjjd | v切换到visual model,jj选择从光标所在行开始的往下两行,d剪切 | ||
| vjjy | v切换到visual model,jj选择从光标所在行开始的往下两行,y复制 | ||
| - | |||
| visual block mode | |||
Ctrl v | 切换到visual block model | ||
| y | block yink | 将选择的块,复制到粘贴板 | |
| p | block paste | 粘贴粘贴板中的内容 | |
| x | block delete | 删除选择的块 | |
| c | block insert | 输入后 使用ESC完成insert | |
| - | |||
| split | |||
| :sp | 水平分割窗口 | :vsp | 垂直分割窗口 |
| Ctrl+w+s | 水平分割窗口 | Ctrl+w+v | 垂直分割窗口 |
| :sp xxx.txt | 水平分割窗口并在新窗口打开xxx.txt | :vsp xxx.txt | 垂直分割窗口并在新窗口打开xxx.txt |
| - | |||
| vim -On | -O垂直分割、-n分割窗口数 | vim -on | -o水平分割、-n分割窗口数 |
| vim -O2 file1 file2 | 垂直分割窗口打开file1 file2 | vim -o2 file1 file2 | 水平分割窗口打开file1 file2 |
| - | |||
| :only | 仅保留当前分屏 | :hide | 关闭当前分屏 |
| Ctrl w c | 关闭当前窗口 | Ctrl w q | 关闭当前窗口,如果只剩最后一个窗口,则退出vim |
| - | |||
| Ctrl w, h、j、k、l | 切换窗口 | Ctrl w, H、J、K、L | 移动窗口到最左下上右 |
| Ctrl w r | 互换窗口 | ||
| :resize 30 | 调整当前窗口高度 | ||
| Ctrl w = | 所以窗口统一高度 | ||
| Ctrl w 1+ | 当前窗口高度+1 | Ctrl w - | 当前窗口高度-1 |
| Ctrl f | 向前翻一页 | Ctrl b | 向后翻一页 |
| Ctrl u | 向前翻半页 | Ctrl d | 向后翻半页 |
set
| :set | |||||
|---|---|---|---|---|---|
| :set ff=unix | unix格式 行结尾 \n | :set ff=dos | dos格式 行结尾 \r\n | :set ff | 查看行结尾格式 |
| :set nu or :set number | 显示行号 | :set nonu or :set nonumber | 隐藏行号 | ||
| :set wrap | 折行 | :set nowrap | 取消折行 | ||
| :set hlsearch | 高亮显示搜索结果 | :set nohlsearch | 取消高亮显示搜索结果 | ||
| :set autoread | 文件更新自动读取新文件 | :set noautoread | 取消文件更新自动读取新文件 |
.vimrc
~/.vimrc
set nu
set nocompatible
set laststatus=2
set statusline=%F%m%r%h%w%=(%{&ff}/%Y)\ (line\ %l\/%L,\ col\ %c)
set linespace=3
set cursorline
set cursorcolumn

highlight CursorLine term=reverse,bold cterm=reverse,bold ctermfg=DarkGray ctermbg=black guibg=Grey90
highlight CursorColumn term=reverse,bold cterm=reverse,bold ctermfg=DarkGray ctermbg=black guibg=Grey90

syntax enable
filetype plugin indent on
let g:rustfmt_autosave = 1
~/_vimrc
" 将当前行向上移动一行
inoremap <M-k> <Esc>kddpk
nnoremap <M-k> kddpk
" 将当前行向下移动一行
inoremap <M-j> <Esc>ddp
nnoremap <M-j> ddp

set ff=unix
" 去掉有关vi一致性模式,避免以前版本的bug和局限
set nocompatible
" indent :set indent :set ai等自动缩进,想使用backspace将字段缩进的删除,必须设置这个选项。否则不响应
" eol 如果 insert 模式再行开头想使用backspace合并两行,需要设置eol
" start 想要删除此次插入前的输入,需要设置start
set backspace=indent,eol,start
set nu
set guifont=JetBrains_Mono_SemiBold:h12
set laststatus=2  "显示状态栏
set statusline=%F%m%r%h%w%=(%{&ff}/%Y)\ (line\ %l\/%L,\ col\ %c)
"上面的状态栏展示信息比较多,,可以如上所示进行集合性配置,如果懒得一一理解,可直接复制进配置文件,因为所有配置对于提升你编程效率都有帮助。当然如果你不嫌麻烦,也可以以下面所示形式单独配置(注意去掉前面”号)
"set statusline+=%{&ff}  "显示文件格式类型
"set statusline+=%h  "帮助文件标识
"set statusline+=%m  "可编辑文件标识
"set statusline+=%r  "只读文件标识
"set statusline+=%y  "文件类型
"set statusline+=%c  "光标所在列数
"set statusline+=%l/%L  "光标所在行数/总行数
"set statusline+=\ %P  "光标所在位置占总文件百分比

" Show a few lines of context around the cursor. Note that this makes the text
" scroll if you mouse-click near the start or end of the window.
set scrolloff=5
set linespace=3
" Don't use Ex mode, use Q for formatting.
map Q gq

" rust.vim start "
syntax enable
filetype plugin indent on
" let current_compiler = 'rustc'
let g:rustfmt_autosave = 1
let g:rustfmt_fail_silently = 0
" let g:syntastic_rust_checkers = ['cargo']
" rust.vim end"
plugin
rust.vim
- https://github.com/rust-lang/rust.vim
- 插件位置:~.vim\pack\plugins\start
注意
vim的~/.vimrc配置项,屏蔽掉下面这句话:
set fileencodings=utf-8,gb2312,gbk,gb18030,ucs-bom
再用 vim 打开jpeg文件,显示ffd8 ffc0 0011 0804和 ffd9 0a,显示正确
vim 为了支持识别和显示中文,规定了 vim 的 fileencodings
当vim打开文件时,会使用规定的编码格式对数据进行解析
jpeg的文件头FFD8、尾FFD9 不是任何一个中文的编码,vim找不到对应的中文字,就显示为??,即:3f3f
gui
Vim’s Graphical User Interface :help gui
- Starting the GUI gui-start
- Scrollbars gui-scrollbars
- Mouse Control gui-mouse 4. Making GUI Selections gui-selections
- Menus menus
- Font gui-font
- Extras gui-extras
- Shell Commands gui-shell
Other GUI documentation:
gui_x11.txt For specific items of the X11 GUI.
gui_w32.txt For specific items of the Win32 GUI.
4. Making GUI Selections
clipboard
There is a special register for storing this selection, it is the "* register. Nothing is put in here unless the information about what text is selected is about to change (e.g. with a left mouse click somewhere), or when another application wants to paste the selected text. Then the text is put in the "* register. For example, to cut a line and make it the current selection/put it on the clipboard:
"*dd
Similary, when you want to paste a selection from another application, e.g., by clicking the middle mouse button, the selection is put in the "* register first, and then put like any other register. For example, to put the selection (contents of the clipboard):
"*p
When using this register under X11, also see x11-selection. This also explains the related "* register.
Note that when pasting text from one Vim into another separate Vim, the type of selections (character, line, or block) will also be copied. For other applications the type is always character. However, if the text gets transferred via the x11-cut-buffer, the selection type is ALWAYS lost.
When the unnamed string is include in the clipboard option, the unnamed register is the same as the "* register. Thus you can yank to and paste the selection without prepending "* to commands.
gui x11
Vim’s Graphical User Interface :help gui_x11
- Starting the X11 GUI gui-x11-start
- GUI Resources gui-resources
- Shell Commands gui-pty
- Various gui-x11-various
- GTK version gui-gtk
- GNOME version gui-gnome
- KDE version gui-kde
- Compiling gui-x11-compiling 9. X11 selection mechanism x11-selection
Other relevant documentation:
gui.txt For generic items of the GUI.
9. X11 selection mechanism
x11-selection
If using X11, in either the GUI or an xterm with an X11-aware Vim, then Vim provides varied access to the X11 selection and clipboard. These are accessed by using the two selection tegisters "* and "+.
X11 provides two basic types of global store, selections and cut-buffers, which differ in one important aspect: selections are owned by an application, and disappear when that application (e.g., Vim) exits, thus losing the data, whereas cut-buffers, are stored within the X-server itself and remain until written over or the X-server exits (e.g., upon logging out).
The contents of selections are held by the originating application (e.g., upon a copy), and only passed on to another application when that other application asks for them (e.g., upon a paste).
The contents of cut-buffers are immediately written to, and are then accessible directly from the X-server, without contacting the originating application.
x11-cut-buffer
There are, by default, 8 cut-buffers: CUT_BUFFER0 to GUI_BUFFER7. Vim only uses CUT_BUFFER0, which is the one that xterm uses by default.
Whenever Vim is about to become unavailable (either via exiting or becoming suspended), and thus unable to respond to another application’s selection request, it writes the contents of any owned selection to CUT_BUFFER0. If the "+ CLIPBOARD selection is owned by Vim, then this is written in preference, otherwise if the "* PRIMARY selection is owned by Vim, then that is written.
Similarly, when Vim tries to paste from "* or "+ (either explicitly, or, in the case of the "* register, when the middle mouse button is clicked), if the requested X selection is empty or unavailable, Vim reverts to reading the current value of the CUT_BUFFER0.
Note that when text is copied to CUT_ BUFFER0 in this way, the type of selection (character, line or block) is always lost, even if it is a Vim which later pastes it.
Xterm, by default, always writes visible selections to both PRIMARY and CUT_BUFFER0. When it pastes, it uses PRIMARY if this is avaiable, or else falls back upon CUT_BUFFER0. For this reason, when cutting and pasting between Vim and an xterm, you should use the "* register. Xterm doesn’t use CLIPBOARD, thus the "+ doesn’t work with xterm.
Most newer applications will provide their current selection via PRIMARY "* and use CLIPBOART "+ for cut/copy/paste operations. You thus have access to both by choosing to use either of the "* or "+ registers.
help
:help Vim help docs
| help | :help | 帮助 |
|---|---|---|
| Move around | Use the cursor keys,or h to go left,j to go down,k to go up,l to go right. | 移动光标 |
| Close this window | Use :q<Enter> | 关闭帮助窗口 |
| Get out of Vim | Use :qa!<Enter>(careful, all change are lost!) | 退出vim |
| Jump to a subject | Position the cursor on a tag (e.g. bars) and hit CTRL-]. | 跳到 bars 节 |
| Jump to a subject with the mouse | :set mouse=a to enablethe mouse (in xterm or GUN). Double-click the left mouse button on a tag, e.g. bars. | 使用鼠标左键双击跳转到bars节 |
| Jump back | Type CTRL-O. Repeat to go further back. | 返回上一节 |
Get specific help
It is possible to go directly to whatever you want help on,by giving an argument to the :help command.Prepend something to specify the context: help-context. See help-summary for more contexts and an explanation.
| WHAT | PREPEND | EXAMPLE |
|---|---|---|
| Normal mode command | :help x | |
| Visual mode command | v_ | :help v_u |
| Insert mode command | i_ | :help i_<Esc> |
| Command-line command | : | :help :quit |
| Command-line editing | c_ | :help c_<Del> |
| Vim command argument | - | :help -r |
| Option | ' | :help 'textwidth' |
| Regular expression | / | :help /[ |
Search for help
Type :help word, then hit CTRL-D to see matching help entries for “word”. Or use :helpgrep word.:helpgrep
Getting started
Do the Vim tutor, a 30-minute interactive course for the basic commands,see vimtutor.Read the user manual form start to end:usr_01.
pattern
:help pattern The very basics can be found in section 03.9 of the user manual. A few more
explanations are in chapter 27 usr_27.txt.
- Search commands search-commands
- The definition of a pattern search-pattern
- Magic /magic
- Overview of pattern items pattern-overview
- Multi items pattern-multi-items
- Ordinary atoms pattern-atoms
- Ignoring case in a pattern /ignorecase
- Composing characters patterns-composing
- Compare with Perl patterns perl-patterns
- Highlighting matches match-highlight
- Fuzzy matching fuzzy-matching
The definition of a pattern
quick reference guide
quick reference guide :help quickref
quickref Contents
| tag | subject | tag | subject |
|---|---|---|---|
| Q_ct | list of help files | Q_re | Repeating commands |
| Q_lr | motion: Left-right | Q_km | Key mapping |
| Q_ud | motion: Up-down | Q_ab | Abbreviations |
| Q_tm | motion: Text object | Q_op | Options |
| Q_pa | motion: Pattern searches | Q_ur | Undo/Redo commands |
| Q_ma | motion: Marks | Q_et | External commands |
| Q_vm | motion: Various | Q_qf | Quickfix commands |
| Q_ta | motion: Using tags | Q_vc | Various commands |
| Q_sc | Scrolling | Q_ce | Ex: Command-line editing |
| Q_in | insert: Inserting text | Q_ra | Ex: Ranges |
| Q_ai | insert: Keys | Q_ex | Ex: Special characters |
| Q_ss | insert: Special keys | Q_st | Starting Vim |
| Q_di | insert: Digraphs | Q_ed | Editing a file |
| Q_si | insert: Special inserts | Q_fl | Using the argument list |
| Q_de | change: Deleting text | Q_wq | Writing and quitting |
| Q_cm | change: Copying and moving | Q_ac | Automatic commands |
| Q_ch | change: Changing text | Q_wi | Multi-window commands |
| Q_co | change: Complex | Q_bu | Buffer list commands |
| Q_vi | Visual mode | Q_sy | Syntax highlighting |
| Q_to | Text objects | Q_gu | GUI commands |
| Q_fo | Folding |
N is used to indicate an optional count that can be given before the command.
Q_lr Left-right motions
| Left-right motions | |||
|---|---|---|---|
| h | N | h | left (also: CTRL-H, <BS>, or <Left> key) |
| l | N | l | right (also: <Space> or <Right> key) |
| 0 | 0 | to first character in the line (also: <Home> key) | |
| ^ | ^ | to first non-blank character in the line | |
| $ | N | $ | to the last character in the line (N-1 lines lower) (also: <End> key) |
| g0 | g0 | to first character in screen line (differs from “0” when lines wrap) | |
| g^ | g^ | to first non-blank character in screen line (differs from “^” when lines wrap) | |
| g$ | N | g$ | to last character in screen line (differs from “$” when lines wrap) |
| gm | gm | to middle of the screen line | |
| gM | gM | to middle of the line | |
| bar | N | | | to column N (default: 1) |
| f | N | f{char} | to the Nth occurrence of {char} to the right |
| F | N | F{char} | to the Nth occurrence of {char} to the left |
| t | N | t{char} | till before the Nth occurrence of {char} to the right |
| T | N | T{char} | till before the Nth occurrence of {char} to the left |
| ; | N | ; | repeat the last “f”, “F”, “t”, or “T” N times |
| , | N | , | repeat the last “f”, “F”, “t”, or “T” N times in opposite direction |
Q_sc Scrolling
| Scrolling | |||
|---|---|---|---|
| CTRL-E | N | CTRL-E | window N lines downwards (default: 1) |
| CTRL-D | N | CTRL-D | window N lines Downwards (default: 1/2 window) |
| CTRL-F | N | CTRL-F | window N pages Forwards (downwards) |
| CTRL-Y | N | CTRL-Y | window N lines upwards (default: 1) |
| CTRL-U | N | CTRL-U | window N lines Upwards (default: 1/2 window) |
| CTRL-B | N | CTRL-B | window N pages Backwards (upwards) |
z<CR> | z<CR> or zt | redraw, current line at top of window | |
| z. | z. or zz | redraw, current line at center of window | |
| z- | z- or zb | redraw, current line at bottom of window | |
| These only work when ‘wrap’ is off: | |||
| zh | N | zh | scroll screen N characters to the right |
| zl | N | zl | scroll screen N characters to the left |
| zH | N | zH | scroll screen half a screenwidth to the right |
| zL | N | zL | scroll screen half a screenwidth to the left |
Q_wi Multi-window commands
| Multi-window commands | ||
|---|---|---|
| CTRL-W_s | CTRL-W s or :split | split window into two parts |
| :split_f | :split {file} | split window and edit {file} in one of them |
| :vsplit | :vsplit {file} | same, but split vertically |
| :vertical | :vertical {cmd} | make {cmd} split vertically |
| :sfind | :sf[ind] {file} | split window, find {file} in ‘path’ and edit it |
| :terminal | :terminal {cmd} | open a terminal window |
| CTRL-W_] | CTRL-W ] | split window and jump to tag under cursor |
| CTRL-W_f | CTRL-W f | split window and edit file name under the cursor |
| CTRL-W_^ | CTRL-W ^ | split window and edit alternate file |
| CTRL-W_n | CTRL-W n or :new | create new empty window |
| CTRL-W_q | CTRL-W q or :q[uit] | quit editing and close window |
| CTRL-W_c | CTRL-W c or :clo[se] | make buffer hidden and close window |
| CTRL-W_o | CTRL-W o or :on[ly] | make current window only one on the screen |
| CTRL-W_j | CTRL-W j | move cursor to window below |
| CTRL-W_k | CTRL-W k | move cursor to window above |
| CTRL-W_CTRL-W | CTRL-W CTRL-W | move cursor to window below (wrap) |
| CTRL-W_W | CTRL-W W | move cursor to window above (wrap) |
| CTRL-W_t | CTRL-W t | move cursor to top window |
| CTRL-W_b | CTRL-W b | move cursor to bottom window |
| CTRL-W_p | CTRL-W p | move cursor to previous active window |
| CTRL-W_r | CTRL-W r | rotate windows downwards |
| CTRL-W_R | CTRL-W R | rotate windows upwards |
| CTRL-W_x | CTRL-W x | exchange current window with next one |
| CTRL-W_= | CTRL-W = | make all windows equal height & width |
| CTRL-W_- | CTRL-W - | decrease current window height |
| CTRL-W_+ | CTRL-W + | increase current window height |
| CTRL-W__ | CTRL-W _ | set current window height (default: very high) |
| CTRL-W_< | CTRL-W < | decrease current window width |
| CTRL-W_> | CTRL-W > | increase current window width |
| CTRL-W_bar | CTRL-W | | set current window width (default: widest possible) |
user manual
The user manual (an older version) is available as a single, ready to print HTML and PDF file here: http://vimdoc.sf.net
Getting Started
Read this from start to end to learn the essential commands.
usr_01 About the manuals
:help usr_01
This chapter introduces the manials available with Vim. Read this to know the conditions under which the commands are explained.
01.1 Two manuals
The Vim docymentation consists of two parts:
- The User manual
- Task oriented explanations, from simple to complex. Reads from start to end like a book.
- The Reference manual
- Precise description of how everything in Vim works.
The notation used in these manuals is explained here: notation
JUMPING AROUND
The text contains hyperlinks between the two parts, allowing you to quickly jump between the descripting of an editing task and a precise explanation of the commands and options used for it. Use these two commands:
- Press
CTRL-]to jump to a subject under the cursor. - Press
CTRL-oto jump back (repeat to go further back).
Many links are in vertical bars,like this: bars. The bar themselves may be hidden or invisible; see below. An option name, like ‘number’, a command in double quotes like :write and any other word can also be used as a link. Try it out: Move the cursor to CTRL-] and press CTRL-o on it.
Other subjects can be found with the :help command; see help.txt
The bars and stars are usually hidden with the conceal feature. They also use hl-Ignore, using the same color for the text as the background. You can make them visible with:
:set conceallevel=0
:hi link HelpBar Normal
:hi link HelpStar Normal
01.2 Vim installed
Most of the manuals assume that Vim has bean properly installed. If you didn’t do that yet, or if Vim doesn’t run properly (e.g., files can’t be found or in the GUI the menus do not show up) first read the chapter on installation: usr_90.txt
not-compatible
The manuals often assume you are using Vim with Vi-compatibility switched off. For most commands this doesn’t matter, but sometimes it is important, e.g., for multi-level undo. An easy way to make sure you are using a nice setup is to copy the example vimrc file. By doing this inside Vim you don’t have to check out where it is located. How to do this depends on the system you are using:
Unix:
:!cp -i $VIMRUNTIME/vimrc_example.vim ~/.vimrc
MS-Windows:
:!copy $VIMRUNTIME/vimrc_example.vim $VIM/_vimrc
Amiga:
:!copy $VIMRUNTIME/vimrc_example.vim $VIM/.vimrc
If the file already exists you probably want to keep it.
If you start Vim now, The compatible option should be off. You can check it with this command:
:set compatible?
If it responds with “nocompatible” you are doing well. If the response is “compatible” you are in trouble. You will have to find out why the option is still set. Perhaps the file you wrote above is not found. Use this command to find out:
:scriptnames
If your file is not in the list, check its location and name. If it is in the list, there must be some other place where the ‘compatible’ option is switched back on.
For more info see vimrc and compatible-default.
Note
This manual is about using Vim in the normal way. There is an alternaive called “evim” (easy Vim). This is still Vim, but used in a way that resembles a click-and-type editor like Notepad. It always stays in Insert mode, thus it feels very different. It is not explained in the user manual, since it should be mostly self-explanatory. See evim-keys for details.
01.3 Using the Vim tutor
tutor vimtutor
Instead of reading the text (boring!) you can use the vimtutor to learn your first Vim commands. This is a 30-minute tytorial that teaches the most basic Vim functionality hands-on.
On Unix, if Vim has bean properly installed, you can start it from the shell:
vimtutor
On MS-Windows you can find it in the Program/Vim menu. Or execute vimtutor.bat in the $VIMRUNTIME directory.
This will make a copyof the tutor file, so that you can edit it without the risk of damaging the original.
There are a few translated versions of the tutor. To find out if yours is avaiable, use the two-letter language code. For French:
vimtutor fr
On Unix, if you prefer using the GUI version of Vim, use gvimtutor or vimtutor -g instead of vimtutor.
For OpenVMS, if Vim has bean properly installed, you can start vimtutor from a VMS prompt with:
@VIM:vimtutor
Optionally add the two-letter language code as above.
On other systems, you have to do a little work:
- Copy the tutor file. You can do this with Vim (it knows where to find it):
vim --clean -c 'e $VIMRUNTIME/tutor/tutor' -c 'w! TUTORCOPY' -c 'q'. This will write the file TUTORCOPY in the current directory.- For French:
vim --clean -c 'e $VIMRUNTIME/tutor/tutor.fr' -c 'w! TUTORCOPY' -c 'q'. To use a translated version of the tutor, append the two-letter language code to the filename.
- Edit the copied file with Vim:
vim --clean TUTORCOPY. The –clean argument makes sure Vim is started with noce defaults. - Delete the copied file when you are finished with it:
del TUTORCOPY.
01.4 Copyright
manual-copyright
The Vim user manual and reference manual are Copyright (c) 1988-2003 by Bram Moolenaar. This material may be distributed only subject to the terms and conditions set forth in the Open Publication License, v1.0 or later. The latest version is presently available at:http://www.opencontent.org/openpub/.
People who contribute to the manuals must agree with the above copyright notice.
frombook
Parts of the user manual come from the book 《Vi IMproved - Vim》 by Steve Oualline (published by New Riders Publishing, ISBN: 0735710015). The Open Publication License applies to this book. Only selected parts are included and these have been modified (e.g., by removing the pictures, updating the text for Vim 6.0 and later, fixing mistakes). The omission of the frombook tag does not mean that the text does not come from the book.
Many thanks to Steve Oualline and New Riders for creating this book and publishing it under the OPL! It has been a great help while writing the user manual. Not only by providing literal text, but also by setting the tone and style.
If you make money through selling the manuals, you are strongly encouraged to donate part of the profit to help AIDS victims in Uganda. See iccf.
usr_02 The first steps in Vim
:help usr_02
This chapter provides just enough information to edit a file with Vim. Not well or fast, but you can edit. Take some time to practice with these commands, they form the base for what follows.
- 02.1 Running Vim for the First Time
- 02.2 Inserting text
- 02.3 Moving around
- 02.4 Deleting characters
- 02.5 Undo and Redo
- 02.6 Other editing commands
- 02.7 Getting out
- 02.8 Finding help
02.1 Running Vim for the First Time
To start Vim, enter this command: gvim file.txt. In UNIX you can type this at any command prompt. If you are running Mocrosoft Windows, open a Command Prompt and enter the command. In either case, Vim starts editing a file called file.txt. Because this is a new file, you get a blank window. This is what your screen will look like:
        +---------------------------------------+
        |#                                      |
        |~                                      |
        |~                                      |
        |~                                      |
        |~                                      |
        |"file.txt" [New file]                  |
        +---------------------------------------+
                ('#' is the cursor position.)
The tilde(~) lines indicate lines not in the file. In other words, when Vim runs out of file to display, it displays tilde lines. At the bottom of the screen, a message line indicates the file is named file.txt and shows that you are creating a new file. The message information is temporary and other information overwrites it.
THE VIM COMMAND
The gvim command causes the editor to create a new window for editing. If you use this command:
vim file.txt
the editing occurs inside your command window. In other words, if you are running inside an xterm, the editor uses your xterm window. If you are using as MS-Windows command prompt window, the editing occurs inside this window. The text in the window will look the same for both versions, but with gvim you have extra features, like a menu bar. More about that later.
02.2 Inserting text
The Vim editor is a modal editor. That means that the editor behaves differently, depending on which mode you are in. The two basic modes are called Normal mode and Insert mode. In Normal mode the characters you type are commands. In Insert mode the characters are inserted as text.
Since you have just started Vim it will be in Normal mode. To start Insert mode you type the i command(i for Insert). Then you can enter the text. It will be inserted into the file. Do not worry if you make mistakes; you can correct then later. To enter the following programmer’s limerick, this is what you type:
iA very intelligent turtle
Found programming UNIX a hurdle
After typing turtle you press the <Enter>key to start a new line. Finally you press the <Esc> key to stop Insert mode and go back to Normal mode. You now have two lines of text in your Vim window:
        +---------------------------------------+
        |A very intelligent turtle              |
        |Found programming UNIX a hurdle        |
        |~                                      |
        |~                                      |
        |                                       |
        +---------------------------------------+
WHAT IS THE MODE?
To be able to see what mode you are in, type this command:
:set showmode
You will notice that when typing the colon Vim moves the cursor to the last line of the window. That’s where you type colon commands (commands that start with a colon). Finish this command by pressing the <Enter> key (all commands that start with a colon are finished this way).
Now, if you type the i command Vim will display –INSERT– at the bottom of the window. This indicates you are in Insert mode.
        +---------------------------------------+
        |A very intelligent turtle              |
        |Found programming UNIX a hurdle        |
        |~                                      |
        |~                                      |
        |-- INSERT --                           |
        +---------------------------------------+
If you press <Esc> to go back to Normal mode the last line will be made blank.
GETTING OUT OF TROUBLE
One of the problems for Vim novices is mode confusion, which is caused by forgetting which mode you are in or by accidentally typing a command that switches modes. To get back to Normal mode, no matter what mode you are in, press the <Esc> key. Sometimes you have to press it twice. If Vim beeps back at you, you already are in Normal mode.
02.3 Moving around
After you return to Normal mode, you can move around by using these keys:
| h | left | 左 |
| j | down | 下 |
| k | up | 上 |
| l | right | 右 |
At first, it may appear that these commands were chosen at random. After all, who ever heard of using l for right? But actually, these is a very good reason for these choices: Moving the cursor is the most common thing you do in an editor, and these keys are on the home row of your right hand. In other words, these commands are placed where you can type them the fastest (especially when you type with ten fingers).
Note
You can alse move the cursor by using the arrow keys. If you do, however, you greatly slow down your editing because to press the arrow keys, you must move your hand from the text keys to the arrow keys. Considering that you might be doing it hundreds of times an hour, this can take a significant amount of time.
Also, there are keyboards which do not have arrow keys, or which locate them in unusual places; therefore, knowning the use of the hjkl keys helps in those situations.
One way to remember these commands is that h is on the left, l is on the right and j points down. In a picture:
                       k
                   h     l
                     j
The best way to learn these commands is by using them. Use the i command to insert some more lines of text. Then use the hjkl keys to move around and insert a word somewhere. Don’t forget to press <Esc> to go back to Normal mode. The vimtutor is also a nice way to learn by doing.
For Japanese users, Hiroshi Iwatani suggested using this:
                        Komsomolsk
                            ^
                            |
           Huan Ho      <--- --->  Los Angeles
        (Yellow river)      |
                            v
                          Java (the island, not the programming language)
02.4 Deleting characters
To delete a character, move the cursor over it and type x. (This is a throwback to the old days of the typewriter, when you deleted things by typing xxxx over them.) Move the cursor to the beginning of the first line, for example, and type xxxxxxx (seven x’s) to delete “A very “. The result should look like this:
        +---------------------------------------+
        |intelligent turtle                     |
        |Found programming UNIX a hurdle        |
        |~                                      |
        |~                                      |
        |                                       |
        +---------------------------------------+
Now you can insert new text, for example by typing:
iA young <Esc>
This begins an insert (the i), inserts the words A young, and then exits insert mode (the final <Esc>). The result:
        +---------------------------------------+
        |A young intelligent turtle             |
        |Found programming UNIX a hurdle        |
        |~                                      |
        |~                                      |
        |                                       |
        +---------------------------------------+
DELETING A LINE
To detete a whole line use the dd command. The following line will then move up to fill the gap:
        +---------------------------------------+
        |Found programming UNIX a hurdle        |
        |~                                      |
        |~                                      |
        |~                                      |
        |                                       |
        +---------------------------------------+
DELETING A LINE BREAK
In Vim you can join two lines together, which means that the line break between them is deleted. The J command does this.
Take these two lines:
        A young intelligent
        turtle
Move the cursor to the first line and press J:
A young intelligent turtle
02.5 Undo and Redo
Suppose you delete too much. Well, you can type it in again, but an easier way exists. The u command undoes the last edit. Take a look at this in action: After using dd to delete the first line, u brings it back.
Another one: Move the cursor to the A in the first line:
A young intelligent turtle
Now type xxxxxxx to delete A young. The result is as follows:
intelligent turtle
Type u to undo the last delete. That delete removed the g, so the undo restores the character.
g intelligent turtle
The next u command restores the next-to-last character deleted:
ng intelligent turtle
The next u command gives you the u, and so on:
        ung intelligent turtle
        oung intelligent turtle
        young intelligent turtle
         young intelligent turtle
        A young intelligent turtle
Note
If you type u twice, and the result is that you get the same text back, you have Vim configured to work Vi compatible. Look here to fix this: not-compatible.
This text assumes you work The Vim Way. You might prefer to use the good old Vi way, but you will have to watch out for small differences in the text then.
REDO
If you undo too many times, you can press CTRL-R (redo) to reverse the preceding command. In other words, it undoes the undo. To see this in action, press CTRL-R twice. The character A and the space after it disappear:
young intelligent turtle
There’s a special version of the undo command, the U (undo line) command.The undo line command undoes all the changes made on the last line that was edited. Typing this command twice cancels the preceding U.
        A very intelligent turtle
          xxxx                          Delete very

        A intelligent turtle
                      xxxxxx            Delete turtle

        A intelligent
                                        Restore line with "U"
        A very intelligent turtle
                                        Undo "U" with "u"
        A intelligent
The U command is a change by itself, which the u command undoes and CTRL-R redoes. This might be a bit confusing. Don’t worry, with u and CTRL-R you can go to any of the situations you had. More about that in section 32.2
02.6 Other editing commands
Vim has a large number of commands to change the text. See Q_in and below.
Here are a few often used ones.
APPENDING
The i command inserts a character before the character under the cursor.
That works fine; but what happens if you want to add stuff to the end of the line? For that you need to insert text after the cursor. This is done with the a (append) command.
For example, to change the line
and that's not saying much for the turtle.
to
and that's not saying much for the turtle!!!
move the cursor over to the dot at the end of the line. Then type x to delete the period. The cursor is now positioned at the end of the line on the e in turtle. Now type
a!!!<Esc>
to append three exclamation points after the e in turtle:
and that's not saying much for the turtle!!!
OPENING UP A NEW LINE
The o command creates a new, empty line below the cursor and puts Vim in Insert mode. Then you can type the text for the new line.
Suppose the cursor is somewhere in the first of these two lines:
        A very intelligent turtle
        Found programming UNIX a hurdle
If you now use the o command and type new text:
oThat liked using Vim<Esc>
The result is:
        A very intelligent turtle
        That liked using Vim
        Found programming UNIX a hurdle
The O command (uppercase) opens a line above the cursor.
USING A COUNT
Suppose you want to move up nine lines. You can type kkkkkkkkk or you can enter command 9k. In fact, you can precede many commands with a number. Earlier in this chapter, for instance, you added three exclamation points to the end of a line by typing a!!!<Esc>. Another wat to do this is to use the command 3a!<Esc>. Thr count of 3 tells the command that follows to triple its effect. Similarly, to delete three characters, use the command 3x. The count always comes before the command it applies to.
02.7 Getting out
To exit, use the ZZ command. This command writes the file and exits.
Note:
Unlike many other editors, Vim does not automatically make a backup file. If you type ZZ, your changes are committed and there’s no turning back. You can configure the Vim editor to produce backup files;see 07.4.
DISCARDING CHANGES
Sometimes you will make a sequence of changes and suddenly realize you were better off before you started. Not to worry; Vim has a quit-and-throw-things-away command. It is:
:q!
Don’t forget to press <Enter> to finish the command.
For those of you interested in the details, the three parts of this command are the colon (:), which enters Command-line mode; the q command, which tells the editor to quit; and the override command modifier (!).
The override command modifier is needed because Vim is reluctant to throw away changes. If you were to just type :q, Vim would display an error message and refuse to exit:
E37: No write since last change (use ! to override)
By specifying the override, you are in effect telling Vim, “I know that what I’m doing looks stupid, but I really want to do this.”
If you want to continue editing with Vim: The :e! command reloads the original version of the file.
02.8 Finding help
Everything you always wanted to know can be found in the Vim help files. Don’t be afraid to ask!
If you know what you are looking for, it is usually easier to search for it using the help system, instead of using Google. Because the subjects follow a certain style guide.
Also the help has the advantage of belonging to your particular Vim version.
You won’t see help for commands added later. These would not work for you.
To get generic help use this command
:help
You could alse use the first function key <F1>. If you keybord has a <Help> key it might work as well.
If you don’t supply a subject, :help displays the general help window. The creators of Vim did something very clever (or very lazy) with the help system: They made the help window a normal editing window. You can use all the normal Vim commands to move through the help information. Therefore h, j, k, and l move left, down, up and right.
To get out of the help window, use the same command you use to get out of the editor: ZZ. This will only close the help window, not exit Vim.
As you read the help text, you will notice some text enclosed in vertical bars (for example, help). This indicates a hyperlink. If you position the cursor anywhere between the bars and press CTRL-] (jump to tag), the help system takes you to the indicated subject. (For reasons not discussed here, the Vim terminology for a hyperlink is tag. So CTRL-] jumps to the location of the tag given by the word under the cursor.)
After a few jumps, you might want to go back. CTRL-T (pop tag) takes you back to the preceding position. CTRL-O (jump to older position) also works nicely here.
At the top of the help screen, there is the notation *help.txt*. This name between * characters is used by the help system to define a tag (hyperlink destination).
See 29.1 for details about using tags.
To get help on a given subject, use the following command:
:help {subject}
To get help on the x command, for example, enter the following:
:help x
To find out how to delete text, use this command:
:help deleting
To get a complete index of all Vim commands, use the following command:
:help index
When you need to get help for a control character command (for example, CTRL-A), you need to spell it with the prefix CTRL-.
:help CTRL-A
The Vim editor has many different modes. By default, the help system displays the normal-mode commands. For example, the following command displays help for the normal-mode CTRL-H command:
:help CTRL-H
To identify other modes, use a mode prefix. If you want the help for the insert-mode version of a command, use i_. For CTRL-H this gives you the following command:
:help i_CTRL-H
When you start the Vim editor, you can use several command-line arguments. These all begin with a dash (-). To find what the -t argument does, for example, use the command:
:help -t
The Vim editor has a number of options that enable you to configure and customize the editor. If you want help for an option, you need to enclose it in single quotation marks To find out what the number option does, for example, use the following command:
:help 'number'
The table with all mode prefixes can be found below: help-summary
Special keys are enclosed in angle brackets. To find help on the up-arrow key in Insert mode, for instance, use this command:
:help i_<Up>
If you see an error message that you don’t understand, for example:
E37: No write since last change (use ! to override)
You can use the error ID at the start to find help about it:
:help E37
help-summary
- Use
Ctrl-Dafter typing a topic and let Vim show all avaiable topics. Or press Tab to complete:
:help some<Tab>
More information on how to use the help:
:help helphelp
- Follow the links in bars to related help. You can go from the detailed help to the user documentation, which describes certain commands more from a user perspective and less detailed. E.g. after:
:help pattern.txt
You can see the user guide topics 03.9 and usr_27 in the introduction.
- Options are enclosed in single apostrophes. To go to the help topic for the list option:
:help 'list'
If you only know you are looking for a certain option, you can also do:
:help options.txt
to open the help page which describes all option handling and then search using regular expressions, e.g. textwidth.
Certain options have their own namespace, e.g.:
:help cpo-<letter>
for the corresponding flag of the cpoptions settings, substitute <letter> by a specific flag, e.g.:
:help cpo-<letter>
And for the guioptions flags:
:help go-<letter>
- Normal mode commands do not have a prefix. To go to the help page for the gt command:
:help gt
- Insert mode commands start with i_. help for deleting a word:
:help i_CTRL-W
- Visual mode commands start with v_. Help for jumping to the other side of the Visual area:
:help v_o
- Command line editing and arguments start with c_. Help for using the command argument %:
:help c_%
- Ex-commands always start with :, so to go to the
:scommand help:
:help :s
- COmmands specifically for debugging start with >. To go to the help for the cont debug command:
:help >cont
- Key combinations. They usually start with a single letter indicating the mode for which they can be used. E.g.:
:help i_CTRL-X
takes you to the family of CTRL-X commands for insert mode which can be used to auto-complete different things. Note, that certain keys will always be written the same, e.g. Control will always be CTRL.
For normal mode commands there is no prefix and the topic is available at :h CTRL-<Letter>. E.g.
:help CTRL-W
In contrast
:help c_CTRL-R
will describe what the CTRL-R does when entering commands in the Command line and
:help v_CTRL-A
talks about incrementing numbers in visual mode and
:help g_CTRL-A
talks about the g<C-A> command (e.g. you have to press g then <CTRL-A>). Here the g stands for the normal command g which always expects a second key before doing something similar to the commands starting with z.
- Regexp items always start with
/.So to get help for the\+quantifier in Vim regexes:
:help /\+
If you need to know everything about regular expressions, start reading at:
- Registers always start with quote. To find out about the special : register:
- Vim script is available at
:help eval.txt
Certain aspects of the language are available at :h expr-X where X is a single letter. E.g.
:help expr-!
will take you to the topic describing the ! (Not) operator for Vim script.
Also important is
:help function-list
to find a short description of all functions available. Help topics for Vim script functions always include the (), so:
:help append()
talks about the append Vim script function rather than how to append text in the current buffer.
- Mapping are talked about in the help page
:h map.txt. Use
:help mapmode-i
to find out about the :imp command. Also use :map-topic
to find out about certain subtopics particular for mapping. e.g:
:help :map-local
for buffer-local mapping or
:help map-bar
for how the | is handled in mappings.
- Command definitions are talked about
:h command-topic, so use
:help command-bar
to find out about the ! argument for custom commands.
- Window management commands always start with
CTRL-W, so you find the corresponding help at:h CTRL-W_letter. E.g.
:help CTRL-W_p
for moving the previous accessed window. You can also access
:help windows.txt
and read your way through if you are looking for window handling commands.
- Use
:helpgrepto search in all help pages (and also of any installed plugins). See:helpgrepfor how to use it.
To search for a topic:
:helpgrep topic
This takes you to the first match. To go to the next one:
:cnext
All matches are available in the quickfix window which can be opened with:
:copen
Move around to the match you like and press Enter to jump to that help.
- The user manual. This describes help topics for beginners in a rather friendly way. Start at usr_toc.txt to find the table of content (as you might have guessed):
:help usr_toc.txt
Skim over the contents to find interesting topics. The Digraphs and “Entering special characters” items are in chapter 24, so to go to that particular help page:
:help usr_24.txt
Also if you want to access a certain chapter in the help, the chapter number can be accessed directly like this:
:help 10.1
which goes to chapter 10.1 in usr_10.txt and talks about recording macros.
- Highlighting groups. Always start with hl-groupname. E.g.
:help hl-WarningMsg
talks about the WarningMsg highlighting group.
- Syntax highlighting is namespaced to
:syn-topic. E.g.
:help :syn-conceal
talks about the conceal argument for the :syn command.
- Quickfix commands usually start with
:cwhile location list commands usually start with:l - Autocommand events can be found by their name:
:help BufWinLeave
To see all possible events:
:help autocommand-events
- Command-line switches always start with
-. SO for the help of the-fcommand switch of Vim use:
:help -f
- Optional features always start with
+. To find out about the conceal feature use:
:help +conceal
- Documentation for included filetype specific functionality is usually available in the form
ft-<filetype>-<functionality>. So
:help ft-c-syntax
talks about the C syntax file and the option it provides. Sometimes, additional sections for omni completion
:help ft-php-omni
or filetype plugins
:help ft-tex-plugin
are available.
- Error and Warning codes can be looked up directly in the help. So
:help E297
takes you exactly to the description of the swap error message and
:help W10
talks about the warning Changing a readonly file.
SomeTimes, however, those error codes are not described, but rather are listed at the Vim command that usually causes this. So:
:help E128
takes you to the :function command
usr_03 Moving around
:help usr_03
Before you can insert or delete text the cursor has to be moved to the right place. Vim has a large number of commands to position the cursor. This chapter shows you how to use the most important ones. You can find a list of these commands below Q_lr.
- 03.1 Word movement
- 03.2 Moving to the start or end of a line
- 03.3 Moving to a character
- 03.4 Matching a paren
- 03.5 Moving to a specific line
- 03.6 Telling where you are
- 03.7 Scrolling around
- 03.8 Simple searches
- 03.9 Simple search patterns
- 03.10 Using marks
03.1 Word movement
To move the cursor forward one word, use the w command. Like most Vim commands, you can use a numeric prefix to move past multiple words. For example, 3w moves three words. This figure shows how it works (starting at the position marked with x):
        This is a line with example text
          x-->-->->----------------->
             w  w w    3w
Notice that w woves to the start of the next word if it already is at the start of a word.
The b command moves backword to the start of the previous word:
        This is a line with example text
        <----<--<-<---------<--x
           b   b b    2b      b
There is also the e command that moves to the next end of a word and ge, which moves to the previous end of a word:
        This is a line with example text
           <----<----x---->------------>
           2ge   ge     e       2e
If you are at the last word of a line, the w command will take you to the first word in the next line. Thus you can use this to move through a paragraph, much faster than using l. b does the same in the other direction.
A word ends at a non-word character, such as a ., - or ). To change what Vim considers to be a word, see the iskeyword option. If you try this out in the help directory, iskeyword needs to be reset for the examples to work:
:set iskeyword&
It is also possible to move by white-space separated WORDs. This is not a word in the normal sense, that’s why the uppercase is used. The commands for moving by WORDs are also uppercase, as this figure shows:
               ge      b          w                             e
               <-     <-         --->                          --->
        This is-a line, with special/separated/words (and some more).
           <----- <-----         -------------------->         ----->
             gE      B                   W                       E
With this mix of lowercase and uppercase commands, you can quickly move forward and backward through a paragraph.
03.2 Moving to the start or end of a line
The $ command moves the cursor to the end of a line. If your keyboard has an <End> key it will do the same thing.
The ^ command moves to the first non-blank character of the line. The 0 command (zero) moves to the very first character of the line, and the <Home> key does the same thing. In a picture (. indicates a space):
                  ^
             <-----------x
        .....This is a line with example text
        <----------------x   x-------------->
                0                  $
(the ….. indicates blanks here)
The $ command takes a count, like most movement commands. But moving to the end of the line several times doesn’t make sense. Therefore it causes the editor to move to the end of another line. For example, 1$ moves you to the end of the first line (the one you’re on), 2$ to the end of the next line, and so on.
The 0 command doesn’t take a count argument, because the 0 would be part of the count. Unexpectedly, using a count with ^ doesn’t have any effect.
03.3 Moving to a character
One of the most useful movement commands is the single-character search command. The command fx searches forward in the line for the single character x. Hint: f stands for Find.
For example, you are at the beginning of the following line. Suppose you want to go to the h of human. Just execute the command fh and the cursor will be positioned over the h:
        To err is human.  To really foul up you need a computer.
        ---------->--------------->
            fh           fy
This also shows that the command fy moves to the end of the word really.
You can specify a count; therefore, you can go to the l of foul with 3fl:
        To err is human.  To really foul up you need a computer.
                  --------------------->
                           3fl
The F command searches to the left:
        To err is human.  To really foul up you need a computer.
                  <---------------------
                            Fh
The tx command works like the fx command, except it stops one character before the searched character. Hint: t stands for To. The backward version of this command is Tx.
        To err is human.  To really foul up you need a computer.
                   <------------  ------------->
                        Th              tn
These four commands can be repeated with ;. , repeats in the other direction. The cursor is never moved to another line. Not even when the sentence continues.
Sometimes you will start a search, only to realize that you have typed the wrong command. You type f to search backward, for example, only to realize that you really meant F. To about a search, press <Esc>. So f<Esc> is an aborted forward search and doesn’t do anything. Note: <Esc> cancels most operations, not just searches.
03.4 Matching a parenthesis
When writing a program you often end up with nested () constructs. Then the % command is very handy: It moves to the matching paren. If the cursor is on a ( it will move to the matching ). If it’s on a ) it will move to the matching (.
                            %
                         <----->
                if (a == (b * c) / d)
                   <---------------->
                            %
This also works for [] and {} pairs. (This can be defined with the matchpairs option.)
When the cursor is not on a useful character, % will search forward to find one. Thus if the cursor is at the start of the line of the previous example, % will search forward and find the first (. Then it moves to its match:
                if (a == (b * c) / d)
                ---+---------------->
                           %
03.5 Moving to a specific line
If you are a C or C++ programmer, you are familiar with error messages such as the following:
prog.c:33: j undeclared (first use in this function)
This tells you that you might want to fix something on line 33. So how do you find line 33? One way is to do 9999k to go to the top of the file and 32j to go down thirty-two lines. It is not a good way, but it works, A much better way of doing things is to use the G command. With a count, this command positions you at the given line number. For example, 33G puts you on line 33. (For a better way of going through a compiler’s error list, see usr_30.txt, for information on the :make command.)
With no argument, G positions you at the end of the file. A quick way to go to the start of a file use gg. 1G will do the same, but is a tiny bit more typing.
            |   first line of a file   ^
            |   text text text text    |
            |   text text text text    |  gg
        7G  |   text text text text    |
            |   text text text text
            |   text text text text
            V   text text text text    |
                text text text text    |  G
                text text text text    |
                last line of a file    V
Another way to move to a line is using the % command with a count. For example 50% moves you to halfway the file. 90% goes to near the end.
The previous assumes that you want to move to a line in the file, no matter if it’s currently visible or not. What if you want to move to one of the lines you can see? This figure shows the three commands you can use:
                        +---------------------------+
                H -->   | text sample text          |
                        | sample text               |
                        | text sample text          |
                        | sample text               |
                M -->   | text sample text          |
                        | sample text               |
                        | text sample text          |
                        | sample text               |
                L -->   | text sample text          |
                        +---------------------------+
HintsL H stands for Home, M for Middle and L for Last. Alternatively, H for high, M for Middle and L for low.
03.6 Telling where you are
To see where you are in a file, there are three ways:
- Use the
CTRL-Gcommand. You get a message like this (assuming theruleroption is off):
"usr_03.txt" line 233 of 650 --35%-- col 45-52
This shows the same of the file you are editing, the line number where the cursor is, the total number of lines, the percentage of the way through the file and the column of the cursor.
Sometimes you will see a split column number. For example, col 2-9. This indicates that the cursor is positioned on the second character, but because character one is a tab, occupying eight spaces worth of columns, the screen column is 9.
- Set the
numberoption. This will display a line number in front of every line:
        :set number
        :set nu
To switch this off again:
        :set nonumber
        :set nonu
Since number is a boolean option, prepending no to its names has the effect of switching it off. A boolean option has only these two values, it is either on or off.
Vim has many options. Besides the boolean ones there are options with a numerical value and string options. You will see examples of this where they are used.
- Set the
ruleroption. This will display the cursor position in the lower right corner of the Vim window:
:set ruler
Using the ruler option has the advantage that it doesn’t take much room, thus there is more space for your text.
03.7 Scrolling around
The CTRL-U command scrolls down half a screen of text. Think of looking through a viewing window at the text and moving this window up by half the height of the window. Thus the window moves up over the text, which is backward in the file. Don’t worry if you have a little trouble remembering which end is up. Most users have the same problem.
The CTRL_D command moves the viewing window down half a screen in the file, thus scrolls the text up half a screen.
                                       +----------------+
                                       | some text      |
                                       | some text      |
                                       | some text      |
        +---------------+              | some text      |
        | some text     |  CTRL-U  --> |                |
        |               |              | 123456         |
        | 123456        |              +----------------+
        | 7890          |
        |               |              +----------------+
        | example       |  CTRL-D -->  | 7890           |
        +---------------+              |                |
                                       | example        |
                                       | example        |
                                       | example        |
                                       | example        |
                                       +----------------+
To scroll one line at a time use CTRL-E (scroll up) and CTRL-Y (scroll down).
Think of CTRL-E to give you one line Extra. (If you use MS-Windows compatible key mappings CTRL-Y will redo a change instead of scroll.)
To scroll forward by a whole screen (except for two lines) use CTRL-F. To scroll backwards, use CTRL-B. These should be easy to remember: F for forwards and B for Backwards.
A common issue is that after moving down many lines with j your cursor is at the bottom of the screen. You would like to see the context of the line with the cursor. That’s done with the zz command.
        +------------------+             +------------------+
        | earlier text     |             | earlier text     |
        | earlier text     |             | earlier text     |
        | earlier text     |             | earlier text     |
        | earlier text     |   zz  -->   | line with cursor |
        | earlier text     |             | later text       |
        | earlier text     |             | later text       |
        | line with cursor |             | later text       |
        +------------------+             +------------------+
The ztcommand put the cursor line at the top, zb at the bottom. There are a few more scrolling commands, see Q_sc. To always keep a few lines of context around the cursor, use the scrolloff option.
03.8 Simple searches
To search for a string, use the /string command. To find the word include, for example, use the command:
/include
You will notice that when you type the / the cursor jumps to the last line of the Vim window, like with colon commands. That is where you type the word. You can press the backspace key (backarrow or <BS>) to make corrections. Use the <Left> and <Right> cursor keys when necessary.
Pressing <Enter> executes the command.
Note:
The characters .*[]^%/\?~$ have special meanings. If you want to use them in a search you must put a \ in front of them. See below.
To find the next occurrence of the same string use the n command. Use this to find the first #include after the cursor:
/#include
And then type n several times. You will move to each #include in the text.
You can also use a count if you know which match you want. Thus 3n finds the third match. You can also use a count with /: 4/the goes to the fourth match of the.
The ? command works like / but searches backwards:
?word
The N command repeats the last search the opposite direction. Thus using N after a / command searches backwards, using N after ? searches forwards.
IGNORING CASE
Normally you have to type exactly what you want to find. If you don’t care about upper or lowercase in a word, set the ignorecase option:
:set ignorecase
If you now search for word, it will also match Word and WORD. To match case again:
:set noignorecase
HISTORY
Suppose you do three searches:
        /one
        /two
        /three
Now let’s start searching by typing a simple / without pressing <Enter>. If you press <Up> (the cursor key), Vim puts /three on the command line. Pressing <Enter> at this point searches for three. If you do not press <Enter>, but press <Up> instead, Vim changes the prompt to /two. Another press of <Up> moves you to /one.
You can also use the <Down> cursor key to move through the history of search commands in the other direction.
If you know what a previously used pattern starts with, and you want to use it again, type that character before pressing <Up>. With the previous example, you can type /o<Up> and Vim will put /one on the command line.
The commands starting with : also have a history. That allows you to recall a previous command and execute it again. These two histories are separate.
SEARCHING FOR A WORD IN THE TEXT
Suppose you see the word TheLongFunctionName in the text and you want to find the next occurrence of it. You could type /TheLongFunctionName, but that’s a lot of typing. And when you make a mistake Vim won’t find it.
There is an easier way: Position the cursor on the word and use the * command. Vim will grab the word under the cursor and use it as the search string.
The # command does the same in the other direction. You can prepend a count: 3* searches for the third occurrence of the word under the cursor.
SEARCHING FOR WHOLE WORDS
If you type /the it will also match there. To only find words that end in the use:
/the\>
The \> item is a special marker that only matches at the end of a word.
Similarly \< only matches at the begining of a word. Thus to search for the word the only:
/\<the\>
This does not match there or soothe. Notice that the * and # commands use these start-of-word and end-of-word markers to only find whole words (you can use g* and g# to match partial words).
HIGHLIGHTING MATCHES
While editing a program you see a variable called nr. You want to check where it’s used. You could move the cursor to nr and use the * command and press n to go along all the matches.
There is another way. Type this command:
:set hlsearch
If you now search for nr, Vim will highlight all matches. That is a very good way to see where the variable is used, without the need to type commands.
To switch this off:
:set nohlsearch
Then you need to switch it on again if you want to use it for the next search command. If you only want to remove the highlighting, use this command:
:nohlsearch
This doesn’t reset the option. Instead, it disables the highlighting. As soon as you execute a search command, the highlighting will be used again. Also for the n and N commands.
TUNING SEARCHES
There are a few options that change how searching works. These are the essential ones:
:set incsearch
This makes Vim display the match for the string while you are still typing it. Use this to check if the right match will be found. Then press <Enter> to really jump to that location. Or type more to change the search string.
:set nowrapscan
This stops the search at the end of the file. Or, when you are searching backwards, it stops the search at the start of the file. The wrapscan option is on by default, thus searching wraps around the end of the file.
INTERMZZO
If you like one of the options mentioned before, and set it each time you use Vim, you can put the command in your Vim startup file.
Edit the file, as mentioned at not-compatible. Or use this command to find out where it is:
:scriptnames
Edit the file, for example with:
:edit ~/.vimrc
Then add a line with the command to set the option, just like you typed it in Vim. Example:
Go:set hlsearch<Esc>
G Moves to the end of the file. o starts a new line, where you type the :set command. You end insert mode with <Esc>. Then write and close the file:
ZZ
If you now start Vim again, the hlsearch option will already be set.
03.9 Simple search patterns
The Vim editor uses regular expressions to specify what to search for.
Regular expressions are an extremely powerful and compact way to specify a search pattern. Unfortunately, this power comes at a price, because regular expressions are a bit tricky to specify.
In this section we mention only a few essential ones. More about search patterns and commands can be found in chapter 27 usr_27.txt. You can find the full explanation here: pattern
BEGINING AND END OF A LINE
The ^ character matches the begining of a line. On an English-US keyboard you find it above the 6. The pattern include matches the word include anywhere on the line. But the pattern ^include matches the word include only if it is at the begining of a line.
The $ character matches the end of a line. Therefore, was$ matches the word was only if it is at the end of a line.
Let’s mark the places where /the matches in this example line with xs:
        the solder holding one of the chips melted and the
        xxx                       xxx                  xxx
Using /the$ we find this match:
        the solder holding one of the chips melted and the
                                                       xxx
And with /^the we find this one:
        the solder holding one of the chips melted and the
        xxx
You can try searching with /^the$; it will only match a single line consisting entirely of the. White space does matter here, thus if a line contains a space after the word, like the , the pattern will not match.
MATCHING ANY SINGLE CHARACTER
The . (dot) character matches any existing character. For example, the pattern c.m matches a string whose first character is a c, whose second character is anything, and whose third character is m. Example:
        We use a computer that became the cummin winter.
                 xxx             xxx      xxx
MATCHING SPECIAL CHARACTERS
If you really want to match a dot, you must avoid its special meaning by putting a backslash before it.
If you search for ter., you will find these matches:
        We use a computer that became the cummin winter.
                      xxxx                          xxxx
Searching for ter\. only finds the second match.
03.10 Using marks
When you make a jump to a position with the G command, Vim remembers the position from before this jump. This position is called a mark. To go back where you came from, use this command:
``
This ` is a backtick or open single-quote character.
If you use the same command a second time you will jump back again. That’s because the ` command is a jump itself, and the position from before this jump is remembered.
Generally, every time you do a command that can move the cursor further than within the same line, this is called a jump. This includes the search commands / and n (it doesn’t matter how far away the match is). But not the character searches with fx and tx or the word movements w and e.
Also, j and k are not considered to be a jump, even when you use a count to make them move the cursor quite a long way away.
The `` command jumps back and forth, between two points. The CTRL-O command jumps to older positions (Hint: O for older). CTRL-I then jumps back to newer positions (Hint: for many common keyboard layouts, I is just next to O).Consider this sequence of commands:
        33G
        /^The
        CTRL-O
You first jump to line 33, then search for a line that starts with The.Then with CTRL-O you jump back to line 33. Another CTRL-O takes you back to where you started. If you now use CTRL-I you jump to line 33 again. And to the match for The with another CTRL-I.
| example text ^ |
33G | example text | CTRL-O | CTRL-I
| example text | |
V line 33 text ^ V
| example text | |
/^The | example text | CTRL-O | CTRL-I
V There you are | V
example text
Note:
CTRL-I is the same as <Tab>.
The :jumps command givesa list of positions you jumped to. The entry which you used last is marked with a >.
NAMED MARKS
Vim enables you to place your own marks in the text. The command ma marks the place under the cursor as mark a. You can place 26 marks (a through z) in your text. You can’t see them, it’s just a position that Vim remembers.
To go to a mark, use the command `{mark}, where {mark} is the mark letter. Thus to move to the a mark:
`a
The command ’mark (single quotation mark, or apostrophe) moves you to the begining of the line containing the mark. This differs from the `mark command, which also moves you to the marked column.
The marks can be very useful when working on two related parts in a file. Suppose you have some text near the start of the file you need to look at, while working on some text near the end of the file.
Move to the text at the start and place the s (start) mark there:
ms
Then move to the text you want to work on and put the e (end) mark there:
me
Now you can move around, and when you want to look at the start of the file, you use this to jump there:
's
Then you can use ‘’ to jump back to where you were, or ’e to jump to the text you were working on at the end.
There is nothing special about using s for start and e for end, they are just easy to remember.
You can use this command to get a list of marks:
:marks
You will notice a few special marks. These include:
' The cursor position before doing a jump
" The cursor position when last editing the file
[ Start of the last change
] End of the last change
usr_04 Making small changes
:help usr_04
This chapter shows you several ways of making corrections and moving text around. It teaches you the three basic ways to change text: operator-motion,Visual mode and text objects.
- 04.1 Operators and motions
- 04.2 Changing text
- 04.3 Repeating a change
- 04.4 Visual mode
- 04.5 Moving text
- 04.6 Copying text
- 04.7 Using the clipboard
- 04.8 Text objects
- 04.9 Replace mode
- 04.10 Conclusion
04.1 Operators and motions
In chapter 2 you learned the x command to delete a single character. And using a count: 4x deletes four characters.
The dw command deletes a word. You may recongnize the w command as the move word command. In fact, the d command may be followed by any motion command, and it deletes from the current location to the place where the cursor winds up.
The 4w command, for example, moves the cursor over four words. The d4w command deletes four words.
To err is human. To really foul up you need a computer.
------------------>
d4w
To err is human. you need a computer.
Vim only deletes up to the position where the motion takes the cursor. That’s because Vim knows that you probably don’t want to delete the first character of a word. if you use the e command to move to the end of a word, Vim guesses that you do want to include that last character:
To err is human. you need a computer.
-------->
d2e
To err is human. a computer.
Whether the character under the cursor is include depends on the command you used to move to that character. The reference manual calls this exclusive when the character isn’t included and inclusive when it is.
The $ command moves to the end of a line. The d$ command deletes from the cursor to the end of the line. This is an inclusive motion, thus the last character of the line is included in the delete operation:
To err is human. a computer.
------------>
d$
To err is human
There is a pattern here: operator-motion. You first type an operator command. For example, d is the delete operator. Then you type a motion command like 4l or w. This way you can operate on any text you can move over.
04.2 Changing text
Another operator is c, change. It acts just like the d operator, except it leaves you in Insert mode. For example, cw changes a word. Or more specifically , it deletes a word and then puts you in Insert mode.
To err is human
------->
c2wbe<Esc>
To be human
This c2wbe<Esc> contains these bits:
c the change operator
2w move two words (they are deleted and Insert mode started)
be insert this text
<Esc> back to Normal mode
You will have noticed something strange: The space before human isn’t deleted. There is a saying that for every problem there is an answer that is simple, clear, and wrong. that is the case with the example used here for the cw command. The c operator works just like the d operator, with one exception: cw. It actually works like ce, change to end of word. Thus the space after the word isn’t included. This is an exception that dates back to the old Vi. Since many people are used to it now, the inconsisrency has remained in Vim.
MORE CHANGES
Like dd deletes a whole line, cc changes a whole line. It keeps the existing indent (leading white space) though.
Just like d$ deletes until the end of the line, c$ changes until the end of the line. It’s like doing d$ to delete the text and then a to start Insert mode and append new text.
SHORTCUTS
Some operator-motion commands are used so often that they have been given a single-letter command:
x stands for dl (delete character under the cursor)
X stands for dh (delete character left of the cursor)
D stands for d$ (delete to end of the line)
C stands for c$ (change to end of the line)
s stands for cl (change one character)
S stands for cc (change a whole line)
WHERE TO PUT THE COUNT
The commands 3dw and d3w delete three words. If you want to get really pickly about things, the first command, 3dw, deletes one word three times; the command d3w deletes three words once. This is a difference without a distinction. You can actually put in two counts, however. For example, 3d2w deletes two words, repeated three times, for a total of six words.
REPLACING WITH ONE CHARACTER
The r command is not an operator. It waits for you to type a character, and will replace the character under the cursor with it. You could do the same with cl or with the s command, but with r you don’t have to press <Esc> to get back out of insert mode.
there is somerhing grong here
rT rt rw
There is something wrong here
Using a count with r causes that many characters to be replaced with the same character. Example:
There is something wrong here
5rx
There is something xxxxx here
To replace a character with a line break use r<Enter>. This deletes one character and inserts a line break. Using a count here only applies to the number of characters deleted: 4r<Enter> replaces four characters with one line break.
04.3 Repeating a change
The . command is one of the simplest yet powerful commands in Vim. It repeats the last change. For instance, suppose you are editing an HTML file and want to delete all the <B> tags. You position the cursor on the first < and delete the <B> with the command df>. You then go to the < of the next </B> and delete it using the . command. The . command executes the last change command (in this case, df>). To delete another tag, position the cursor on the < and use the . command.
To <B>generate</B> a table of <B>contents
f< find first < --->
df> delete to > -->
f< find next < --------->
. repeat df> --->
f< find next < ------------->
. repeat df> -->
The . command works for all changes you make, except for u (undo), CTRL-R (redo) and commands that start with a colon (:).
Another example: You want to change the word four to five. It appears several times in your text. You can do this quickly with this sequence of commands:
/four<Enter> find the first string "four"
cwfive<Esc> change the word to "five"
n find the next "four"
. repeat the change to "five"
n find the next "four"
. repeat the change
etc.
04.4 Visual mode
To delete simple items the operator-motion changes work quite well. But often it’s not so easy to decide which command will move over the text you want to change. Then you can use Visual mode.
You start Visual mode by pressing v. You move the cursor over the text you want to work on. While you do this, the text is highlighted. Finally type the operator command.
For example, to delete from the middle of one word to the middle of another word:
This is an examination sample of visual mode
---------->
velllld
This is an example of visual mode
When doing this you don’t really have to count how many times you have to press l to end up in the right position. You can immediately see what text will be deleted when you press d.
If at any time you decide you don’t want to do anything with the highlighted text, just press <Esc> and Visual mode will stop without doing anything.
SELECTING LINES
If you want to work on whole lines, use V to start Visual mode. You will see right away that the whole line is highlighted, without moving around.When you move left or right nothing changes. When you move up or down the selection is extended whole lines at a time.
For example, select three lines with Vjj:
+------------------------+
| text more text |
>> | more text more text | |
selected lines >> | text text text | | Vjj
>> | text more | V
| more text more |
+------------------------+
SELECTING BLOCKS
If you want to work on a rectangular block of characters, use CTRL-V (:visual block or :vb)to start Visual mode. This is very useful when working on tables.
name Q1 Q2 Q3
pierre 123 455 234
john 0 90 39
steve 392 63 334
To delete the middle Q2 column, move the cursor to the Q of Q2. Press CTRL-V to start blockwise Visual mode. Now move the cursor three lines down with 3j and to the next word with w. You can see the first character of the last column is included. To exclude it, use h. Now press d and the middle column is gone.
GOING TO THE OTHER SIDE
If you have selected some text in Visual mode, and discover that you need to change the other end of the selection, use the o command (Hint: o for other end). The cursor will go to the other end, and you can move the cursor to change where the selection starts. Pressing o again brings you back to the other end.
When using blockwise selection, you have four corners. o only takes you to one of the other corners, diagonally. Use O to move to the other corner in the same line.
Note that o and O in Visual mode work very differently from Normal mode, where they open a new line below or above the cursor.
04.5 Moving text
When you delete something with d, x, or another command, the text is saved. You can paste it back by using the p command. (The Vim name for this is put).
Take a look at how this works. First you will delete an entire line, by putting the cursor on the line you want to delete and typing dd. Now you move the cursor to where you want to put the line and use the p (put) command. The line is inserted on the line below the cursor.
a line a line a line
line 2 dd line 3 p line 3
line 3 line 2
Because you deleted an entire line, the p command placed the text line below the cursor. If you delete part of a line (a word,for instance), the p command puts it just after the cursor.
Some more boring try text to out commands.
---->
dw
Some more boring text to out commands.
------->
welp
Some more boring text to try out commands.
MORE ON PUTTING
The P command puts text line p, but before the cursor. When you deleted a whole line with dd, P will put it back above the cursor. When you deleted a word with dw, P will put it back just before the cursor.
You can repeat putting as many times as you like. The same text will be used.
You can use a count with p and P. The text will be repeated as many times as specified with the count. Thus dd and then 3p puts three copies of the same deleted line.
SWAPPING TWO CHARACTERS
Frequently when you are typing, you fingers get ahead of your brain (or the other way around?). The result is a type such as teh for the. Vim makes it easy to correct such problems. Just put the cursor on the e of teh and execute the command xp. This works as follows: x deletes the character e and places it in a register. p puts the text after the cursor, which is after the h.
teh th the
x p
04.6 Copying text
To copy text from one place to another, you could delete it, use u to undo the deletion and then p to put it somewhere else. There is an easier way: yanking. The y operator copies text into a register. Then a p command can be used to put it.
Yanking is just a Vim name for copying. The c letter was already used for the change operator, and y was still available. Calling this operator yank made it easier to temember to use the y key.
Since y is an operator, you use yw to yank a word. A count is possible as usual. To yank two words use y2w. Example:
let sqr = LongVariable *
-------------->
y2w
let sqr = LongVariable *
p
let sqr = LongVariable * LongVariable
Notice that yw includes the white space after a word. If you don’t want this, use ye.
The yy command yanks a whole line, just like dd deletes a whole line. Unexpectedly, while D deletes from the cursor to the end of the line, Y works like yy, it yanks the whole line. Watch out for this inconsistency! Use y$ to yank to the end of the line.
a text line yy a text line a text line
line 2 line 2 p line 2
last line last line a text line
last line
04.7 Using the clipboard
If you are using the GUI version of Vim (gvim), you can find the Copy item in the Edit menu. First select some text with Visual mode, then use the Edit/Copy menu item. The selected text is now copied to the clipboard. You can paste the text in other programs. In Vim itself too.
If you have copied text to the clipboard in another application, you can paste it in Vim with the Edit/Paste menu item. This works in Normal mode and Insert mode. In Visual mode the selected text is replaced with the pasted text.
The Cut menu item deletes the text before it’s put on thr clipboard. The Copy, Cut and Paste items are also avaiable in the popup menu (only where there is a popup menu, of course). If your Vim has a toobar, you can also find these items there.
If you are not using the GUI, or if you don’t like using a menu, you have to use another way. You use the normal y (yank) and p (put) commands, but prepend "* (double-quote star) before it. To copy a line to the clipboard:
"*yy
To put text from the clipboard back into the text:
"*p
This only morks on versions of Vim that include clipboard support. More about the clipboard can be found in section 09.3 and here: clipboard
04.8 Text objects
If the cursor is in the middle of a word and you want to delete that word, you need to move back to its start before you can do dw. There is a simpler way to do this: daw.
this is some example text.
daw
this is some text.
The d of daw is the delete operator. aw is a text object. Hint: aw stands for A Word. Thus daw is Delete A Word. To be precise, the white space after the word is also deleted (or the white space before the word if at the end of the line).
Using text objects is the third way to make changes in Vim. We already had operator-motion and Visual mode. Now we add operator-text object.
It is very similar to operator-motion, but instead of operating on the text between the cursor position before and after a movement command, the text object is used as a whole. It doesn’t matter where in the object the cursor was.
To change a whole sentence use cis. Take this text:
Hello there. This
is an example. Just
some text.
Move to the start of the second line, on is an. Now use cis:
Hello there. Just
some text.
The cursor is in between the blanks in the first line. Now you type the new sentence Another line.:
Hello there. Another line. Just
some text.
cis consists of the c (change) operator and the is text object. This stands for Inner Sentence. There is also the as (A Sentence) object. The difference is that as includes the white space after the sentence and is doesn’t. If you would delete a sentence, you want to delete the white space at the same time, thus use das. If you want to type new text the white space can remain, thus you use cis.
You can also use text objects in Visual mode. It will include the text object in the Visual selection. Visual mode continues, thus you can do this several times. For example, start Visual mode with v and select a sentence with as. Now you can repeat as to include more sentences. Finally you use an operator to do something with the selected sentences.
You can find a long list of text objects here: text-objects
04.9 Replace mode
The R command causes Vim to enter replace mode. In this mode, each character you type replaces the one under the cursor. This continues until you type <Esc>.
In this example you start Replace mode on the first t of text:
This is text.
Rinteresting.<Esc>
This is interesting.
You may have noticed that this command replaced 5 characters in the line with twelve others. The R command automatically extends the line if it runs out of characters to replace. It will not continue on the next line.
You can switch between Insert mode and Replace mode with the <Insert> key.
When you use <BS> (backspace) to make a correction, you will notice that the old text is put back. Thus it works like an undo command for the previously typed character.
04.10 Conclusion
The operators, movement commands and text objects give you the possibility to make lots of combinations. Now that you know how they mork, you can use N operators with M movement commands to make N * M commands!
You can find a list of operators here: operator.
For example, there are many other ways to delete pieces of text. Here are a few common ones:
x delete character under the cursor (short for "dl")
X delete character before the cursor (short for "dh")
D delete from cursor to end of line (short for "d$")
dw delete from cursor to next start of word
db delete from cursor to previous start of word
diw delete word under the cursor (excluding white space)
daw delete word under the cursor (including white space)
dG delete until the end of the file
dgg delete until the start of the file
If you use c instead of d they become change commands. And with y you yank the text. And so forth.
There are a few common commands to make changes that didn’t fit somewhere else:
~ Change case of the character under the cursor, and move the
cursor to the next character. This is not an operator (unless 'tildeop' is set),
thus you can't use it with a motion command.
It does work in Visual mode, where it changes case for all the selected text.
I Start Insert mode after moving the cursor to the first
non-blank in the line.
A Start Insert mode after moving the cursor to the end of the
line.
usr_05 Set your settings
:help usr_05
Vim can be tuned to work like you want it to. This chapter shows you how to make Vim start with options set to different values. Add pligins to extend Vim’s capabilities. Or define your own macros.
- 05.1 The vimrc file
- 05.2 The example vimrc file explained
- 05.3 The defaults.vim file explained
- 05.4 Simple mappings
- 05.5 Adding a package
- 05.6 Adding a plugin
- 05.7 Adding a help file
- 05.8 The option window
- 05.9 Often used options
05.1 The vimrc file
vimrc intro
You probably got tired of typing commands that you use very often. To start Vim with all your favorite option settings and mappings, you write them in what is called the vimrc file. Vim executes the commands in this file when it starts up.
If you already have a vimrc file (e.g., when your sysadmin has one setup for you), you can edit it this way:
:edit $MYVIMRC
If you don’t have a vimrc file yet, see vimrc to find out where you can create a vimrc file. Also, the :version command mentions the name of the *user vimrc file Vim looks for.
For Unix and Macintosh this file is always used and is recommended:
~/.vimrc
For MS-Windows you can use one of these:
$HOME/_vimrc
$VIM/_vimrc
If you are creating the vimrc file for the first time, it is recommended to put this line at the top:
source $VIMRUNTIME/defaults.vim
This initializes Vim for new users (as opposed to traditional Vi users). See defaults.vim for the details.
The vimrc file can contain all the commands that you type after a colon. The simplest ones are for setting options. For example, if you want Vim to always start with the incsearch option on, add this line your vimrc file:
set incsearch
For this new line to take effect you need to exit Vim and start it again. Later you will learn how to do this without exiting Vim.
This chapter only explains the most basic items. For more information on how to write a Vim script file: usr_41.txt.
05.2 The example vimrc file explained
vimrc_example.vim
In the first chapter was explained how the example vimrc (include in the Vim distribution) file can be used to make Vim startup in not-compatible mode (see not-compatible). The file can be found here:
$VIMRUNTIME/vimrc_example.vim
In this section we will explain the various commands used in this file. This will give you hints about how to set up your own preferences. Not everything will be explained though. Use the :help command to find out more.
" Get the defaults that most users want.
source $VIMRUNTIME/defaults.vim
This loads the defaults.vim file in the $VIMRUNTIME directory. This sets up Vim for how most users like it. If you are one of the few that don’t, then comment out this line. The commands are explained below:
defaults.vim-explained
if has("vms")
set nobackup
else
set backup
if has('persistent_undo')
set undofile
endif
endif
This tells Vim to keep a backup copy of a file when overwriting it. But not on the VMS system, since it keeps old versions of files already. The backup file will have the same name as the original file with ~ added. See 07.4
This also sets the undofile option, if available. This will store the multi-level undo information in a file. The result is that when you change a file, exit Vim, and then edit the file again, you can undo the changes made previously. It’s a very powerful and useful feature, at the cost of storing a file. For more information see undo-persistence.
The if command is very useful to set options<bt>
only when some condition is met. More about that in use_41.txt.
if &t_Co > 2 || has("gui_running")
set hlsearch
endif
This switches on the hlsearch option, telling Vim to highlight matches with the last used search pattern.
augroup vimrcEx
au!
autocmd FileType text setlocal textwidth=78
augroup END
This makes Vim break text to avoid lines getting longer than 78 characters. But only for files that have been detected to be plain text. There are actually two parts here. autocmd FileType text is an autocommand. This defines that when the file type is set to text the following command is automatically executed. setlocal textwidth=78 sets the textwidth option to 78, but only locally in one file.
The wrapper with augroup vimrcEx and augroup END makes it possible to delete the autocommand with the au! command. See :augroup
if has('syntax') && has('eval')
packadd! matchit
endif
This loads the matchit plugin if the required features are available. It makes the % command more powerful. This is explained at matchit-install
05.3 The default.vim file explained
defaults.vim-explained
The defaults.vim file is loaded when the user has no vimrc file. When you create a new vimrc file, add this line near the top to keep using it:
source $VIMRUNTIME/defaults.vim
Or use the vimrc_example.vim file, as explained above.
The following explains what defaults.vim is doing.
if exists('skip_defaults_vim')
finish
endif
Loading defaults.vim can be disabled with this command:
let skip_defaults_vim = 1
This has to be done in the system vimrc file. See system-vimrc. If you have a user vimrc this is not needed, since defaults.vim will not be loaded automatically.
set nocompatible
As mentioned in the first chapter, these manuals explain Vim working in an improved way, thus not completely Vi compatible. Setting the compatible option off, thus nocompatible takes care of this.
set backspace=indent,eol,start
This specifies where in Insert mode the <BS> is allowed to delete the character in front of the cursor. The three items, separated bt commas, tell Vim to delete the white space at the start of the line, a line break and the character before where Insert mode started. See backspace.
set history=200
Keep 200 commands and 200 search patterns in the history. Use another number if you want to remember fewer or more lines. See history.
set ruler
Always display the current cursor position in the lower right corner of the Vim window. See ruler.
set showcmd
Display an incomplete command in the lower right corner of the Vim window, left of the ruler. For example, when you type 2f, Vim is waiting for you to type the character to find and 2f is displayed. When you press w next, the 2fw command is executed and the displayed 2f is removed.
+-------------------------------------------------+
|text in the Vim window |
|~ |
|~ |
|-- VISUAL -- 2f 43,8 17% |
+-------------------------------------------------+
^^^^^^^^^^^ ^^^^^^^^ ^^^^^^^^^^
'showmode' 'showcmd' 'ruler'
set wildmenu
Display completion matches in a status line. That is when you type <Tab> and there is more than one match. See wildmenu.
set ttimeout
set ttimeoutlen=100
This makes typing Esc take effect more quickly. Normally Vim waits a second to see if the Esc is the start of an escape sequence. If you have a very slow remote connection, increase the number. See ttimeout.
set display=truncate
Show @@@ in the last line if it is truncted, instead of hiding the whole line. See dispaly.
set incsearch
Display the match for a search pattern when halfway typing it. See incsearch
set nrformats-=octal
Do not recognize numbers starting with a zero as octal. See nrformats.
map Q gq
This defines a key mapping. More about that in the next section. This defines the Q command to do formatting with the gq operator. This is how it worked before Vim 5.0. Otherwise the Q command starts Ex mode, but you will not need it.
inoremap <C-U> <C-G>u<C-U>
CTRL-U in insert mode deletes all entered text in the current line. Use CTRL-G u to first break undo, so that you can undo CTRL-U after inserting a line break. Revert with :iunmap <C-U>.
if has('mouse')
set mouse=a
endif
Enable using the mouse if avaiable. See mouse.
vnoremap _g y:exe "grep /" .. escape(@", '\\/') .. "/ *.c *.h"<CR>
This mapping yanks the visually selected text and searches for it in C files. You can see that a mapping can be used to do quite complicated things. Still, it is just a sequence of commands that are executed like you typed them.
syntax on
Enable highlighting files in color. See syntax.
vimrc-filetype
filetype plugin indent on
This switches on three very clever mechanisms:
- Filetype detecition.
Whenever you start editing a file, Vim will try to figure out what kind of file this is. When you edit main.c, Vim will see the.cextension and recognize this as a c filetype. When you edit a file that starts with#!/bin/sh, Vim will recognize it as a sh filetype.
The filetype detection is used for syntax highlighting and the other two items below.
See filetype. - Using filetype plugin files
Many different filetypes are edited with different options. For example, when you edit a c file, it’s very useful to set the cindent option to automatically indent the lines. These commonly useful option settings are included with Vim in filetype plugins. You can also add your own, see write-filetype-plugin. - Using indent files
When editing programs, the indent of a line can often be computed automatically. Vim comes with these indent rules for a number of filetypes. See :filetype-indent-on and indentexpr.
restore-cursor last-position-jump
autocmd BufReadPost *
\ if line("'\"") >= 1 && line("'\"") <= line("$") && &ft !~# 'commit'
\ | exe "normal! g`\""
\ | endif
Another autocommand. This time it is used after reading any file. The complicated stuff after it checks if the '" mark is defined, and jumps to it if so. The backslash at the start of a line is used to continue the command from the previous line. That avoids a line getting very long.
See line-continuation. This only works in a Vim script file, not when typing commands at the command-line.
command DiffOrig vert new | set bt=nofile | r ++edit # | 0d_ | diffthis
\ | wincmd p | diffthis
This adds the :DiffOrig command. Use this in a modified buffer to see the differences with the file it was loaded from. See diff and :DiffOrig.
set nolangremap
Prevent that the langmap option applies to characters that result from a mapping. If set (default), this may break plugins (but it’s backward compatible). See langremap.
05.4 Simple mappings
A mapping enables you to bind a set of Vim commands to a single key. Suppose, for example, that you need to surround certain words with curly braces. In other words, you need to change a word such as amount into {amount}. With the :map command, you can tell Vim that the F5 key does this job. The command is as follows:
:map <F5> i{<Esc>ea}<Esc>
Note:
When entering this command, you must enter <F5> by typing four characters. Similarly, <Esc> is not entered by pressing the <Esc> key, but by typing five characters. Watch out for this difference when reading the manual!
Let’s break this down:
<F5> The F5 function key. This is the trigger key that causes the
command to be executed as the key is pressed.
i{<Esc> Insert the { character. The <Esc> key ends Insert mode.
e Move to the end of the word.
a}<Esc> Append the } to the word.
After you execute the :map command, all you have to do to put {} around a word is to put the cursor on the first character and press F5.
In this example, the tirgger is a single key; it can be any string. But when you use an existing Vim command, that command will no longer be available.You better avoid that.
One key that can be used with mappings is the backslash. Since you probably want to define more than one mapping, add another character. You could map \p to add parentheses around a word, and \c to add curly braces, for example:
:map \p i(<Esc>ea)<Esc>
:map \c i{<Esc>ea}<Esc>
You need to type \ and the p quickly after another, so that Vim knows they belong together.
The :map command (with no arguments) lists your current mappings. At least the ones for Normal mode. More about mappings in section 40.1.
05.5 Adding a package
add-package matchit-install
A package is a set of files that you can add to Vim. There are two kinds of packages: optional and automatically loaded on startup.
The Vim distribution comes with a few packages that you can optionally use. For example, the matchit plugin. This plugin makes the % command jump to matching HTML tags, if/else/endif in Vim scripts, etc. Very useful, although it’s not backwards compatible (that’s why it is not enabled by default).
To start using the matchit plugin, add one line to your vimrc file:
packadd! matchit
That’s all! After restarting Vim you can find help about this plugin:
:help matchit
This works, because when :packadd loaded the plugin it also added the package directory in runtimepath, so that the help file can be found.
You can find packages on the Internet in various places. It usually comes as an archive or as a repository. For an archive you can follow these steps:
1. create the package directory:
mkdir -p ~/.vim/pack/fancy
"fancy" can be any name of your liking. Use one that describes the package.
2. unpack the archive in that directory. This assumes the top directory in the archive is "start":
cd ~/.vim/pack/fancy
unzip /tmp/fancy.zip
If the archive layout is different make sure that you end up with a path like this:
~/.vim/pack/fancy/start/fancytext/plugin/fancy.vim
Here "fancytext" is the name of the package, it can be anything else.
Note:
MS-Windows path like this ~\vimfiles\pack\fancy\start\fancytext\plugin\fancy.vim
More information about packages can be found here: packages
05.6 Adding a plugin
add-plugin plugin
Vim’s functionally can be extended by adding plugins. A plugin is nothing more than a Vim script file that is loaded automatically when Vim starts. You can add a plugin very easily by dropping it in your plugin directory. {not available when Vim was compiled without the +eval feature}
There are two types of plugins:
- global plugin: Used for all kinds of files
- filetype plugin: Only used for a specific type of file
The global plugins will be discussed first, then the filetype ones add-filetype-plugin
GLOBAL PLUGINS
######## standard-plugin
When you start Vim, it will automatically load a number of global plugins. You don’t have to do anything for this. They add functionality that most people will want to use, but which was implemented as a Vim script instead of being compiled into Vim. You can find them listed in the help index standard-plugins-list. Also see load-plugins.
######## add-global-plugin
You can add a global plugin to add functionality that will always be present when you use Vim. There are only two steps for adding a global plugin:
- Get a copy of the plugin.
- Drop it in the right directory.
GETTING A GLOBAL PLUGIN
Where can you find plugins?
- Some are always loaded, you can see them in the directory $VIMRUNTIME/plugin.
- Some come with Vim. You can find them in the directory $VIMRUNTIME/macros and its sub-directories and under $VIM/vimfiles/pack/dist/opt/.
- Download from the net. There is a large collection on http://www.vim.org.
- They are sometimes posted in a Vim maillist.
- You could write one yourself, see write-plugin.
Some plugins come as a vimball archive, see vimball.
Some plugins can be updated automatically, see getscript.
USING A GLOBAL PLUGIN
First read the text in the plugin itself to check for any special conditions. Then copy the file to your plugin directory:
| system | plugin directory |
|---|---|
| Unix | ~/.vim/plugin |
| PC | $HOME/vimfiles/plugin or $VIM/vimfiles/plugin |
| Amiga | s:vimfiles/plugin |
| Macintosh | $VIM:vimfiles:plugin |
| Mac OS X | ~/.vim/plugin/ |
Example for Unix (assuming you didn’t have a plugin directory yet):
mkdir ~/.vim
mkdir ~/.vim/plugin
cp /tmp/yourplugin.vim ~/.vim/plugin
That’s all! Now you can use the commands defined in this plugin.
Instead of putting plugins directly into the plugin/ directory, you may better organize them by putting them into subdirectories under plugin/. As an example, consider using ~/.vim/plugin/perl/*.vim for all your Perl plugins.
FILETYPE PLUGINS
######## add-filetype-plugin ftplugins
The Vim distribution comes with a set of plugins for different filetypes that you can start using with this command:
:filetype plugin on
That’s all! See vimrc-filetype.
If you are missing a plugin for a filetype you are using, or you found a better one, you can add it. There are two steps for adding a filetype plugin:
- Get a copy of the plugin.
- Drop it in the right directory.
GETTING A FILETYPE PLUGIN
You can find them in the same places as the global plugins. Watch out if the type of file is mentioned, then you know if the plugin is a global or a filetype one. The scripts in $VIMRUNTIME/macros are global ones, the filetype plugins are in $VIMRUNTIME/ftplugin.
USING A FILETYPE PLUGIN
######## ftplugin-name
You can add a filetype plugin by dropping it in the right directory. The name of this directory is in the same directory mentioned above for global plugins, but the last part is ftplugin. Suppose you have found a plugin for the stuff filetype, and you are on Unix. Then you can move this file to the ftplugin directory:
mv thefile ~/.vim/ftplugin/stuff.vim
If that file already exists you already have a plugin for stuff. You might want to check if the existing plugin doesn’t conflict with the one you are adding. If it’s OK, you can give the new one another name:
mv thefile ~/.vim/ftplugin/stuff_too.vim
The underscore is used to separate the name of the filetype from the rest, which can be anything. If you use otherstuff.vim it wouldn’t work, it would be loaded for the otherstuff filetype.
On MS-DOS like filesystems you cannot use long filenames. You would run into trouble if you add a second plugin and the filetype has more than six characters. You can use an extra directory to get around this:
mkdir $VIM/vimfiles/ftplugin/fortran
copy thefile $VIM/vimfiles/ftplugin/fortran/too.vim
The generic names for the filetype plugins are:
ftplugin/<filetype>.vim
ftplugin/<filetype>_<name>.vim
ftplugin/<filetype>/<name>.vim
Here <name> can be any name that you prefer.
Examples for the stuff filetype on Unix:
~/.vim/ftplugin/stuff.vim
~/.vim/ftplugin/stuff_def.vim
~/.vim/ftplugin/stuff/header.vim
The <filetype> part is the name of the filetype the plugin is to be used for. Only files of this filetype will use the settings from the plugin. The <name> part of the plugin file doesn’t matter, you can use it to have several plugins for the same filetype. Note that it must end in .vim.
Further reading:
- filetype-plugins Documentation for the filetype plugins and information about how to avoid that mappings cause problems.
- load-plugins When the global plugins are loaded during startup.
- ftplugin-overrule Overruling the settings from a global plugin.
- write-plugin How to write a plugin script.
- plugin-details For more information about using plugins or when your plugin doesn’t work.
- new-filetype How to detect a new file type.
05.7 Adding a help file
add-local-help
If you are lucky, the plugin you installed also comes with a help file. We will explain how to install the help file, so that you can easily find help for your new plugin.
Let us use the doit.vim plugin as an example. This plugin comes with documentation: doit.txt. Let’s first copy the plugin to the right directory. This time we will do it from inside Vim. (You may skip some of the mkdir commands if you already have the directory.)
:!mkdir ~/.vim
:!mkdir ~/.vim/plugin
:!cp /tmp/doit.vim ~/.vim/plugin
The cp command is for Unix, on MS-Windows you can use copy.
Now create a doc directory in one of the directories in runtimepath.
:!mkdir ~/.vim/doc
Copy the help file to the doc directory.
:!cp /tmp/doit.txt ~/.vim/doc
Now comes the trick, which allows you to jump to the subjects in the new help file: Generate the local tags file with the :helptags command.
:helptags ~/.vim/doc
Now you can use the
:help doit
command to find help for doit in the help file you just added. You can see an entry for the local help file when you do:
:help local-additions
The title lines from the local help files are automagically added to this section. There you can see which local help files have bean added and jump to them through the tag.
For writing a local help file, see write-local-help.
05.8 The option window
If you are looking for an option that does what you want, you can search in the help files here: options. Another way is by using this command:
:options
This opens a new window, with a list of options with a one-line explanation. The options are grouped by subject. Move the cursor to a subject and press <Enter> to jump there. Press <Enter> again to jump back. Or use CTRL-O.
You can change the value of an option. For example, move to the displaying text subject. Then move the cursor down to this line:
set wrap nowrap
When you hit <Enter>, the line will change to:
set nowrap wrap
The option has now been switched off.
Just above this line is a short description of the wrap option. Move the cursor one line up to place it in this line. Now hit <Enter> and you jump to the full help on the wrap option.
For options that take a number or string argument you can edit the value. Then press <Enter> to apply the new value. For example, move the cursor a few lines up to this line:
set so=0
Position the cursor on the zero with $. Change it into a five with r5. Then press <Enter> to apply the new value. When you now move the cursor around you will notice that the text starts scrolling before you reach the border. This is what the scrolloff option does, it specifies an offset from the window border where scrolling starts.
05.9 Often used options
There are an awful lot of options. Most of them you will hardly ever use. Some of the more useful ones will be mentioned here. Don’t forget you can find more help on these options with the :help command, with single quotes before and after the option name. For example:
:help 'wrap'
In case you have messed up an option value, you can set it back to the default by putting an ampersand (&) after the option name. Example:
:set iskeyword&
NOT WRAPPING LINES
Vim normally wraps long lines, so that you can see all of the text. Sometimes it’s better to let the text continue right of the window. Then you need to scroll the text left-right to see all of a long line. Switch wrapping off with this command:
:set nowrap
Vim will automatically scroll the text when you move to text that is not displayed. To see a context of ten characters, do this:
:set sidescroll=10
This doesn’t change the text in the file, only the way it is displayed.
WRAPPING MOVEMENT COMMANDS
Most commands for moving around will stop moving at the start and end of a line. You can change that whit the whichwrap option. This sets it to the default value:
:set whichwrap=b,s
This allows the <BS> key, when used in the first position of a line, to move the cursor to the end of the previous line. And the <Space> key moves from the end of a line to the start of the next one.
To allow the cursor keys <Left> and <Right> to also wrap, use this command:
:set whichwrap=b,s,<,>
This is still only for Normal mode. To let <Left> and <Right> do this in Insert mode as well:
:set whichwrap=b,s,<,>,[,]
There are a few other flags that can be added, see whichwrap
VIEWING TABS
When there are tabs in a file, you cannot see where they are. To make them visible:
:set list
Now every tab is displayed as ^I. And a $ is displayed at the end of each line, so that you can spot trailing spaces that would otherwise go unnoticed.
A disadvantage is that this looks ugly when there are mant Tabs in a file. If you have a color terminal, or are using the GUI, Vim can show the spaces and tabs as highlighted characters. Use the listchars option:
:set listchars=tab:>-,trail:-
Now every tab will be displayed as >--- (with more or less -) and trailing white space as -. Looks a lot better, doesn’t it?
KEYWORDS
The iskeyword option specifies which characters can appear in a word:
:set iskeyword
iskeyword=@,48-57,_,192-255
The @ stands for all alphabetic letters. 48-57 stands for ASCII characters 48 to 57, which are the numbers 0 to 9. 192-255 are the printable latin characters.
Sometimes you will want to include a dash in keywords, so that commands like w consider upper-case to be one word. You can do it like this:
:set iskeyword+=-
:set iskeyword
iskeyword=@,48-57,_,192-255,-
If you look at the new value, you will see that Vim has added a comma for you.
To remove a character use -=. For example, to remove the underscore:
:set iskeyword-=_
:set iskeyword
iskeyword=@,48-57,192-255,-
This time a comma is automatically deleted.
ROOM FOR MESSAGES
When Vim starts there is one line at the bottom that is used for messages. When a message is long, it is either truncated, thus you can only see part of it, or the text scrolls and you have to press <Enter> to continue.
You can set the cmdheight option to the number of lines used for messages. Example:
:set cmdheight=3
This does mean there is less room to edit text, thus it’s a compromise.
usr_06 Using syntax highlighting
:help usr_06
Black and white text is boring. With colors your file comes to life. This not only looks nice, it also speeds up your work. Change the colors used for the different sorts of text. Print your text, with the colors you see on the screen.
- 06.1 Switching it on
- 06.2 No or wrong colors?
- 06.3 Different colors
- 06.4 With colors or without colors
- 06.5 Printing with colors
- 06.6 Further reading
06.1 switching it on
It all starts with one simple command:
:syntax enable
That should work in most situations to get color in your files. Vim will automagically detect the type of file and load the right syntax highlighting. Suddenly comments are blue, keywords brown and string red. This makes it easy to overview the file. After a while you will find that black&white text slows you down!
If you always want to use syntax highlighting, put the :syntax enable command in your vimrc file.
If you always want syntax highlighting only when the terminal supports colors, you can put this in your vimrc file:
if &t_Co > 1
syntax enable
endif
If you want syntax highlighting only in the GUI version, put the :syntax enable command in your gvimrc file.
06.2 No or wrong colors?
There can be a numberof reasons why you don’t see colors:
- You terminal does not support colors.
Vim will use bold, italic and underlined text, but this doesn’t look very nice. You probably will want to try to get a terminal with colors. For Unix, I recommend the xterm from the XFree86 project: xfree-xterm. - Your terminal does support colors, but Vim doesn’t know this.
Make sure your $TERM setting is correct. For example, when using an xterm that supports colors:setenv TERM xterm-coloror (depending on your shell):TERM=xterm-color; export TERM
The terminal name must match the terminal you are using. If it still doesn’t work, have a look at xterm-color, which shows a few ways to make Vim display colors (not only for an xterm). - The file type is not recognized.
Vim doesn’t know all file types, and sometimes it’s near to impossible to tell what language a file uses. Try this command::set filetype
If the result isfiletype=then the problem is indeed that Vim doesn’t know what type of file this is. You can set the type manually::set filetype=fortran
To see which types are available, look in the directory $VIMRUNTIME/syntax. For the GUI you can use the Syntax menu. Setting the filetype can also be done with a modeline, so that the file will be highlighted each time you edit it. For example, this line can be used in a Makefile (put it near the start or end of the file):# vim: syntax=make
You might know how to detect the file type yourself. Often the file name extension (after the dot) can be used.
See new-filetype for how to tell Vim to detect that file type. - There is no highlighting for your file type.
You could try using a similar file type by manually setting it as mentioned above. If that isn’t good enough, you can write your own syntax file, see mysyntaxfile.
Or the colors could be wrong:
- The colored text is very hard to read.
Vim guesses the background color that you are using. If it is black (or another dark color) it will use light colors for text. If it is white (or another light color) it will use dark colors for text. If Vim guessed wrong the text will be hard to read. To solve this, set the background option. For a dark background::set background=darkAnd for a light background::set background=light
Make sure you put this before the:syntax enablecommand, otherwise the colors will already have been set. You could do:syntax resetafter settingbackgroundto make Vim set the default colors again. - The colors are wrong when scrolling bottom to top.
Vim doesn’t read the whole file to parse the text. It starts parsing wherever you are viewing the file. That saves a lot of time, but sometimes the colors are wrong. A simple fix is hittingCTRL-L. Or scroll back a bit and then forward again.
For a real fix, see :syn-sync. Some syntax files have a way to make it look further back, see the help for the specific syntax file. For example, tex.vim for the Tex syntax.
06.3 Different colors
:syn-default-override
If you don’t like the default colors, you can select another color scheme. In the GUI use the Edit/Color Scheme menu. You can also type the command:
:colorscheme evening
evening is the name of the color scheme. There are several others you might want to try out. Look in the directory $VIMRUNTIME/colors.
When you found the color scheme that you like, add the :colorscheme command to your vimrc file.
You could also write your own color scheme. This is how you do it:
- Select a color scheme that comes close. Copy this file to your own Vim directory. For Unix, this should work:
!mkdir ~/.vim/colors
!cp $VIMRUNTIME/colors/morning.vim ~/.vim/colors/mine.vim
This is done from Vim, because it knows the value of $VIMRUNTIME.
- Edit the color scheme file.
| Edit the color scheme file. These entries are useful | |
|---|---|
| term | attributes in a B&W terminal |
| cterm | attributes in a color terminal |
| ctermfg | foreground color in a color terminal |
| ctermbg | background color in a color terminal |
| gui | attributes in the GUI |
| guifg | foreground color in the GUI |
| guibg | background color in the GUI |
For example, to make comments green:
:highlight Comment ctermfg=green guifg=green
Attributes you can use for cterm and gui are bold and underline. If you want both, use bold,underline. For details see the :highlight command.
- Tell Vim to always use your color scheme. Put this line in your vimrc:
colorscheme mine
If you want to see what the most often used color combinations look like, use this command:
:runtime syntax/colortest,vim
You will see text in various color combinations. You can check which ones are readable and look nice. These aren’t the only colors available to you though. You can specify #rrggbb hex colors and you can define new names for hex colors in v:colornames like so:
let v:colornames['mine_red'] = '#aa0000'
If you are authoring a color scheme for others to use, it is important to define these colors only when they do not exist:
call extend(v:colornames, {'mine_red': '#aa0000'}, 'keep')
This allows users of the color scheme to override the precise definition of that color prior to loading your color scheme. For example, in a .vimrc file:
runtime colors/lists/css_colors.vim
let v:colornames['your_red'] = v:colornames['css_red']
colorscheme yourscheme
As a color scheme author, you should be able to reply on some color names for GUI colors. These are defined in colors/lists/default.vim. All such files found on the runtimepath are loaded each time the colorscheme command is run. A canonical list is provided by the vim distribution, which should include all X11 colors (previously defined in rgb.txt).
06.4 With colors or without colors
Displaying text in color takes a lot of effort. If you find the displaying too slow, you might want to disable syntax highlighting for a moment:
:syntax clear
When editing another file (or the same one) the colors will come back.
If you want to stop highlighting completely use:
:syntax off
This will completely disable syntax highlighting and remove it immediately for all buffers. See :syntax-off for more details.
:syn-manual
If you want syntax highlighting only for specific files, use this:
:syntax manual
This will enable the syntax highlighting, but not switch it on automatically when starting to edit a buffer. To switch highlighting on for the current buffer, set the syntax option:
:set syntax=ON
06.5 Printing with colors
syntax-printing
In the MS-Windows version you can print the current file with this command:
:hardcopy
You will get the usual printer dialog, where you can select the printer and a few settings. If you have a color printer, the paper output should look the same as what you see inside Vim. But when you use a dark background the colors will be adjusted to look good on white paper.
There are several options that change the way Vim prints:
To print only a range of lines, use Visual mode to select the lines and then type the command:
v100j:hardcopy
v starts Visual mode. 100j modes a hundred lines down, they will be highlighted. Then :hardcopy will print those lines. You can use other commands to move in Visual mode, of course.
This also works on Unix, if you have a PostScript printer. Otherwise, you will have to do a bit more work. You need to convert the text to HTML first, and then print it from a web browser.
Convert the current file to HTML with this command:
:TOhtml
In case that doesn’t work:
:source $VIMRUNTIME/syntax/2html.vim
You will see it crunching away, this can take quite a while for a large file. Some time later another window shows the HTML code. Now write this somewhere (doesn’t matter where, you throw it away later):
write main.c.html
Open this file in your favorite brower and print it from there. If all goes well, the output should look exactly as it does in Vim. See 2html.vim for details. Don’t forget to delete the HTML file when you are done with it.
Instead of printing, you could also put the HTML file on a web server, and let others look at the colored text.
06.6 Further reading
usr_44.txt Your own syntax highlighted.
syntax All the details.
usr_07 Editing more than one file
help :usr_07
No matter how many files you have, you can edit them without leaving Vim. Define a list of files to work on and jump from one to the other. Copy text from one file and put it in another one.
- 07.1 Edit another file
- 07.2 A list of files
- 07.3 Jumping from file to file
- 07.4 Backup files
- 07.5 Copy text between files
- 07.6 Viewing a file
- 07.7 Changing the file name
07.1 Edit another file
So far you had to start Vim for every file you wanted to edit. There is a simple way. To start editing another file, use this command:
:edit foo.txt
You can use any file name instead of foo.txt. Vim will close the current file and open the new one. If the current file has unsaved changes, however, Vim displays an error message and does not open the new file:
E37: No write since last change (use ! to override)
Note:
Vim puts an error ID at the start of each error message. If you do not understand the message or what caused it, look in the help system for this ID. In this case:
:help E37
At this point, you have a number of alternatives. You can write the file using this command:
:write
Or you can force Vim to discard your changes and edit the new file, using the force (!) character:
:edit! foo.txt
If you want to edit another file, but not write the changes in the current file yet, you can make it hidden:
:hide edit foo.txt
The text with changes is still there, but you can’t see it. This is further explained in section 22.4: The buffer list.
07.2 A list of files
You can start Vim to edit a sequence of files. For example:
vim one.c two.c three.c
This command starts Vim and tells it that you will be editing three files. Vim displays just the first file. After you have done your thing in this file, to edit the next file you use this command:
:next
If you have unsaved changes in the current file, you will get an error message and the :next will not work. This is the same problem as with :edit mentioned in the previous section. To abandon the changes:
:next!
But mostly you want to save the changes and move on to the next file. There is a special command for this:
:wnext
This does the same as using two separate commands:
:write
:next
WHERE AM I?
To see which file in the argument list you are editing, look in the window title. It should show something like (2 of 3). This means you are editing the second file out of three files.
If you want to see the list of files, use this command:
:args
This is short for arguments. The output might look like this:
one.c [two.c] three.c
These are the files you started Vim with. The one you are currently editing, two.c, is in square brackets.
MOVING TO OTHER ARGUMENTS
To go back one file:
:previous
This is just like the :next command, except that it moves in the other direction. Again, there is a shortcut command for when you want to write the file first:
:wprevious
To move to the very last file in the list:
:last
And to move back to the first one again:
:first
There is no :wlast or wfirst command though!
You can use a count for :next and :previous. To skip two files forward:
:2next
AUTOMATIC WRITING
When moving around the files and making changes, you have to remember to use :write. Otherwise you will get an error message. If you are sure you always want to write modified files, you can tell Vim to automatically write them:
:set autowrite
When you are editing a file which you may not want to write, switch it off again:
:set noautowrite
EDITING ANOTHER LIST OF FILES
You can redefine the list of files without the need to exit Vim and start it again. Use this command to edit three other files:
:args five.c six.c seven.h
Or use a wildcard, like it’s used in the shell:
:args *.txt
Vim will take you to the first file in the list. Again, if the current file has changes, you can either write the file first, or use :args! (wirh ! added) to abandon the changes.
arglist-quit
DID YOU EDIT THE LAST FILE?
When you use a list of files, Vim assumes you want to edit them all. To protect you from exiting too early, you will get this error when you didn’t edit the last file in the list yet:
E173: 46 more files to edit
If you really want to exit, just do it again. Then it will work (but not when you did other commands in between).
07.3 Jumping from file to file
To quickly jump between two files, press CTRL-^ (on English-US keyboards the ^ is above the 6 key). Example:
:args one.c two.c three.c
You are now in one.c.
:next
Now you are in two.c. Now use CTRL-^ to go back to one.c. Another CTRL-^ and you are back in two.c. Another CTRL-^ and you are in one.c again. If you now do:
:next
You are in three.c. Notice that the CTRL-^ command does not change the idea of where you are in the list of files. Only commands like :next and :previous do that.
The file you were previously editing is called the alternate file. When you just started Vim CTRL-^ will not work, since there isn’t a previous file.
PREDEFINED MARKS
After jumping to another file, you can use two predefined marks which are very useful:
`"
This takes you to the position where the cursor was when you left the file. Another mark that is remembered is the position where you made the last change:
`.
Suppose you are editing the file one.txt. Somewhere halfway through the file you use x to delete a character. Then you go to the last line with G and write the file with :w. You edit several other files, and then use :edit one.txt to come back to one.txt. If you now use `“ Vim jumps to the last line of the file. Using `. takes you to the position where you deleted the character. Even when you move around in the file `” and `. will take you to the remembered position. At least until you make another change or leave the file.
FILE MARKS
In section 03.10 was explained how you can place a mark in a file with mx and jump to that position with `x. That works within one file. If you edit another file and place marks there, these are specific for that file. Thus each file has its own set of marks, they are local to the file.
So far we were using marks with a lowercase letter. There are also marks with an uppercase letter. These are global, they can be used from any file. For example suppose that we are editing the file foo.txt. Go to halfway down the file (“50%”) and place the F mark there (F for foo):
50%mF
Now edit the file bar.txt and place the B mark (B for bar) at its last line:
GmB
Now you can use the ’F command to jump back to halfway foo.txt. Or edit yet another file, type ’B and you are at the end of bar.txt again.
The file marks are remembered until they are placed somewhere else. Thus you can place the mark, do hours of editing and still be able to jump back to that mark.
It’s often useful to think of a simple connection between the mark letter and where it is placed. For example, use the H mark in a header file, M in a Makefile and C in a C code file.
To see where a specific mark is, give an argument to the :marks command:
:marks M
You can also give several arguments:
:marks MCP
Don’t forget that you can use CTRL-O and CTRL-I to jump to older and newer positions without placing marks there.
07.4 Backup files
Usually Vim does not produce a backup file. If you want to have one, all you need to do is execute the following command:
:set backup
The name of the backup file is the original file with a ~ added to the end. If your file is named data.txt, for example, the backup file name is data.txt~.
If you do not like the fact that the backup files end with ~, you can change the extension:
:set backupext=.bak
This will use data.txt.bak instead of data.txt~.
Another option that matters here is backupdir. It specifies where the backup file is written. The default, to write the backup in the same directory as the original file, will mostly be the right thing.
Note:
When the backup option isn’t set but the writebackup is, Vim will still create a backup file. However, it is deleted as soon as writing the file was completed successfully. This functions as a safety against losing your original file when writing fails in some way (disk full is the most common cause; being hit by lightning might be another, although less common).
KEEPING THE ORIGINAL FILE
If you are editing source files, you might want to keep the file before you make any changes. But the backup file will be overwritten each time you write the file. Thus it only contains the previous version, not the first one.
To make Vim keep the original file, set the patchmode option. This specifies the extension used for the first backup of a changed file. Usually you would do this:
:set patchmode=.orig
When you now edit the file data.txt for the first time, make changes and write the file, Vim will keep a copy of the unchanged file under the name data.txt.orig.
If you make further changes to the file, Vim will notice that data.txt.orig already exists and leave it alone. Further backup files will then be called data.txt~ (or whatever you specified with backupext).
If you leave patchmode empty (that is the default), the original file will not be kept.
07.5 Copy text between files
This explains how to copy text from one file to another. Let’s start with a simple example. Edit the file that contains the text you want to copy. Move the cursor to the start of the text and press v. This starts Visual mode. Now move the cursor to the end of the text and press y. This yanks (copies) the selected text.
To copy the above paragraph, you would do:
:edit thisfile
/This
vjjjj$y
Now edit the file you want to put the text in. Move the cursor to the character where you want the text to appear after. Use p to put the text there.
:edit otherfile
/There
p
Of course you can use many other commands to yank the text. For example, to select whole lines start Visual mode with V. Or use CTRL-V to select a rectangular block. Or use Y to yank a single line, yaw to yank-a-word, etc.
The p command puts the text after the cursor. Use P to put the text before the cursor. Notice that Vim remembers if you yanked a whole line or a block, and puts it back that way.
USING REGISTERS
When you want to copy several pieces of text from one file to another, having to switch between the files and writing the target file takes a lot of time. To avoid this, copy each piece of text to its own register.
A register is a place where Vim stores text. Here we will use the registers named a to z (later you will find out there are others). Let’s copy a sentence to the f register (f for First):
"fyas
The yas command yanks a sentence like before. It’s the "f that tells Vim the text should be placed in the f register. This must come just before the yank command.
Now yank three whole lines to the l register (l for line):
"l3y
The count could be before the "l just as well. To yank a block of text to the b (for block) register:
CTRL-Vjjww"by
Notice that the register specification "b is just before the y command. This is required. If you would have put it before the w command, it would not have worked.
Now you have three pieces of text in the f, l and b registers. Edit another file, move around and place the text where you want it:
"fp
Again, the register specification "f comes before the p command.
You can put the registers in any order. And the text stays in the register until you yank something else into it. Thus you can put it as many times as you like.
When you delete text, you can also specify a register. Use this to move several pieces of text around. For example, to delete-a-word and write it in the w register:
"wdaw
Again, the register specification comes before the delete command d.
APPENDING TO A FILE
When collecting lines of text into one file, you can use this command:
:write >> logfile
This will write the text of the current file to the end of logfile. Thus it is appended. This avoids that you have to copy the lines, edit the log file and put them there. Thus you save two steps. But you can only append to the end of a file.
To append only a few lines, select them in Visual mode before typing :write. In chapter 10 you will learn other ways to select a range of lines.
07.6 Viewing a file
Sometimes you only want to see what a file contains, without the intention to ever write it back. There is the risk that you type :w without thinking and overwrite the original file anyway. To avoid this, edit the file read-only.
To start Vim in readonly mode, use this command:
vim -R file
On Unix this command should do the same thing:
view file
You are now editing file in read-only mode. When you try using :w you will get an error message and the file won’t be written.
When you try to make a change to the file Vim will give you a warning:
W10: Warning: Changing a readonly file
The change will be done though. This allows for formatting the file, for example, to be able to read it easily.
If you make changes to a file and forgot that it was read-only, you can still write it. Add the ! to the write command to force writing.
If you really want to forbid making changes in a file, do this:
vim -M file
Now every attempt to change the text will fail. The help files are like this, for example. If you try to make a change you get this error message:
E21: Cannot make changes, 'modifiable' is off
You could use the -M argument to setup Vim to work in a viewer mode. This is only voluntary though, since these commands will remove the protection:
:set modifiable
:set write
07.7 Changing the file name
A clever way to start editing a new file is by using an existing file that contains most of what you need. For example, you start writing a new program to move a file. You know that you already have a program that copies a file, thus you start with:
:edit copy.c
You can delete the stuff you don’t need. Now you need to save the file under a new name. The :saveas command can be used for this:
:saveas move.c
Vim will write the file under the given name, and edit that file. Thus the next time you do :write, it will write move.c. copy.c remains unmodified.
When you want to change the name of the file you are editing, but don’t want to write the file, you can use this command:
:file move.c
Vim will mark the file as not edited. This means that Vim knows this is not the file you started editing. When you try to write the file, you might get this message:
E13: File exists (use ! to override)
This protects you from accidentally overwriting another file.
usr_08 Splitting windows
:help usr_08
Display two different files above each other. Or view two locations in the file at the same time. See the difference between two files by putting them side by side. All this is possible with split windows.
- 08.1 Split a window
- 08.2 Split a window on another file
- 08.3 Window size
- 08.4 Vertical splits
- 08.5 Moving windows
- 08.6 Commands for all windows
- 08.7 Viewing differences with vimdiff
- 08.8 Various
- 08.9 Tab pages
08.1 Split a window
The easiest way to open a new window is to use the following command:
:split
This command splits the screen into two windows and leaves the cursor in the top one:
+----------------------------------+
|/* file one.c */ |
|~ |
|~ |
|one.c=============================|
|/* file one.c */ |
|~ |
|one.c=============================|
| |
+----------------------------------+
What you see here is two windows on the same file. The line with ==== is the status line. It displays information about the window above it. (In practice the status line will be in reverse video.)
The two windows allow you to view two parts of the same file. For example, you could make the top window show the variable declarations of a program, and the bottom one the code that uses these variables.
The CTRL-W w command can be used to jump between the windows. If you are in the top window, CTRL-W w jumps to the window below it. If you are in the bottom window it will jump to the first window. (CRTL-W CTRL-W does the same thing, in case you let go of the CTRL key a bit later.)
CLOSE THE WINDOW
To close a window, use the command:
:close
Actually, any command that quits editing a file works, like :quit and ZZ. But :close prevents you from accidentally exiting Vim when you close the last window.
CLOSING ALL OTHER WINDOWS
If you have opened a whole bunch of windows, but now want to concentrate on one of them, this command will be useful:
:only
This closes all windows, except for the current one. If any of the other windows has changes, you will get an error message and that window won’t be closed.
08.2 Split a window on another file
The following command opens a second window and starts editing the given file:
:split two.c
If you were editing one.c, then the result looks like this:
+----------------------------------+
|/* file two.c */ |
|~ |
|~ |
|two.c=============================|
|/* file one.c */ |
|~ |
|one.c=============================|
| |
+----------------------------------+
To open a window on a new, empty file, use this:
:new
You can repeat the :split and :new commands to create as many windows as you like.
08.3 Window size
The :split command can take a number argument. If specified, this will be the height of the new window. For example, the following opens a new window three lines high and starts editing the file alpha.c:
:3split alpha.c
For existing windows you can change the size in several ways. When you have a working mouse, it is easy: Move the mouse pointer to the status line that separates two windows, and drag it up or down.
To increase the size of a window:
CTRL-W +
To decrease it:
CTRL-W -
Both of these commands take a count and increase or decrease the window size by that many lines. Thus 4 CTRL-W + make the window four lines higher.
To set the window height to a specified number of lines:
{height}CTRL-W _
That’s: a number {height}, CTRL-W and then an under score (the - key with Shift on English-US keyboards).
To make a window as high as it can be, use the CTRL-W _ command without a count.
USING THE MOUSE
In Vim you can do many things very quickly from the keyboard. Unfortunately, the window resizing commands requite quite a bit of typing. In this case, using the mouse is faster. Position the mouse pointer on a status line. Now press the left mouse button and drag. The status line will move, thus making the window on one side higher and the other smaller.
OPTIONS
The winheight option can be set a minimal desired height of a window and winminheight to a hard minimum height.
Likewise, there is winwidth for the minimal desired width and winminwidth for the hard minimum width.
The equalalways option, when set, makes Vim equalize the windows sizes when a window is closed or opened.
08.4 Vertical splits
The :split command creates the new window above the current one. To make the window appear at the left side, use:
:vsplit
or:
:vsplit two.c
The result looks something line this:
+--------------------------------------+
|/* file two.c */ |/* file one.c */ |
|~ |~ |
|~ |~ |
|~ |~ |
|two.c===============one.c=============|
| |
+--------------------------------------+
Actually, the | lines in the middle will be in reverse video. This is called the vertical separator. It separates the two windows left and right of it.
There is also the :vnew command, to open a vertically split window on a new, empty file. Another way to do this:
:vertical new
The :vertical command can be inserted before another command that splits a window. This will cause that command to split the window vertically instead of horizontally. (If the command doesn’t split a window, it works unmodified.)
MOVING BETWEEN WINDOWS
Since you can split windows horizontally as much as you like, you can create almost any layout of windows. Then you can use these commands to move between them:
CTRL-W h move to the window on the left
CTRL-W j move to the window below
CTRL-W k move to the window above
CTRL-W l move to the window on the right
CTRL-W t move to the TOP window
CTRL-W b move to the BOTTOM window
You will notice the same letters as used for moving the cursor. And the cursor keys can also be used, if you like.
More commands to move to other windows: Q_wi.
08.5 Moving windows
You have split a few windows, but now they are in the wrong place. Then you need a command to move the window somewhere else. For example, you have three windows like this:
+----------------------------------+
|/* file two.c */ |
|~ |
|~ |
|two.c=============================|
|/* file three.c */ |
|~ |
|~ |
|three.c===========================|
|/* file one.c */ |
|~ |
|one.c=============================|
| |
+----------------------------------+
Clearly the last one should be at the top. Go to that window (using CTRL-W w) and then type this command:
CTRL-W K
This uses the uppercase letter K. What happens is that the window is moved to the very top. You will notices that K is again used for moving upwards.
When you have vertical splits, CTRL-W K will move the current window to the top and make it occupy the full width of the Vim window. If this is your layout:
+-------------------------------------------+
|/* two.c */ |/* three.c */ |/* one.c */ |
|~ |~ |~ |
|~ |~ |~ |
|~ |~ |~ |
|~ |~ |~ |
|~ |~ |~ |
|two.c=========three.c=========one.c========|
| |
+-------------------------------------------+
The using CTRL-W K in the middle window (three.c) will result in:
+-------------------------------------------+
|/* three.c */ |
|~ |
|~ |
|three.c====================================|
|/* two.c */ |/* one.c */ |
|~ |~ |
|two.c==================one.c===============|
| |
+-------------------------------------------+
The other three similar commands (you can probably guess these now):
CTRL-W H move window to the far left
CTRL-W J move window to the bottom
CTRL-W L move window to the far right
08.6 Commands for all windows
When you have several windows open and you want to quit Vim, you can close each window separately. A quicker way is using this command:
:qall
This stands for quit all. If any of the windows contain changes, Vim will not exit. The cursor will automatically be positioned in a window with changes. You can then either use :write to save the changes, or :quit! to throw them away.
If you know there are windows with changes, and you want to save all these changes, use this command:
:wall
This stands for write all. But actually, it only writes files with changes. Vim knows it doesn’t make sense to write files that were not changed.
And then there is the combination of :qall and :wall: the write and quit all command:
:wqall
This writes all modified files and quits Vim.
Finally, there is a command that quits Vim and throws away all changes:
:qall!
Be careful, there is no way to undo this command!
OPENING A WINDOW FOR ALL ARGUMENTS
To make Vim open a window for each file, start it with the -o argument:
vim -o one.txt two.txt three.txt
This results in:
+-------------------------------+
|file one.txt |
|~ |
|one.txt========================|
|file two.txt |
|~ |
|two.txt========================|
|file three.txt |
|~ |
|three.txt======================|
| |
+-------------------------------+
The -O argument is used to get vertically split windows.
When Vim is already running, the :all command opens a window for each file in the argument list. :vertical all does it with vertical splits.
08.7 Viewing differences with vimdiff
There is a special way to start Vim, which shows the differences between two files. Let’s take a file main.c and insert a few characters in one line. Write this file with the [backup] option set, so that the backup file main.c~ will contain the previous version of the file.
Type this command in a shell (not in Vim):
vimdiff main.c~ main.c
Vim will start, with two windows side by side. You will only see the line in which you added characters, and a few lines above and blow it.
VV VV
+-----------------------------------------+
|+ +--123 lines: /* a|+ +--123 lines: /* a| <- fold
| text | text |
| text | text |
| text | text |
| text | changed text | <- changed line
| text | text |
| text | ------------------| <- deleted line
| text | text |
| text | text |
| text | text |
|+ +--432 lines: text|+ +--432 lines: text| <- fold
| ~ | ~ |
| ~ | ~ |
|main.c~==============main.c==============|
| |
+-----------------------------------------+
(This picture doesn’t show the highlighting, use the vimdiff command for a better look.)
The lines that were not modified have been collapsed into one line. This is called a closed fold. They are indicated in the picture with <- fold. Thust he single fold line at the top stands for 123 text lines. These lines are equal in both files.
The line marked with <- changed line is highlighted, and the inserted text is displayed with another color. This clearly shows what the difference is between the two files.
The line that was deleted is displayed with --- in the main.c window. See the <- deleted line marker in the picture. These characters are not really there. They just fill up main.c, so that it displays the same number of lines as the other window.
THE FOLD COLUMN
Each window has a column on the left with a slightly different background. In the picture above these are indicated with VV. You notice there is a plus character there, in front of each closed fold. Move the mouse pointer to that plus and click the left button. The fold will open, and you can see the text that it contains.
The fold column contains a minus sign for an open fold. If you click on this -, the fold will close.
Obviously, this only works when you have a working mouse. You can also use zo to open a fold and zc to close it.
DIFFING IN VIM
Another way to start in diff mode can be done from inside Vim. Edit the main.c file, then make a split and show the differences:
:edit main.c
:vertical diffsplit main.c~
The :vertical command is used to make the window split vertically. If you omit this, you will get a horizontal split.
If you have a patch or diff file, you can use the third way to start diff mode. First edit the file to which the patch applies. Then tell Vim the name of the patch file:
:edit main.c
:vertical diffpatch main.c.diff
WARNING: The patch file must contain only one patch, for the file you are editing. Otherwise you will get a lot of error messages, and some files might be patched unexpectedly.
The patching will only be done to the copy of the file in Vim. The file on your harddisk will remain unmodified (until you decide to write the file).
SCROLL BINDING
When the files have more changes, you can scroll in the usual way. Vim will try to keep both the windows start at the same position, so you can easily see the differences side by side.
When you don’t want this for a moment, use this command:
:set noscrollbind
JUMPING TO CHANGES
When you have disabled folding in some way, it may be difficult to find the changes. Use this command to jump forward to the next change:
]c
To go the other way use:
[c
Prepended a count to jump further away.
REMOVING CHANGES
You can move text from one window to the other. This either removes differences or adds new ones. Vim doesn’t keep the highlighting updated in all situations. To update it use this command:
:diffupdate
To remove a difference, you can move the text in a highlighted block from one window to another. Take the main.c and main.c~ example above. Move the cursor to the left window, on the line that was deleted in the other window. Now type this command:
dp
The change will be removed by putting the text of the current window in the other window. dp stands for diff put.
You can also do it the other way around. Move the cursor to the right window, to the line where changed was inserted. Now type this command:
do
The change will now be removed by getting the text from the other window. Since there are no changes left now, Vim puts all text in a closed fold. do stands for diff obtain. dg would have been better, but that already has a different meaning (dgg deletes from the cursor until the first line).
For details about diff mode, see vimdiff
08.8 Various
The laststatus option can be used to specify when the last window has a statusline:
0 never
1 only when there are split windows (the default)
2 always
Many commands that edit another file have a variant that splits the window. For Command-line commands this is done by prepending an s. For example: :tag jumps to a tag, :stag splits the window and jumps to a tag.
For Normal mode commands a CTRL-W is prepended. CTRL-^ jumps to the alternate file, CTRL-W CTRL-^ splits the window and edits the alternate file.
The splitbelow option can be set to make a new window appear below the current window. The splitright option can be set to make a vertically split window appear right of the current window.
When splitting a window you can prepend a modifier command to tell where the window is to appear:
:leftabove {cmd} left or above the current window
:aboveleft {cmd} idem
:rightbelow {cmd} right or below the current window
:belowright {cmd} idem
:topleft {cmd} at the top or left of the Vim window
:botright {cmd} at the bottom or right of the Vim window
08.9 Tab pages
You will have noticed that windows never overlap. That means you quickly run out of screen space. The solution for this is called Tab pages.
Assume you are editing thisfile. To create a new tab page use this command:
:tabedit thatfile
This will edit the file thatfile in a window that occupies the whole Vim window. And you will notice a bar at the top with the two file names:
+----------------------------------+
| thisfile | /thatfile/ __________X| (thatfile is bold)
|/* thatfile */ |
|that |
|that |
|~ |
|~ |
|~ |
| |
+----------------------------------+
You now have two tab pages. The first one has a window for thisfile and the second one a window for thatfile. It’s like two pages that are on top of each other, with a tab sticking out of each page showing the file name.
Now use the mouse to click on thisfile in the top line. The result is
+----------------------------------+
| /thisfile/ | thatfile __________X| (thisfile is bold)
|/* thisfile */ |
|this |
|this |
|~ |
|~ |
|~ |
| |
+----------------------------------+
Thus you can switch between tab pages by clicking on the label in the top line. If you don’t have a mouse or don’t want use it, you can use the gt command. Mnemonic: Goto Tab.
Now let’s create another tab page with the command:
:tab split
This makes a new tab page with one window thatis editing the same buffer as the window we were in:
+-------------------------------------+
| thisfile | /thisfile/ | thatfile __X| (thisfile is bold)
|/* thisfile */ |
|this |
|this |
|~ |
|~ |
|~ |
| |
+-------------------------------------+
You can put :tab before any Ex command that opens a window. The window will be opened in a new tab page. Another example:
:tab help gt
Will show the help text for gt in a new tab page.
A few more things you can do with tab pages:
- click with the mouse in the space after the last label
The next tab page will be selected, like withgt - click with the mouse on the X in the top right corner
The current tab page will be closed. Unless there are unsaved changes in the current tab page. - double click with the mouse in the top line
A new tab page will be created. - the
tabonlycommand
Closes all tab pages except the current one. Unless there are unsaved changes in other tab pages.
For more information about tab pages see tab-page.
usr_09 Using the GUI
:help usr_09
usr_10 Making big changes
:help usr_10
10.1 Record and playback commands
usr_11 Recovering from a crash
:help usr_11
Did your computer crash? And you just spent hours editing? Don’t panic! Vim stores enough information to be able to restore most of your work. This chapter shows you how to get your work back and explains how the swap file is used.
11.1 Basic recovery
In most cases recovering a file is quite simple, assuming you know which file you were editing (and the harddisk is still working). Start Vim on the file, with the -r argument added:
vim -r help.txt
Vim will read the swap file (used to store text you were editing) and may read bits and pieces of the original file. If Vim recovered your changes you will see these messages (with different file names, of course):
Using swap file ".help.txt.swp"
Original file "~/vim/runtime/doc/help.txt"
Recovery completed. You should check if everything is OK.
(You might want to write out this file under another name
and run diff with the original file to check for changes)
You may want to delete the .swp file now.
To be on the safe side, write this file under another name:
:write help.txt.recovered
Compare the file with the original file to check if you ended up with what you expected. Vimdiff is very useful for this 08.7. For example:
:write help.txt.recovered
:edit #
:diffsp help.txt
Watch out for the original file to contain a more recent version (you saved the file just before the computer crashed). And check that no lines are missing (something went wrong that Vim could not recover).
If Vim produces warning messages when recovering, read them carefully. This is rare though.
If the recovery resulted in text that is exactly the same as the file contents, you will get this message:
Using swap file ".help.txt.swp"
Original file "~/vim/runtime/doc/help.txt"
Recovery completed. Buffer contents equals file contents.
You may want to delete the .swp file now.
This usually happens if you already recovered your changes, or you wrote the file after making changes. It is safe to delete the swap file now.
It is normal that the last few changes can not be recovered. Vim flushes the changes to disk when you don’t type for about four seconds, or after typing about two hundred characters. This is set with the undatetime and updatecount options. Thus when Vim didn’t get a chance to save itself when the system went down, the changes after the last flush will be lost.
If you were editing without a file name, give an empty string as argument:
vim -r ""
You must be in the right directory, otherwise Vim can’t find the swap file.
11.2 Where is the swap file?
Vim can store the swap file in several places. Normally it is in the same directory as the original file. To find it, change to the directory of the file, and use:
vim -r
Vim will list the swap files that it can find. It will also look in other directories where the swap file for files in the current directory may be located. It will not find swap files in any other directories though, it doesn’t search the directory tree.
The output could look like this:
Swap files found:
In current directory:
1. .main.c.swp
owned by: mool dated: Tue May 29 21:00:25 2001
file name: ~mool/vim/vim6/src/main.c
modified: YES
user name: mool host name: masaka.moolenaar.net
process ID: 12525
In directory ~/tmp:
-- none --
In directory /var/tmp:
-- none --
In directory /tmp:
-- none --
If there are several swap files that look like they may be the one you want to use, a list is given of these swap files and you are requested to enter the number of the one you want to use. Carefully look at the dates to decide which one you want to use.
In case you don’t know which one to use, just try them one by one and check the resulting files if they are what you expected.
USING A SPECIFIC SWAP FILE
If you know which swap file needs to be used, you can recovering by giving the swap file name. Vim will then find out the name of the original file from the swap file.
Example:
vim -r .help.txt.swo
This is also handy when the swap file is in another directoey than expected. Vim recognizes files with the pattern *.s[uvw][a-z] as swap files.
If this still does not work, see what file names Vim reports and rename the files accordingly. Check the directory option to see where Vim may have put the swap file.
Note:
Vim tries to find the swap file by searching the directories in the dir option, looking for files that match filename.sw?. If wildcard expansion doesn’t work (e.g., when the shell option is invalid), Vim does a desperate try to find the file filename.swp. If that fails too, you will have to give the name of the swapfile itself to be able to recover the file.
11.3 Crashed or not?
ATTENTION E325
Vim tries to protect you from doing stupid things. Suppose you innocently start editing a file, expecting the contents of the file to show up. Instead, Vim produces a very long message:
E325: ATTENTION
Found a swap file by the name ".main.c.swp"
owned by: mool dated: Tue May 29 21:09:28 2001
file name: ~mool/vim/vim6/src/main.c
modified: no
user name: mool host name: masaka.moolenaar.net
process ID: 12559 (still running)
While opening file "main.c"
dated: Tue May 29 19:46:12 2001
(1) Another program may be editing the same file.
If this is the case, be careful not to end up with two
different instances of the same file when making changes.
Quit, or continue with caution.
(2) An edit session for this file crashed.
If this is the case, use ":recover" or "vim -r main.c"
to recover the changes (see ":help recovery").
If you did this already, delete the swap file ".main.c.swp"
to avoid this message.
You get this message, because, when starting to edit a file, Vim checks if a swap file already exists for that file. If there is one, there must be something wrong. It may be one of these two situations.
- Another edit session is active on this file. Look in the message for the line with
process ID. It might look like this:
process ID: 12559 (still running)
The text (still running) indicates that the process editing this file runs on the same computer. When working on a non-Unix system you will not get this extra hint. When editing a file over a network, you may not see the hint, because the process might be running on another computer. In those two cases you must find out what the situation is yourself.
If there is another Vim editing the same file, continuing to edit will result in two versions of the same file. The one that is written last will overwrite the other one, resulting in loss of changes. You better quit this Vim.
- The swap file might be the result from a previous crash of Vim or the computer. Check the dates mentioned in the message. If the date of the swap file is newer than the file you were editing, and this line appers:
modified: YES
Then you very likely have a crashed edit session that is worth recovering.
If the date of the file is newer than the date of the swap file, then either it was changed after the crash (perhaps you recovered it earlier, but didn’t delete the swap file?), or else the file was saved before the crash but after the last write of the swap file (then you’re lucky: you don’t even need that old swap file). Vim will warn you for this with this extra line:
NEWER than swap file!
Note that in the following situation Vim knows the swap file is not useful and will automatically delete it:
- The file is a valid swap file (Magic number is correct).
- The flag that the file was modified is not set.
- The process is not running.
You can programmatically deal with this situation with the FileChangedShell autocommand event.
UNREADABLE SWAP FILE
Sometimes the line
[cannot be read]
will appear under the name of the swap file. This can be good or bad, depending on circumstances.
It is good if a previous editing session crashed without having made any changes to the file. Then a directory listing of the swap file will show that it has zero bytes. You may delete it and proceed.
It is slightly bad if you don’t have read permission for the swap file. You may want to view the file read-only, or quit. On multi-user systems, if you yourself did the last changes under a different login name, a logout followed by a login under that other name might cure the read error. Or else you might want to find out who last edited (or is editing) the file and have a talk with them.
It is very bad if it means there is a physical read error on the disk containing the swap file. Fortunately, this almost never happens. You may want to view the file read-only at first (if you can), to see the extent of the changes that were forgotten. If you are the one in charge of that file, be prepared to redo your last changes.
swap-exists-choices
WHAT TO DO?
If dialogs are supported you will be asked to select one of six choices:
Swap file ".main.c.swp" already exists!
[O]pen Read-Only, (E)dit anyway, (R)ecover, (Q)uit, (A)bort, (D)elete it:
- O Open the file readonly. Use this when you just want to view the file and don’t need to recover it. You might want to use this when you know someone else is editing the file, but you just want to look in it and not make changes.
- E Edit the file anyway. Use this with caution! If the file is being edited in another Vim, you might end up with two versions of the file. Vim will try to warn you when this happens, but better be safe than sorry.
- R Recover the file from the swap file. Use this if you know that the swap file contains changes that you want to recover.
- Q Quit. This avoids starting to edit the file. Use this if there is another Vim editing the same file.
When you just started Vim, this will exit Vim. When starting Vim with files in several windows, Vim quits only if there is a swap file for the first one. When using an edit command, the file will not be loaded and you are taken back to the previously edited file. - A Abort. Like Quit, but also abort further commands. This is useful when loading a script that edits several files, such as a session with multiple windows.
- D Delete the swap file. Use this when you are sure you no longer need it. For example, when it doesn’t contain changes, or when the file itself is newer than the swap file.
On Unix this choice is noly offered when the process that created the swap file does not appear to be running.
If you do not get the dialog (you are running a version of Vim that does not support it), you will have to do it manually. To recover the file, use this command:
:recover
Vim cannot always detect that a swap file already exists for a file. This is the case when the other edit session puts the swap files in another directory or when the path name for the file is different when editing it on different machines. Therefore, don’t rely on Vim always warning you.
If you really don’t want to see this message, you can add the A flag to the shortmess option. But it’s very unusual that you need this.
For remarks about encryption and the swap file, see :recover-crypt.
For programmatic access to the swap file, see swapinfo().
11.4 Further reading
- swap-file An explanation about where the swap file will be created and what its name is.
- :preserve Manually flushing the swap file to disk.
- :swapname See the name of the swap file for the current file.
- updatecount Number of key strokes after which the swap file is flushed to disk.
- updatetime Timeout after which the swap file is flushed to disk.
- swapsync Whether the disk is synced when the swap file is flushed.
- directory List of directory names where to store the swap file.
- maxmem Limit for memory usage before writing text to the swap file.
- maxmemtot Same, but for all files in total.
usr_12 Clever tricks
:help usr_12
Editing Effectively
Subjects that can be read independently.
usr_20 Typing command-line commands quickly
:help usr_20
usr_21 Go away and come back
:help usr_21
usr_21 Go away and come back :help usr_21
usr_22 Finding the file to edit
:help usr_22
usr_23 Editing other files
:help usr_23
usr_24 Inserting quickly
:help usr_24
usr_25 Editing formatted text
:help usr_25
usr_26 Repeating
:help usr_26
usr_27 Search commands and patterns
:help usr_27
usr_28 Folding
:help usr_28
usr_29 Moving through programs
:help usr_29
usr_30 Editing programs
:help usr_30
usr_31 Exploiting the GUI
:help usr_31
usr_32 The undo tree
:help usr_32
Vim provides multi-level undo. If you undo a few changes and then make a new change you create a branch in the undo tree. This text is about moving through the branches.
- 32.1 Undo up to a file write
- 32.2 Numbering changes
- 32.3 Jumping around the tree
- 32.4 Time travelling
32.2 Numbering changes
In section 02.5 we only discussed one line of undo/redo. But it is also possible to branch off. This happens when you undo a few changes and then make a new change. The new changes become a branch in the undo tree.
Let’s start with the text one. The first change to make is to append ** too**. And then move to the first o and change it into w. We then have two changes, numbered 1 and 2, and three states of the text:
one
|
change 1
|
one too
|
change 2
|
one two
If we now undo one change, back to one too, and change one to me we create a branch in the undo tree:
one
|
change 1
|
one too
/ \
change 2 change 3
| |
one two me too
You can noe use the ucommand to undo. If you do this twice you get to one. Use CTRL-R to redo, and you will go to one too. One more CTRL-R takes you to me too. Thus undo and redo go up and down in the tree, using the branch that was last used.
What matters here is the order in which the changes are made. Undo and redo are not considered changes in this context. After each change you have a new state of the text.
Note
that only the changes are numbered, the text shown in the tree above has no identifier. They are mostly referred to by the number of the change above it. But sometimes by the number of one of the changes below it, especially when moving up in the tree, so that you know which change was just undone.
Next chapter: usr_40 Make new commands
Tuning Vim
Make Vim work as you like it.
usr_40 Make new commands
:help usr_40
Vim is an extensible editor. You can take a sequence of commands you use often and turn it into a new command. Or redefine an existing command. Autocmooands make it possible to execute commands automatically.
40.1 Key mapping
A simple mapping was explained in section 05.4. The principle is that one sequence of key strokes is translated into another sequence of key strokes. This is a simple, yet powerful mechanism.
The simplest form is that one key is mapped to a sequence of keys. Since the function keys, except <F1>, have no predefined meaning in Vim, these are good choices to map. Example:
:map <F2> GoDate: <Esc>:read !date<CR>kJ
This shows how three modes are used. After going to the last line with G, the o command opens a new line and starts Insert mode. The text Date: is inserted and <Esc> takes you out of insert mode.
Notice the use of special keys inside <>. This is called angle bracket notation. You type these as separate characters, not by pressing the key itself. This makes the mappings better readable and you can copy and paste the text without problems.
The : character takes Vim to the command line. The :read !date command reads the output from the date command and appends it below the current line. The <CR> is required to execute the :read command.
At this point of execution the text looks like this:
Date:
Fri Jun 15 12:54:34 CEST 2001
Now kj moves the cursor up and joins the lines together.
To decide which key or keys you use for mapping, see map-which-keys.
MAPPING AND MODES
The :map command defines remapping for keys in Normal mode. You can also define mappings for other modes. For example, :imap applies to Insert mode. You can use it to insert a date below the cursor:
:imap <F2> <CR>DATE: <Esc>:read !date<CR>kj
It looks a lot like the mapping for <F2> in Normal mode, only the start is different. The <F2> mapping for Normal mode is still there. Thus you can map the same key differently for each mode.
Notice that, although this mapping starts in Insert mode, it ends in Normal mode. If you want it to continue in Insert mode, append an a to the mapping.
| Here is an overview of map commands and in which mode they work | |
|---|---|
| :map | Normal, Visual and Operator-pending |
| :vmap | Visual |
| :nmap | Normal |
| :omap | Operator-pending |
| :map! | Insert and Command-line |
| :imap | Insert |
| :cmap | Command-line |
Operator-pending mode is when you typed an operator character, such as d or y, and you are expected to type the motion command or a text object. Thus when you type dw, the w is entered in operator-pending mode.
Suppose that you want to define <F7> so that the command d<F7> deletes a C program block (text enclosed in curly braces, {}). Similarly y<F7> would yank the program block into the unnamed register. Therefore, what you need to do is to define <F7> to select the current program block. You can do this with the following command:
:omap <F7> a{
This causes <F7> to perform a select block a{ in operator-pending mode, just like you typed it. This mapping is useful if typing a { on your keyboard is a bit difficult.
LISTING MAPPING
To see the currently defined mappings, use :map without arguments. Or one of the variants that include the mode in which they work. The output could look like this:
_g :call MyGrep(1)<CR>
v <F2> :s/^/> /<CR>:noh<CR>``
n <F2> :.,$s/^/> /<CR>:noh<CR>``
<xHome> <Home>
<xEnd> <End>
The first column of the list shows in which mode the mapping is effective. This is n for Normal mode, i for Insert mode, etc. Ablank is used for a mapping defined with :map, thus effective in both Normal and Visual mode.
One useful purpose of listing the mapping is to check if special keys in <> form have bean recognized (this only works when color is supported). For example, when <Esc> is displayed in clolor, it stands for the escape character. When it has the same color as the other text, it is five characters.
REMAPPING
The result of a mapping is inspected for other mappings in it. For example, the mappings for <F2> above could be shortened to:
:map <F2> G<F3>
:imap <F2> <Esc><F3>
:map <F3> oDate: <Esc>:read !date<CR>kJ
For Normal mode <F2> is mapped to go to the last line, and then behave like <F3> was pressed. In Insert mode <F2> stops Insert mode with <Esc> and then also uses <F3>. Then <F3> is mapped to do the actual work.
Suppose you hardly ever use Ex mode, and want to use the Q command to format text (this was so in old versions of Vim). This mapping will do it:
:map Q gq
But, in rare cases you need to use Ex mode anyway. Let’s map gQ to Q,so that you can still go to Ex mode:
:map gQ Q
What happens now is that when you type gQ it is mapped to Q. So far so good. But then Q is mapped to gq, thus typing gQ results in gq, and you don’t get to Ex mode at all.
To avoid keys to be mapped again. use the :noremap command:
:noremap gQ Q
Now Vim knows that the Q is not to be inspected for mappings that apply to it. There is a similar command for every mode: | |
|---|---|
| :noremap | Normal,Visual and Operator-pending |
| :vnoremap | Visual |
| :nnoremap | Normal |
| :onoremap | Operator-pending |
| :noremap! | Insert and Command-line |
| :inoremap | Insert |
| :cnoremap | Command-line |
RECURSIVE MAPPING
When a mapping triggers itself, it will run forever. This can be used to repeat an action an unlimited number of times.
For example, you have a list of files that contain a version number in the first line. You edit these files with Vim *.txt. You are now editing the first file. Define this mapping:
:map ,, :s/5.1/5.2/<CR>:wnext<CR>,,
Now you type ,,. This triggers the mapping. It replaces 5.1 with 5.2 in the first line. Then it does a :wnext to write the file and edit the next one. The mapping ends in ,,. This triggers the same mapping again, thus doing the substitution, etc.
This continues until there is an error. In this case it could be a file where the substitute command doesn’t find a match for 5.1. You can then make a change to insert 5.1 and continue by typing ,, again. Or the :wnext fails, because you are in the last file in the list.
When a mapping runs into an error halfway, the rest of the mapping is discarded. CTRL-C interrupts the mapping (CTRL-Break on MS-Windows).
DELETE A MAPPING
To remove a mapping use the :unmap command.
| Again, the mode the unmapping applies to depends on the command used: | |
|---|---|
| :unmap | Normal, Visual and Operator-pending |
| :vunmap | Visual |
| :nunmap | Normal |
| :ounmap | Operator-pending |
| :unmap! | Insert and Command-line |
| :iunmap | Insert |
| :cunmap | Command-line |
There is a trick to define a mapping that works in Normal and Operator-pending mode, but not in Visual mode. First define it for all three modes, then delete it for Visual mode:
:map <C-A> /---><CR>
:vunmap <C-A>
Notice that the five characters <C-A> stand for the single key CTRL-A.
To remove all mappings use the :mapclear command. You can guess the variations for different modes by now. Be careful with this command, it can’t be undone.
SPECIAL CHARACTERS
The :map command can be followed by another command. A | character separates the two commands. This also means that a | character can’t be used inside a map command. To include one, use <Bar> (five characters). Example:
:map <F8> :write <Bar> !checkin %:S<CR>
The same problem applies to the :unmap command, with the addition that you have to watch out for trailing white space. These two commands are different:
:unmap a | unmap b
:unmap a| unmap b
The first command tries to unmap a , with a trailing space.
When using a space inside a mapping, use <Space> (seven characters):
:map <Space> W
This makes the spacebar move a blank-separated word forward.
It is not possible to put a comment directly after a mapping, because the character is considered to be part of the mapping. You can use |, this starts a new, empty command with a comment. Example:
:map <Space> W| " Use spacebar to move forward a word
MAPPING AND ABBREVIATIONS
Abbreviations are a lot like Insert mode mappings. The arguments are handled in the same way. The main difference is the way they are triggered. An abbreviation is triggered by typing a non-word character after the word. A mapping is triggered when typing the last character.
Another difference is that the characters you type for an abbreviation are inserted in the text while you type them. When the abbreviation is triggered these characters are deleted and replaced by what the abbreviation produces. When typing the characters for a mapping, nothing is inserted until you type the last character that triggers it. If the showcmd option is set, the typed characters are displayed in the last line of the Vim window.
An exception is when a mapping is ambiguous. Suppose you have done two mappings:
:imap aa foo
:imap aaa bar
Now, when you type aa, Vim doesn’t know if it should apply the first or the second mapping. It waits for another character to be typed. If it is an a, the second mapping is applied add results in bar. If it is a space, for example, the first mapping is applied, resulting in foo, and then the space is inserted.
ADDITIONALLY…
The <script> keyword can be used to make a mapping local to a script. See :map-<script>.
The <buffer> keyword can be used to make a mapping local to a specific buffer. See :map-<buffer>.
The <unique> keyword can be used to make defining a new mapping fail when it already exists. Otherwise a new mapping simple overwrites the old one. See :map-<unique>.
To make a key do nothing, map it to <Nop> (five characters). This will make the <F7> key do nothing at all:
:map <F7> <Nop>| map! <F7> <Nop>
There must be no space after <Nop>.
40.2 Defining command-line commands
The Vim editor enables you to define your own commands. You execute these commands just like any other Command-line mode command.
To define a command, use the :command command, as follows:
:command DeleteFirst 1delete
Now when you execute the command :DeleteFitst Vim executes :1delete, which deletes the first line.
Note:
User-defined commands must start with a capital letter. You cannot use :X, :Next and :Print. The underscore cannot be used! You can use digits, but this is discouraged.
To list the user-defined commands, execute the following command:
:command
Just like with the builtin commands, the user defined commands can be abbreviated. You need to type just enough to distinguish the command from another. Command line completion can be used to get the full name.
NUMBER OF ARGUMENTS
User-defined commands can take a series of arguments. The number of arguments must be specified by the -nargs option. For instance, the example :DeleteFirst command takes no arguments, so you could have defined it as follows:
:command -nargs=0 DeleteFirst 1delete
However, beacuse zero arguments is the default, you do not need to add -nargs=0. The other values of -narg are as follows:
| -nargs | |
|---|---|
| -nargs=0 | No arguments |
| -nargs=1 | One argument |
| -nargs=* | Any number of arguments |
| -nargs=? | Zero or one argument |
| -nargs=+ | One or more arguments |
USING THE ARGUMENTS
Inside the command definition, the arguments are represented by the <args> keyword. For example:
:command -nargs=+ Say :echo "<args>"
Now when you type
:Say Hello World
Vim echoes Hello World. However, if you add a double quote, it won’t work. For example:
:Say he said "hello"
To get special characters turned into a string, properly escaped to use as an expression, use <q-args>:
:command -nargs=+ Say :echo <q-args>
Now the above :Say command will result in this to be executed:
:echo "he said" \"hello\""
The <f-args> keyword contains the same information as the <args> keyword, except in a format suitable for use as function call arguments. For example:
:command -nargs=* DoIt :call AFunction(<f-args>)
:DoIt a b c
Executes the following command:
:call AFunction("a","b","c")
LINE RANGE
Some commands take a range as their argument. To tell Vim that you are defining such a command, you need to specify a -range option. The values for this option are as follows:
-range Range is allowed; default is the current line.
-range=% Range is allowed; default is the whole file.
-range={count} Range is allowed; the last number in it is used as a
single number whose default is {count}.
When a range is specified, the keywords <line1> and <line2> get the values of the first and last line in the range. For example, the following command defines the SaveIt command, which writes out the specified range to the file save_file:
:command -range=% SaveIt :<line1>,<line2>write! save_file
OTHER OPTIONS
Some of the other options and keywords are as follows:
-count={number} The command can take a count whose default is
{number}. The resulting count can be used
through the <count> keyword.
-bang You can use a !. If present, using <bang> will result in a !.
-register You can specify a register. (The default is
the unnamed register.)
The register specification is available as
<reg> (a.k.a. <register>).
-complete={type} Type of command-line completion used. See
:command-completion for the list of possible
values.
-bar The command can be followed by | and another
command, or " and a comment.
-buffer The command is only available for the current
buffer.
Finally, you have the <lt> keyword. It stands for the character <. Use this to escape the special meaning of the <> items mentioned.
REDEFINING AND DELETING
To redefine the same command use the ! argument:
:command -nargs=+ Say :echo "<args>"
:command! -nargs=+ Say :echo <q-args>
To delete a user command use :delcommand. It tales a single argument, which is the name of the command. Example:
:delcommand SaveIt
To delete all the user commands:
:comclear
Careful, this can’t be undone!
More details about all this in the reference manual: user-commands.
40.3 Autocommands
An autocommand is a command that is executed automatically in response to some event, such as a file being read or written or a buffer change, Through the use of autocommands you can train Vim to edit compressed files, for example. That is used in the gzip plugin.
Autocommands are very powerfull. Use them with care and they will help you avoid typing many commands. Use them carelessly and they will cause a lot of trouble.
Suppose you want to replace a datestamp on the end of a file every time it is written. First you define a function:
:function DateInsert()
: $delete
: read !date
:endfunction
You want this function to be called each time, just before a buffer is written to a file. This will make that happen:
:autocmd BufWritePre * call DateInsert()
BufWritePre is the event for which this autocommand is triggered: Just before (pre) writing a buffer to a file. The * is a pattern to match with the file name. In this case it matches all files.
With this command enabled, when you do a :write, Vim checks for any matching BufWritePre autocommands and executes them, and then it performs the :write.
The general form of the :autocmd command is as follows:
:autocmd [group] {events} {file-pattern} [++nested] {command}
The [group] name is optional. It is used in managing and calling the commands (more on this later).
The {event} parameter is a list of events (comma separated) that trigger the command.
{file-pattern} is a filename, usually with wildcards. For example, using *.txt makes the autocommand be used for all files whose name end in .txt.
The optional [++nested] flag allows for nesting of autocommands (see below),
and finally, {command} is the command to be executed.
When adding an autocommand the already existing ones remain. To avoid adding the autocommand several times you should use this form:
:augroup updateDate
: autocmd!
: autocmd BufWritePre * call DateInsert()
:augroup END
This will delete any previously defined autocommand with :autocmd! before defining the new one. Groups are explained later.
EVENTS
One of the most useful events is BufReadPost. It is triggered after a new file is being edited. It is commonly used to set option values. For example, you know that *.gsm files are GUN assembly language. To get the syntax file right, define this autocommand:
:autocmd BufReadPost *.gsm set filetype=asm
If Vim is also to detect the type of file, it will set the filetype option for you. This triggers the Filetype event. Use this to do something when a certain type of file is edited. For example, to load a list of abbreviations for text files:
:autocmd Filetype text source ~/.vim/abbrevs.vim
When starting to edit a new file, you could make Vim insert a skeleton骨架;框架:
:autocmd BufNewFile *.[ch] 0read ~/skeletons/skel.c
See autocmd-events for a complete list of events.
PATTERNS
The {file-pattern} argument can actually be a comma-separated list of file patterns. For example: *.c,*.h matches files ending in .c and .h.
The usual file wildcards can be used. Here is a summary of the most often used ones:
* Match any character any number of times
? Match any character once
[abc] Match the character a, b or c
. Matches a dot
a{b,c} Matches "ab" and "ac"
When the pattern includes a slash (/) Vim will compare directory names. Without the slash only the last part of a file name is used. For example,*.txt matches /home/biep/readme.txt. The pattern /home/biep/* would also match it. But /home/foo/*.txt wouldn’t.
When including a slash, Vim matches the pattern against both the full path of the file (/home/biep/readme.txt) and the relative path (e.g., biep/readme.txt).
Note:
When working on a system that uses a backslash as file separator, such as MS-Windows, you still use forward slashes in autocommands. This makes it easier to write the pattern, since a backslash has a special meaning. It also makes the autocommands portable.
DELETING
To delete an autocommand, use the same command as what it was defined with, but leave out the {command} at the end and use a !. Example:
:autocmd! FileWritePre *
This will delete all autocommands for the FileWritePre event that use the * pattern.
LISTING
To list all the currently defined autocommands, use this:
:autocmd
The list can be very long, especially when filetype detection is used. To list only part of the commands, specify the group, event and/or pattern. For example, to list all BufNewFile autocommands:
:autocmd BufNewFile
To list all autocommands for the pattern *.c:
:autocmd * *.c
Using * for the event will list all the events. To list all autocommands for the cprograms group:
:autocmd cprograms
GROUPS
The {group} item, used when defining an autocommand, groups related autocommands together. This can be used to delete all the autocommands in a certain group, for example.
When defining several autocommands for a certain group, use the :augroup command. For example, let’s define autocommands for C programs:
:augroup cprograms
: autocmd BufReadPost *.c,*.h :set sw=4 sts=4
: autocmd BufReadPost *.cpp :set sw=3 sts=3
:augroup END
This will do the same as:
:autocmd cprograms BufReadPost *.c,*.h :set sw=4 sts=4
:autocmd cprograms BufReadPost *.cpp :set sw=3 sts=3
To delete all autocommands in the cprograms group:
:autocmd! cprograms
NESTING
Generally, commands executed as the result of an autocommand event will not trigger any new events. If you read a file in response to a FileChangedShell event, it will not trigger the autocommands that would set the syntax, for example. To make the events triggered, add the nested argument:
:autocmd FileChangedShell * ++nested edit
EXECUTING AUTOCOMMANDS
It is possible to trigger an autocommand by pretending an event has occurred. This is useful to have one autocommand trigger another one. Example:
:autocmd BufReadPost *.new execute "doautocmd BufReadPost " . expand("<afile>:r")
This defines an autocommand that is triggered when a new file has been edited. The file name must end in .new. The :execute command uses expression evaluation to form a new command and execute it. When editing the file tryout.c.new the executed command will be:
:doautocmd BufReadPost tryout.c
The expand() function takes the <afile> argument, which stands for the file name the autocommand was executed for, and takes the root of the file name with :r.
:doautocmd executes on the current buffer. The :doautoall command works like doautocmd except it executes on all the buffers.
USING NORMAL MODE COMMANDS
The commands executed by an autocommand are Command-line commands. If you want to use a Normal mode command, the :normal command can be used. Example:
:autocmd BufReadPost *.log normal G
This will make the cursor jump to the last line of *.log files when you start to edit it.
Using the :normal command is a bit tricky. First of all, make sure its argument is a complete command, including all the arguments. When you use i to go to Insert mode, there must also be a <Esc> to leave Insert mode again. If you use a / to start a search pattern, there must be a <CR> to exeucte it.
The :normal command uses all the text after it as commands. Thus there can be no | and another command following. To work around this, put the :normal command inside an :execute command. This also makes it possible to pass unprintable characters in a convenient way. Example:
:autocmd BufReadPost *.chg execute "normal ONew entry:\<Esc>" |
\ 1read !date
This also shows the use of a backslash to break a long command into more lines. This can be used in Vim scripts (not at the command line).
When you want the autocommand do something complicated, which involves jumping around in the file and then returning to the original position, you may want to restore the view on the file. See restore-position for an example.
IGNORING EVENTS
At times, you will not want to trigger an autocommand. The eventignore option contains a list of events that will be totally ignored. For example, the following causes events for entering and leaving a window to be ignored:
:set eventignore=WinEnter,WinLeave
To ignore all events, use the following command:
:set eventignore=all
To set it back to the normal behavior, make eventignore empty:
:set eventignore=
usr_41 Write a Vim script
:help usr_41
usr_42 Add new menus
:help usr_42
usr_43 Using filetypes
:help usr_43
usr_44 Your own syntax highlighted
:help usr_44
usr_45 Select your language (locale)
:help usr_45
Writing Vim script
usr_50 Advanced Vim script writing
:help usr_50
usr_51 Write plugins
:help usr_52
usr_52 Installing Vim
:help usr_52
Making Vim Run/read
usr_90 Installing Vim
:help usr_90
Before you can use Vim you have to install it. Depending on your system it’s simple or easy. This Chapter gives a few hints and also explains how upgrading to a new version is done.
90.1 Unix
First you have to decide if you are going to install Vim system-wide or for a single user. The installation is almost the same, but the directory where Vim is installed in differs.
For a system-wide installation the base directory /usr/local is often used. But this may be different for your system. Try finding out where other packages are installed.
When installing for a single user, you can use your home directory as the base. The files will be placed in subdirectories like bin and shared/vim.
FROM A PACKAGE
You can get precompiled binaries for many different UNIX systems. There is a long list with links on this page: http://www.vim.org/binaries.html
Volunteers maintain the binaries, so they are often out of date. It is a good idea to compile your own UNIX version from the source. Also, creating the editor from the source allows you to control which features are compiled.
This does require a compiler though.
If you have a Linux distribution, the vi program is probably a minimal version of Vim. It doesn’t do syntax highlighting, for example. Try finding another Vim package in your distribution, or search on the web site.
FROM SOURCES
To compile and install Vim, you will need the following:
- A C compiler (GCC preferred)
- The GZIP program (you can get it from http://www.gnu.org)
- The Vim source and runtime archives
To get the Vim archives, look in this file for a mirror near you, this should provide the fastest download: ftp://ftp.vim.org/pub/vim/MIRRORS
Or use the home site ftp.vim.org, if you think it’s fast enough. Go to the unix directory and you’ll find a list of files there. The version number is embedded in the file name. You will want to get the most recent version.
You can get the files for Unix in one big archive that contains everything: vim-8.2.tar.bz2
You need the bizp2 program to uncompress it.
COMPILING
First create a top directory to work in, for example:
mkdir ~/vim
cd ~/vim
Then unpack the archives there. You can unpack it like this:
tar xf path/vim-8.2.tar.bz2
If your tar command doesn’t support bz2 directly:
bzip2 -d -c path/vim-8.2.tar.bz2|tar xf -
Change path to where you have downloaded the file.
If you are satisfied with getting the default features, and your environment is setup properly, you should be able to compile Vim with just this:
cd vim82/src
make
The make program will run configure and compule everything. Further on we will explain how to compile with different features.
If there are errors while compiling, carefully look at the error messages.
There should be a hint about what went wrong. Hopefully you will be able to correct it. You might have to disable some features to make Vim compile.
Look in the Makefile for specific hints for your system.
TESTING
Now you can check if compiling worked OK:
make test
This will run a sequence of test scripts to verify that Vim works as expected.
Vim will be started many times and all kinds of text and messages flash by.
If it is alright you will finally see:
test results:
ALL DONE
If you get TEST FAILURE some test failed. If there are one or two messages about failed tests, Vim might still work, but not perfectly. If you see a lot of error messages or Vim doesn’t finish until the end, there must be something wrong. Either try to find out yourself, or find someone who can solve it.
You could look in the maillist-archive for a solution. If everything else fails, you could ask in the vim maillist if someone can help you.
INSTALLING
if you want to install in your home directory, edit the Makefile and search for a line:
#prefix = $(HOME)
Remove the # at the start of the line.
When installing for the whole system, Vim has most likely already selected a good installation directory for you. You can also sprcify one, see below.
You need to become root for the following.
To install Vim do:
make install
That should move all the relevant files to the right place. Now you can try running vim to verify that it works. Use two simple tests to check if Vim can find its runtime files:
:help
:syntax enable
If this doesn’t work, use this command to check where Vim is looking for the runtime files:
:echo $VIMRUNTIME
You can also start Vim with the -V argument to see what happens during startup:
vim -V
Don’t forget that the user manual assumes you Vim in a certain way. After installing Vim, follow the instructions at not-compatible to make Vim work as assumed in this manual.
SELECTING FEATURES
Vim has many ways to select features. One of the simple ways is to edit the Makefile. There are many directions and examples. Often you can enable or disable a feature by uncommenting a line.
An alternative is to run configure separately. This allows you to specify configuration options manually. The disadvantage is that you have to figure out what exactly to type.
Some of the most interesting configure arguments follow. These can also be enabled from the Makefile.
--prefix={directory} Top directory where to install Vim.
--with-features=tiny Compile with many features disabled.
--with-features=small Compile with some features disabled.
--with-features=big Compile with more features enabled.
--with-features=huge Compile with most features enabled.
See +feature-list for which featur e
is enabled in which case.
--enable-perlinterp Enable the Perl interface. There are
similar arguments for ruby, python and
tcl.
--disable-gui Do not compile the GUI interface.
--without-x Do not compile X-windows features.
When both of these are used, Vim will
not connect to the X server, which
makes startup faster.
To see the whole list use:
./configure --help
You can find a bit of explanation for each feature, and links for more information here: feature-list.
For the adventurous, edit the file feature.h. You can also change the source code yourself!
90.2 MS-Windows
There are two ways to install the Vim program for Microsoft Windows. You can uncompress several archives, or use a self-installing big archive. Most users with fairly recent computers will prefer the second method. For the first one, you will need:
- An archive with binaries for Vim.
- The Vim runtime archive.
- A program to unpack the zip files.
To get the Vim archives, look in this file for a mirror near you, this should provide the fastest download: ftp://ftp.vim.org/pub/vim/MIRRORS
Or use the home site ftp.vim.org, if you think it’s fast enough. Go to the pc directory and you’ll find a list of files there. The version number is embedded in the file name. You will want to get the most recent version.
We will use *82 here, which is version 8.2.
gvim82.exe The self-installing archive.
This is all you need for the second method. Just launch the executable, and follow the prompts.
For the first method you must choose one of the binary archive. These are available:
gvim82.zip The normal MS-Windows GUI version.
gvim82ole.zip The MS-Windows GUI version with OLE support.
Uses more memory, supports interfacing with
other OLE applications.
vim82w32.zip 32 bit MS-Windows console version.
You only need one of them. Although you could install both a GUI and a console version. You always need to get the archive with runtime files.
vim82rt.zip The runtime files.
Use your un-zip program to unpack the files. For example, using the unzip program:
cd c:\
unzip path\gvim82.zip
unzip path\vim82rt.zip
This will unpack the files in the directory c:\vim\vim82. If you already have a vim directory somewhere, you will want to move to the directory just above it. Now change to the vim\vim82 directory and run the install program:
install
Carefully look through the messages and select the options you want to use. If you finally select do it the install program will carry out the actions you selected.
The install program doesn’t move the runtime files. They remain where you unpacked them.
In case you are not satisfied with the features included in the supplied binaries, you could try compiling Vim yourself. Get the source archive from the same location as where the binaries are. You need a compiler for which a makefile exists. Microsoft Visual C, MinGW and Cygwin compilers can be used.
CHeck the file src/INSTALLpc.txt for hints.
90.3 upgrading
If you are running one version of Vim and want to install another, here is what to do.
UNIX
When you type make install the runtime files will be copied to a directory which is specific for this version. Thus they will not overwrite a previous version. This makes it possible to use two or more versions next to each other.
The executable vim will overwrite an older version. If you don’t care about keeping the old version, running make install will work fine. You can delete the old runtime files manually. Just delete the directory with the version number in it and all files below it. Example:
rm -rf /usr/local/share/vim/vim74
There are normally no changed files below this directory. If you did change the filetype.vim file, for example, you better merge the changes into the new version before deleting it.
If you are careful and want to try out the new version for a while before switching to it, install the new version under another name. You need to specify a configure argument. For example:
./configure --with-vim-name=vim8
Before running make install, you could use make -n install to check that no valuable existing files are overwritten.
When you finally decide to switch to the new version, all you need to do is to rename the binary to vim. For example:
mv /usr/local/bin/vim8 /usr/local/bin/vim
MS-WINDOWS
Upgrading is mostly equal to installing a new version. Just unpack the files in the same place as the previous version. A new directory will be created. e.g., vim82, for the files of the new version. Your runtime files, vimrc file, viminfo, etc. will be left alone.
If you want to run the new version next to the old one, you will have to do some handwork. Don’t run the install program, it will overwrite a few files of the old version. Execute the new binaries by specifying the full path. The program should be able to automatically find the runtime files for the right version. However, this won’t work if you set the $VIMRUNTIME variable somewhere.
If you are satisfied with the upgrade, you can delete the files of the previous version. See 90.5.
90.4 Common installation issues
This section describes some of the common problems that occur when installing Vim and suggests some solutions. It also contains answers to many installation questions.
Q: I Do Not Have Root Privileges. How Do I Install Vim?(Unix)
Use the following configuration command to install Vim in a directory called $HOME/vim:
./configure --prefix=$HOME
This gives you a personal copy of Vim. You need to put $HOME/bin in your path to execute the editor. Also see install-home.
Q: The Colors Are Not Right on My Screen.(Unix)
Check your terminal settings by using the following command in a shell:
echo $TERM
If the terminal type listed is not correct, fix it. For more hints, see 06.2. Another solution is to always use the GUI version of Vim, called gvim. This avoids the need for a correct terminal setup.
Q: My Backspace And Delete Keys Don’t Work Right
The definition of what key sends what code is very unclear for backspace <BS> and Delete <Del> keys. First of all, check your $TERM setting. If there is nothing wrong with it, try this:
:set t_kb=^V<BS>
:set t_kD=^V<Del>
In the first line you need to press CTRL-V and then hit the backspace key.
In the second line you need to press CTRL-V and then hit the Delete key.
You can put these lines in your vimrc file, see 05.1. A disadvantage is that it won’t work when you use another terminal some day. Look here for alternate solutions: :fixdel.
Q: I Am Using RedHat Linux. Can I Use the Vim That Comes with the System?
By default RedHat installs a minimal version of Vim. Check your RPM packages for something named Vim-enhanced-version.rpm and install that.
Q: How Do I Turn Syntax Coloring On? How Do I Make Plugins Work?
Use the example vimrc script. You can find an explanation on how to use it here: not-compatible.
See chapter 6 for information about syntax highlighting: usr_06.txt.
Q: What Is a Good vimrc File to Use?
See the http://www.vim.org Web site for several good examples.
Q: Where Do I Find a Good Vim Plugin?
See the Vim-online site: http://vim.sf.net. Many users have uploaded useful Vim scripts and plugins there.
Q: Where Do I Find More Tips?
See the Vim-online site: http://vim.sf.net. There is an archive with hints from Vim users. You might also want to search in the maillist-archive.
90.5 Uninstalling Vim
In the unlikely event you want to uninstall Vim completely, this is how you do it.
UNIX
When you installed Vim as a package, check your package manager to find out how to remove the package again.
If you installed Vim from sources you can use this command:
make uninstall
However, if you have deleted the original files or you used an archive that someone supplied, you can’t do this. Do delete the files manually, here is an example for when /usr/local was used as the root:
rm -rf /usr/local/share/vim/vim82
rm /usr/local/bin/eview
rm /usr/local/bin/evim
rm /usr/local/bin/ex
rm /usr/local/bin/gview
rm /usr/local/bin/gvim
rm /usr/local/bin/gvim
rm /usr/local/bin/gvimdiff
rm /usr/local/bin/rgview
rm /usr/local/bin/rgvim
rm /usr/local/bin/rview
rm /usr/local/bin/rvim
rm /usr/local/bin/rvim
rm /usr/local/bin/view
rm /usr/local/bin/vim
rm /usr/local/bin/vimdiff
rm /usr/local/bin/vimtutor
rm /usr/local/bin/xxd
rm /usr/local/man/man1/eview.1
rm /usr/local/man/man1/evim.1
rm /usr/local/man/man1/ex.1
rm /usr/local/man/man1/gview.1
rm /usr/local/man/man1/gvim.1
rm /usr/local/man/man1/gvimdiff.1
rm /usr/local/man/man1/rgview.1
rm /usr/local/man/man1/rgvim.1
rm /usr/local/man/man1/rview.1
rm /usr/local/man/man1/rvim.1
rm /usr/local/man/man1/view.1
rm /usr/local/man/man1/vim.1
rm /usr/local/man/man1/vimdiff.1
rm /usr/local/man/man1/vimtutor.1
rm /usr/local/man/man1/xxd.1
MS-WINDOWS
If you installed Vim with the self-installing archive you can run the uninstall-gui program located in the same directory as the other Vim programs, e.g. c:\vim\vim82. You can also launch it from the Start menu if installed the Vim entries there. This will remove most of the files, menu entries and desktop shortcuts. Some files may remain however, as they need a Windows restart before being deleted.
You will be given the option to remove the whole *vim directory. It probably contains your vimrc file and other runtime files that you created, so be careful.
Else, if you installed Vim with the zip archives, the preferred way is to use the uninstall program. You can find it in the same directory as the install program , e.g., c:\vim\vim82. This should also work from the usual install/remove software page.
However, this only removes the registry entries for Vim. You have to delete the files yourself. Simple select the directory vim\vim82 and delete it recursively. There should be no files there that you changed, but you might want to check that first.
The vim directory probably contains your vimrc file and other runtime files that you created. You might want to keep that.
OS Management
shell
Shell
条件 test & []
字符串比较
字符串相同则结果为真
if test str1 = str2
if [ str1 = str2 ]
字符串不同则结果为真
if test str1 != str2
if [ str1 != str2 ]
字符串不为空则结果为真
if test -n str
if [ -n str ]
字符串为null则结果为真
if test -z str
if [ -z str ]
算术比较
相等
if test exp1 -eq exp2
if [ exp1 -eq exp2 ]
不相等
if test exp1 -ne exp2
if [ exp1 -ne exp2 ]
大于
if test exp1 -gt exp2
if [ exp1 -gt exp2 ]
大于等于
if test exp1 -ge exp2
if [ exp1 -ge exp2 ]
小于
if test exp1 -lt exp2
if [ exp1 -lt exp2 ]
小于等于
if test exp1 -le exp2
if [ exp1 -le exp2 ]
非
if test ! exp
if [ ! exp ]
文件有关的条件测试
如果文件是一个目录结果为真
if test -d file
if [ -d file ]
如果文件存在则结果为真,历史上-e选项不可移植,所以通常使用的是-f选项
if test -e file
if [ -e file ]
如果文件是一个普通文件则结果为真
if test -f file
if [ -f file ]
如果文件的set-group-id位被设置则结果为真(set-group-id 和 set-gid 授予程序其所在组的访问权限 通过chmod 选项 g 设置,该标志对shell脚本程序不起作用,只对可执行的二进制文件有用)
if test -g file
if [ -g file ]
如果文件可读则结果为真
if test -r file
if [ -r file ]
如果文件的大小不为0则结果为真
if test -s file
if [ -s file ]
如果文件的set-user-id位被设置则结果为真(set-user-id 和 set-uid 授予程序其拥有者的访问权限,不是其使用者的访问权限 通过chmod 选项 u 设置,该标志对shell脚本程序不起作用,只对可执行的二进制文件有用)
if test -u file
if [ -u file ]
如果文件可写则结果为真
if test -w file
if [ -w file ]
如果文件可执行则结果为真
if test -x file
if [ -x file ]
控制结构 if & elif & for & while & until & case & AND列表 & OR列表 & {}语句块
oh_my_zsh
Zsh is a powerful shell that operates as both an interactive shell and as a scripting language interpreter.
install
archlinux
pacman -S zsh curl git
opensuse
zypper in zsh curl git
install
sh -c "$(curl -fsSL https://raw.github.com/ohmyzsh/ohmyzsh/master/tools/install.sh)"
update
Manual Updates
omz update
Getting Updates:
By default, you will be prompted to check for updates every 2 weeks.
You can choose other update modes by adding a line to your ~/.zshrc file, before Oh My Zsh is loaded:
# Uncomment one of the following lines to change the auto-update behavior
# zstyle ':omz:update' mode disabled # disable automatic updates
# zstyle ':omz:update' mode auto # update automatically without asking
zstyle ':omz:update' mode reminder # just remind me to update when it's time
# Uncomment the following line to change how often to auto-update (in days).
zstyle ':omz:update' frequency 13 # This will check for updates every 13 days
# zstyle ':omz:update' frequency 0 # This will check for updates every time you open the terminal (not recommended)
# Updates verbosity
# You can also limit the update verbosity with the following settings:
zstyle ':omz:update' verbose default # default update prompt
# zstyle ':omz:update' verbose minimal # only few lines
# zstyle ':omz:update' verbose silent # only errors
config
config your ~/.zshrc file
# Set name of the theme to load --- if set to "random", it will
# load a random theme each time oh-my-zsh is loaded, in which case,
# to know which specific one was loaded, run: echo $RANDOM_THEME
# See https://github.com/ohmyzsh/ohmyzsh/wiki/Themes
#ZSH_THEME="darkblood"
ZSH_THEME="linuxonly"
#ZSH_THEME="frisk"
#ZSH_THEME="random"
# Set list of themes to pick from when loading at random
# Setting this variable when ZSH_THEME=random will cause zsh to load
# a theme from this variable instead of looking in $ZSH/themes/
# If set to an empty array, this variable will have no effect.
#ZSH_THEME_RANDOM_CANDIDATES=("linuxonly" "frisk" "darkblood")
# Which plugins would you like to load?
# Standard plugins can be found in $ZSH/plugins/
# Custom plugins may be added to $ZSH_CUSTOM/plugins/
# Example format: plugins=(rails git textmate ruby lighthouse)
# Add wisely, as too many plugins slow down shell startup.
plugins=(git docker-compose kubectl)
docker-compose plugins
| Alias | Command | Description |
|---|---|---|
| dco | docker-compose | Docker-compose main command |
| dcb | docker-compose build | Build containers |
| dce | docker-compose exec | Execute command inside a container |
| dcps | docker-compose ps | List containers |
| dcrestart | docker-compose restart | Restart container |
| dcrm | docker-compose rm | Remove container |
| dcr | docker-compose run | Run a command in container |
| dcstop | docker-compose stop | Stop a container |
| dcup | docker-compose up | Build, (re)create, start, and attach to containers for a service |
| dcupb | docker-compose up –build | Same as dcup, but build images before starting containers |
| dcupd | docker-compose up -d | Same as dcup, but starts as daemon |
| dcdn | docker-compose down | Stop and remove containers |
| dcl | docker-compose logs | Show logs of container |
| dclf | docker-compose logs -f | Show logs and follow output |
| dcpull | docker-compose pull | Pull image of a service |
| dcstart | docker-compose start | Start a container |
| dck | docker-compose kill | Kills containers |
kubectl plugins
| Alias | Command | Description |
|---|---|---|
| k | kubectl | The kubectl command |
| kca | kubectl –all-namespaces | The kubectl command targeting all namespaces |
| kaf | kubectl apply -f | Apply a YML file |
| keti | kubectl exec -ti | Drop into an interactive terminal on a container |
| Manage configuration quickly to switch contexts between local, dev and staging | ||
| kcuc | kubectl config use-context | Set the current-context in a kubeconfig file |
| kcsc | kubectl config set-context | Set a context entry in kubeconfig |
| kcdc | kubectl config delete-context | Delete the specified context from the kubeconfig |
| kccc | kubectl config current-context | Display the current-context |
| kcgc | kubectl config get-contexts | List of contexts available |
| General aliases | ||
| kdel | kubectl delete | Delete resources by filenames, stdin, resources and names, or by resources and label selector |
| kdelf | kubectl delete -f | Delete a pod using the type and name specified in -f argument |
| Pod management | ||
| kgp | kubectl get pods | List all pods in ps output format |
| kgpw | kgp –watch | After listing/getting the requested object, watch for changes |
| kgpwide | kgp -o wide | Output in plain-text format with any additional information. For pods, the node name is included |
| kep | kubectl edit pods | Edit pods from the default editor |
| kdp | kubectl describe pods | Describe all pods |
| kdelp | kubectl delete pods | Delete all pods matching passed arguments |
| kgpl | kgp -l | Get pods by label. Example: kgpl “app=myapp” -n myns |
| kgpn | kgp -n | Get pods by namespace. Example: kgpn kube-system |
| Service management | ||
| kgs | kubectl get svc | List all services in ps output format |
| kgsw | kgs –watch | After listing all services, watch for changes |
| kgswide | kgs -o wide | After listing all services, output in plain-text format with any additional information |
| kes | kubectl edit svc | Edit services(svc) from the default editor |
| kds | kubectl describe svc | Describe all services in detail |
| kdels | kubectl delete svc | Delete all services matching passed argument |
| Ingress management | ||
| kgi | kubectl get ingress | List ingress resources in ps output format |
| kei | kubectl edit ingress | Edit ingress resource from the default editor |
| kdi | kubectl describe ingress | Describe ingress resource in detail |
| kdeli | kubectl delete ingress | Delete ingress resources matching passed argument |
| Namespace management | ||
| kgns | kubectl get namespaces | List the current namespaces in a cluster |
| kcn | kubectl config set-context –current –namespace | Change current namespace |
| kens | kubectl edit namespace | Edit namespace resource from the default editor |
| kdns | kubectl describe namespace | Describe namespace resource in detail |
| kdelns | kubectl delete namespace | Delete the namespace. WARNING! This deletes everything in the namespace |
| ConfigMap management | ||
| kgcm | kubectl get configmaps | List the configmaps in ps output format |
| kecm | kubectl edit configmap | Edit configmap resource from the default editor |
| kdcm | kubectl describe configmap | Describe configmap resource in detail |
| kdelcm | kubectl delete configmap | Delete the configmap |
| Secret management | ||
| kgsec | kubectl get secretGet | secret for decoding |
| kdsec | kubectl describe secret | Describe secret resource in detail |
| kdelsec | kubectl delete secret | Delete the secret |
| Deployment management | ||
| kgd | kubectl get deployment | Get the deployment |
| kgdw | kgd –watch | After getting the deployment, watch for changes |
| kgdwide | kgd -o wide | After getting the deployment, output in plain-text format with any additional information |
| ked | kubectl edit deployment | Edit deployment resource from the default editor |
| kdd | kubectl describe deployment | Describe deployment resource in detail |
| kdeld | kubectl delete deployment | Delete the deployment |
| ksd | kubectl scale deployment | Scale a deployment |
| krsd | kubectl rollout status deployment | Check the rollout status of a deployment |
| kres | kubectl set env $@ REFRESHED_AT=… | Recreate all pods in deployment with zero-downtime |
| Rollout management | ||
| kgrs | kubectl get rs | To see the ReplicaSet rs created by the deployment |
| krh | kubectl rollout history | Check the revisions of this deployment |
| kru | kubectl rollout undo | Rollback to the previous revision |
| Port forwarding | ||
| kpf | kubectl port-forward | Forward one or more local ports to a pod |
| Tools for accessing all information | ||
| kga | kubectl get all | List all resources in ps format |
| kgaa | kubectl get all –all-namespaces | List the requested object(s) across all namespaces |
| Logs | ||
| kl | kubectl logs | Print the logs for a container or resource |
| klf | kubectl logs -f | Stream the logs for a container or resource (follow) |
| File copy | ||
| kcp | kubectl cp | Copy files and directories to and from containers |
| Node management | ||
| kgno | kubectl get nodes | List the nodes in ps output format |
| keno | kubectl edit node | Edit nodes resource from the default editor |
| kdno | kubectl describe node | Describe node resource in detail |
| kdelno | kubectl delete node | Delete the node |
| Persistent Volume Claim management | ||
| kgpvc | kubectl get pvc | List all PVCs |
| kgpvcw | kgpvc –watch | After listing/getting the requested object, watch for changes |
| kepvc | kubectl edit pvc | Edit pvcs from the default editor |
| kdpvc | kubectl describe pvc | Describe all pvcs |
| kdelpvc | kubectl delete pvc | Delete all pvcs matching passed arguments |
| StatefulSets management | ||
| kgss | kubectl get statefulset | List the statefulsets in ps format |
| kgssw | kgss –watch | After getting the list of statefulsets, watch for changes |
| kgsswid | e kgss -o wide | After getting the statefulsets, output in plain-text format with any additional information |
| kess | kubectl edit statefulset | Edit statefulset resource from the default editor |
| kdss | kubectl describe statefulset | Describe statefulset resource in detail |
| kdelss | kubectl delete statefulset | Delete the statefulset |
| ksss | kubectl scale statefulset | Scale a statefulset |
| krsss | kubectl rollout status statefulset | Check the rollout status of a deployment |
| Service Accounts management | ||
| kdsa | kubectl describe sa | Describe a service account in details |
| kdelsa | kubectl delete sa | Delete the service account |
| DaemonSet management | ||
| kgds | kubectl get daemonset | List all DaemonSets in ps output format |
| kgdsw | kgds –watch | After listing all DaemonSets, watch for changes |
| keds | kubectl edit daemonset | Edit DaemonSets from the default editor |
| kdds | kubectl describe daemonset | Describe all DaemonSets in detail |
| kdelds | kubectl delete daemonset | Delete all DaemonSets matching passed argument |
| CronJob management | ||
| kgcj | kubectl get cronjob | List all CronJobs in ps output format |
| kecj | kubectl edit cronjob | Edit CronJob from the default editor |
| kdcj | kubectl describe cronjob | Describe a CronJob in details |
| kdelcj | kubectl delete cronjob | Delete the CronJob |
tmux
Tmux
- archlinux 安装
pacman -S tmux - 帮助
ctrl+b激活控制台等待输入指令ctrl+b ? - 查看所有 tmux session
tmux ls或ctrl+b s - 新建 tmux session
tmux或tmux new -s <session-name> - 重命名 session
tmux rename-session -t <old-name> <new-name>或ctrl+b $ - 退出单不关闭session
tmux detach或ctrl+b d - 重连 detach session
tmux attach -t <session-name>或tmux at -t <session-name> - 退出当前session并关闭当前session
exit - kill session
tmux kill-session -t <session-name> - switch session
tmux switch -t <session-name> - 平铺当前 session(再次执行该命令恢复)
ctrl+b z - 上下划分两个窗格
ctrl+b “ - 左右划分两个窗格
ctrl+b % - 窗格内切换光标
ctrl+b 方向键- 上
ctrl+b 方向键上或tmux select-pane -U - 下
ctrl+b 方向键下或tmux select-pane -D - 左
ctrl+b 方向键左或tmux select-pane -L - 右
ctrl+b 方向键右或tmux select-pane -R
- 上
Systemd
systemd is a suite of basic building blocks for a Linux system. It provides a system and service manager that runs as PID 1 and starts the rest of the system.
archlinux Wiki
i3wm 普通用户关机 重新安装 polkit 即可
root
systemctl=systemctl --systemsystemctl enable NetworkManager=systemctl --system enable NetworkManagersystemctl enable sshd=systemctl enable sshd --systemsystemctl enable update-system.timer=systemctl --system enable update-system.timer
poweroff
systemctl poweroff
reboot
systemctl reboot
Show system status
systemctl status
List running units
systemctl
systemctl list-units
List failed units
systemctl --failed
List installed unit files
systemctl list-unit-files
not root
参考archlinux wiki
offers the ability to manage services under the user’s control with a per-user systemd instance,enabling them to start, stop, enable, and disable their own user units systemctl --user Connect to user service manager
systemctl --user enable mpdsystemctl --user start mpd
systemd/Timers
There are many cron implementations, but none of them are installed by default as the base system uses systemd/Timers instead.
archlinux Wiki
systemd.timer
systemd.time 执行时间策略
systemd.exec
file path
- /etc/systemd/system/update-system.timer
- /etc/systemd/system/update-system.service
update-system.timer
[Unit]
Description=update system weekly
[Timer]
OnCalendar= Fri *-*-* 12:00:00
[Install]
WantedBy=timers.target
update-system.service
[Unit]
Description=update system weekly
[Service]
ExecStart=pacman -S -y --noconfirm -u
查看定时任务
systemctl list-timers
systemctl list-timers --all
开机激活定时器
systemctl enable update-system.timer
取消开机激活定时器
systemctl disable update-system.timer
手动激活定时器
systemctl start update-system.timer
手动停止定时器
systemctl stop update-system.timer
查看定时器状态
systemctl status update-system.timer
OnCalendar
systemd-analyze calendar weekly
systemd-analyze calendar "Mon *-*-* 00:00:00"
注意 / 仅用于月份
| desc | word | 周 年-月-日 时:分:秒 |
|---|---|---|
| 每分钟 | minutely | *-*-* *:*:00 |
| 从0分钟起每5分钟 | minutely | *-*-* *:00/5:00 |
| 每小时 | hourly | *-*-* *:00:00 |
| 每天 | daily | *-*-* 00:00:00 |
| 每月 | monthly | *-*-01 00:00:00 |
| 每周 | weekly | Mon *-*-* 00:00:00 |
| 每年 | yearly /annually | *-01-01 00:00:00 |
| 每季度 | quarterly | *-01,04,07,10-01 00:00:00 |
| 每半年 | semiannually | *-01,07-01 00:00:00 |
| 九月倒数第一天0点 | *-09~01 00:00:00 | |
| 每年的九月倒数第七天起每过4天后的周一 | Mon *-09~07/4 00:00:00 | |
| 下一个周一或周五 | Mon,Fri *-*-* 00:00:00 | |
| 周一到周五每天0点 | Mon..Fri *-*-* 00:00:00 |
Journal
systemd has its own logging system called the journal; running a separate logging daemon is not required. To read the log, use journalctl(1).
help:
journalctl -h --help
检索 pacman 相关日志
journalctl --grep=pacman
Show only the most recent journal entries, and continuously print new entries as they are appended to the journal.
显示最新日志,并连续输出
journalctl -f --follow
Reverse output so that the newest entries are displayed first
反转输出 以便先显示最新的日志
journalctl -r --reverse
Show all kernel logs from previous boot
显示上次启动的所有内核日志
journalctl -k -b -1
Show a live log display from a system service kubelet.service
实时显示 kubelet 日志
journalctl -f -u kubelet
查看 kubelet 日志
journalctl _SYSTEMD_UNIT=kubelet.service
查看进程号 28097 日志
journalctl _PID=28097
查看进程号 28097 的 kubelet服务的日志 交集
journalctl _SYSTEMD_UNIT=kubelet.service _PID=28097
用户管理
用户和组相关文件
localhost:~ # cat /etc/passwd
# 用户名:密码:用户标识号:组标识号:组名:主目录:shell
# 密码:用户口令的加密串,不是明文,但是/etc/passwd对所有用户可读,存在安全隐患,许多linux使用shadow技术把加密后的口令存放在/etc/shadow,/etc/passwd文件的口令字段只存放一个特殊的字符例如"x"或“*”
# 用户登陆后启动的进程:负责将用户操作传给内核,这个进程是用户登录到系统后运行的命令解释器或某个特定的程序即:shell
root:x:0:0:root:/root:/bin/bash
......
localhost:~ # cat /etc/group
# 组名:组口令(linux用户组一般不设置口令为空或特殊字符"x"或"*"):组标识号
root:x:0:
......
localhost:~ # cat /etc/shadow
# 登录名:加密口令:最后一次修改时间:两次修改口令之间所需的最小天数:口令保持有效的最大天数:密码正式失效前多少天开始发出警告:用户不登录但账号仍能保持有效的最大天数:多少天后失效,失效后该账号不再是一个合法账号,也不能再用来登录:
root:$6$pNxL8HuTTjWXDCQM$JsX1DhLGe.mA01bRwmQ4eVCNB1qT8YmIaSD03DWzi2IKE3UtsMydwXjDHQ9gOhTJrektvdMRjnsAqPyXsmY9Q.:18978::::::
......
localhost:~ # stat -c %U text.txt
root
localhost:~ # stat -c %G text.txt
root
localhost:~ # stat -c %A text.txt
-rwxr-xr-x
localhost:~ # find ./ -group root
./
./text.txt
localhost:~ # find ./ -group 0
./
./text.txt
localhost:~ # find ./ -user root
./
./text.txt
Group management
# 查看用户所属组
testu@master:~> groups testu
testu : users
# 查看用户详情
testu@master:~> id testu
uid=1000(testu) gid=100(users) groups=100(users)
# To list all groups on the system:
cat /etc/group
# Create new groups with the groupadd command:
groupadd groupname
# To delete existing groups:
groupdel group
# Add users to a group with the gpasswd command
gpasswd -a user group
# add a user to additional groups with usermod
usermod -aG additional_groups username
# To remove users from a group
gpasswd -d user group
# Modify an existing group with the groupmod command e.g. to rename the old_group group to new_group:
groupmod -n new_group old_group
User management
# -m/--create-home the user's home directory is created as /home/username. The directory is populated by the files in the skeleton directory. The created files are owned by the new user.
# -G/--groups 所属组名 默认组名=username; a comma separated list of supplementary groups which the user is also a member of. The default is for the user to belong only to the initial group
# -s/--shell a path to the user's login shell. Ensure the chosen shell is installed if choosing something other than Bash.
useradd -m -G testu -s /bin/bash testu
useradd -m -s /bin/bash testu
# with the -u/--uid and -g/--gid options when creating the user
useradd -r -u 850 -g 850 -s /usr/bin/nologin username
# To add a new user named archie
useradd -m archie
# Although it is not required to protect the newly created user archie with a password, it is highly recommended to do so:
passwd archie
# To change a user's home directory:
usermod -d /my/new/home -m username
ln -s /my/new/home/ /my/old/home
# To change a user's login name:
usermod -l newname oldname
# To change the user's login shell:
usermod -s /bin/bash username
# User accounts may be deleted with the userdel command:
userdel -r username
# To mark a user's password as expired, requiring them to create a new password the first time they log in, type:
chage -d 0 username
Chmod
chmod -R 777 html
- SUID 4
- SGID 2
- SBIT 1
- — 0
- –x 1
- -w- 2
- r– 4
SGID set-group-id
# set-group-id 和 set-gid 授予程序其所在组的访问权限
# 通过chmod 选项 g 设置,该标志对shell脚本程序不起作用,
# 只对可执行的二进制文件有用
# 2 表示 SUID 占据拥有者的x权限位
chmod 2755 a.out # -rwxr-sr-x
chmod g-s a.out # -rwxr-xr-x
chmod g+s a.out # -rwxr-sr-x
# S 表示空 没有x权限 S无意义
chmod g-x a.out # -rwxr-Sr-x
chmod g-s a.out # -rwxr--r-x
chmod g+xs a.out # -rwxr-sr-x
SUID set-user-id
# set-user-id 和 set-uid 授予程序其拥有者的访问权限,不是其使用者的访问权限
# 通过chmod 选项 u 设置,该标志对shell脚本程序不起作用,
# 只对可执行的二进制文件有用
# 4 表示 SUID 占据拥有者的x权限位
chmod 4755 a.out # -rwsr-xr-x
chmod u-s a.out # -rwxr-xr-x
chmod u+s a.out # -rwsr-xr-x
# S 表示空 没有x权限 S无意义
chmod u-x a.out # -rwSr-xr-x
chmod u-s a.out # -rw-r-xr-x
chmod u+xs a.out # -rwsr-xr-x
SBIT sticky-bit
# SBIT即Sticky Bit,
# 它出现在其他用户权限的执行位上,它只能用来修饰一个目录。
# 当某一个目录拥有SBIT权限时,则任何一个能够在这个目录下建立文件的用户,
# 该用户在这个目录下所建立的文件,只有该用户自己和root可以删除,其他用户均不可以
# 如下末尾的 t 占用 x,如果为大T则表示该目录没有x权限
[caddy@onepiece frp]$ ls -ld /tmp
drwxrwxrwt 10 root root 240 Sep 7 17:31 /tmp
#测试:
mkdir tmp drwxr-xr-x
# 第一个1表示其他用户权限 SBIT
chmod 1777 /tmp drwxrwxrwt
chmod o-t /tmp drwxrwxrwx
chmod o+t /tmp drwxrwxrwt
#T 没有x权限是就会从小t变成大T,t只有在目录有x权限时才有意义
chmod o-x /tmp drwxrwxrwT
chmod o+x /tmp drwxrwxrwt
chmod o-xt /tmp drwxrwxrw-
btrfs
Btrfs is a modern copy on write (COW) file system for Linux aimed at implementing advanced features while also focusing on fault tolerance, repair and easy administration.
- documentation
- archlinux wiki
- Btrfs 文件系统特性
Btrfs (B-tree FS,Butter FS, Better FS) - SUSE12/15 支持生产环境
- GPL开源文件系统
- Oracle 2007年开始研发
CoW(copy-on-write)写时复制,比就地修改的文件系统有更大的好处- 主要目标: 取代 ext3/ext4文件系统
- 支持非常大的单个文件大小,实现文件检测
- 支持快照,支持快照的快照(增量备份),可以对单个文件快照
- 内置支持
raid,支持条带或mirror等常见raid功能 - 透明压缩
- 热移除设备
格式化并创建
mkfs.btrfs 格式化并创建 btrfs
## eg
mkfs.btrfs -L root /dev/nvme0n1p3
mkfs.btrfs -L disk /dev/sdc
## show
~> sudo btrfs filesystem show
Label: 'root' uuid: 47c7555a-5a1f-4b19-b251-21ee9c40b398
Total devices 1 FS bytes used 10.28GiB
devid 1 size 200.59GiB used 15.02GiB path /dev/nvme0n1p3
Label: 'disk' uuid: 6ccbdbf6-54b2-49be-ad73-7736146ea43a
Total devices 1 FS bytes used 193.96GiB
devid 2 size 931.51GiB used 196.06GiB path /dev/sda
## --help
~ ᐅ mkfs.btrfs --help
Usage: mkfs.btrfs [options] dev [ dev ... ]
Options:
allocation profiles:
-d|--data PROFILE data profile, raid0, raid1, raid1c3, raid1c4, raid5, raid6, raid10, dup or single
-m|--metadata PROFILE metadata profile, values like for data profile
-M|--mixed mix metadata and data together
features:
--csum TYPE
--checksum TYPE checksum algorithm to use, crc32c (default), xxhash, sha256, blake2
-n|--nodesize SIZE size of btree nodes
-s|--sectorsize SIZE data block size (may not be mountable by current kernel)
-O|--features LIST comma separated list of filesystem features (use '-O list-all' to list features)
-R|--runtime-features LIST comma separated list of runtime features (use '-R list-all' to list runtime features)
-L|--label LABEL set the filesystem label
-U|--uuid UUID specify the filesystem UUID (must be unique)
creation:
-b|--byte-count SIZE set filesystem size to SIZE (on the first device)
-r|--rootdir DIR copy files from DIR to the image root directory
--shrink (with --rootdir) shrink the filled filesystem to minimal size
-K|--nodiscard do not perform whole device TRIM
-f|--force force overwrite of existing filesystem
general:
-q|--quiet no messages except errors
-v|--verbose increase verbosity level, default is 1
-V|--version print the mkfs.btrfs version and exit
--help print this help and exit
deprecated:
-l|--leafsize SIZE deprecated, alias for nodesize
挂载
# 挂载
mount /dev/nvme0n1p3 /mnt
# 卸载 方式1
umount /mnt
# 卸载 方式2
umount /dev/nvme0n1p3
# 挂载
mount /dev/sdc /mnt
# 卸载 方式1
umount /mnt
# 卸载 方式2
umount /dev/sdc
df -Th
Filesystem Type Size Used Avail Use% Mounted on
/dev/sda btrfs 932G 195G 737G 21% /var
/dev/sda btrfs 932G 195G 737G 21% /home
/dev/sda btrfs 932G 195G 737G 21% /data
/dev/sda btrfs 932G 195G 737G 21% /code
mount
/dev/sda on /var type btrfs (rw,relatime,space_cache=v2,subvolid=257,subvol=/var)
/dev/sda on /home type btrfs (rw,relatime,space_cache=v2,subvolid=256,subvol=/home)
/dev/sda on /data type btrfs (rw,relatime,space_cache=v2,subvolid=258,subvol=/data)
/dev/sda on /code type btrfs (rw,relatime,space_cache=v2,subvolid=259,subvol=/code)
添加移除
# 查看帮助
btrf help
# 添加磁盘
## 先挂载要添加到的 btrfs
mount /dev/sdc /mnt
## 添加设备
btrfs device add /dev/sda /mnt
## 强制添加设备 格式化磁盘
btrfs device add -f /dev/sda /mnt
# 查看 btrfs
btrfs filesystem show
# 同一个btrfs 系统 所有磁盘的 UUID 都一样
[root@lotus caddy]# blkid /dev/sda
/dev/sda: LABEL="disk" UUID="6ccbdbf6-54b2-49be-ad73-7736146ea43a" UUID_SUB="f3ed8a08-b49e-48e8-9fe5-7091fca68f2b" BLOCK_SIZE="4096" TYPE="btrfs"
[root@lotus caddy]# blkid /dev/sdc
/dev/sdc: LABEL="disk" UUID="6ccbdbf6-54b2-49be-ad73-7736146ea43a" UUID_SUB="f467bf90-826f-4cdd-902f-6e31d8dd6acb" BLOCK_SIZE="4096" TYPE="btrfs"
# 移除磁盘
# 添加磁盘
## 先挂载要添加到的 btrfs
mount /dev/sdc /mnt
## 移除磁盘 此时会自动进行文件迁移
btrfs device delete /dev/sdc /mnt
# 查看 btrfs
btrfs filesystem show
多个磁盘数据平衡
mount /dev/sda /mnt
btrfs filesystem show
# 带提示 倒数10s 开平衡数据
btrfs balance start /mnt
# 直接执行平衡
btrfs balance start --full-balance /mnt
btrfs filesystem show
查看文件系统
mount /dev/sda /mnt
[root@lotus caddy]# btrfs filesystem df /mnt | column -t
Data, single: total=194.00GiB, used=193.43GiB
System, DUP: total=32.00MiB, used=48.00KiB
Metadata, DUP: total=1.00GiB, used=570.69MiB
GlobalReserve, single: total=238.36MiB, used=0.00B
raid
多磁盘可以使用 raid
raid5 最少需要三块磁盘
# btrfs filesystem df /mnt | column -t
# -dconvert ====> Data, single: total=194.00GiB, used=193.43GiB
btrfs balance start -dconvert=raidX /mnt
# -mconvert ====> Metadata, DUP: total=1.00GiB, used=570.69MiB
# 同时会修改 System, DUP: total=32.00MiB, used=48.00KiB
btrfs balance start -mconvert=raidX /mnt
多设备修改大小
# 挂载主卷
mount /dev/sda /mnt
[root@lotus caddy]# btrfs filesystem show
Label: 'root' uuid: 47c7555a-5a1f-4b19-b251-21ee9c40b398
Total devices 1 FS bytes used 10.28GiB
devid 1 size 200.59GiB used 15.02GiB path /dev/nvme0n1p3
Label: 'disk' uuid: 6ccbdbf6-54b2-49be-ad73-7736146ea43a
Total devices 2 FS bytes used 193.97GiB
devid 2 size 931.51GiB used 196.06GiB path /dev/sda
devid 3 size 465.76GiB used 0.00B path /dev/sdc
# 调整 `disk` 的编号为3的 /dev/sdc 大小 -3G
[root@lotus caddy]# btrfs filesystem resize 3:-3G /mnt
Resize device id 3 (/dev/sdc) from 465.76GiB to 462.76GiB
[root@lotus caddy]# btrfs filesystem show
Label: 'root' uuid: 47c7555a-5a1f-4b19-b251-21ee9c40b398
Total devices 1 FS bytes used 10.28GiB
devid 1 size 200.59GiB used 15.02GiB path /dev/nvme0n1p3
Label: 'disk' uuid: 6ccbdbf6-54b2-49be-ad73-7736146ea43a
Total devices 2 FS bytes used 193.97GiB
devid 2 size 931.51GiB used 196.06GiB path /dev/sda
devid 3 size 462.76GiB used 0.00B path /dev/sdc
# 调整 `disk` 的编号为3的 /dev/sdc 大小 +1G
[root@lotus caddy]# btrfs filesystem resize 3:+1G /mnt
Resize device id 3 (/dev/sdc) from 462.76GiB to 463.76GiB
[root@lotus caddy]# btrfs filesystem show
Label: 'root' uuid: 47c7555a-5a1f-4b19-b251-21ee9c40b398
Total devices 1 FS bytes used 10.28GiB
devid 1 size 200.59GiB used 15.02GiB path /dev/nvme0n1p3
Label: 'disk' uuid: 6ccbdbf6-54b2-49be-ad73-7736146ea43a
Total devices 2 FS bytes used 193.99GiB
devid 2 size 931.51GiB used 196.06GiB path /dev/sda
devid 3 size 463.76GiB used 0.00B path /dev/sdc
# 调整 `disk` 的编号为3的 /dev/sdc 大小为最大 max
[root@lotus caddy]# btrfs filesystem resize 3:max /mnt
Resize device id 3 (/dev/sdc) from 463.76GiB to max
[root@lotus caddy]# btrfs filesystem show
Label: 'root' uuid: 47c7555a-5a1f-4b19-b251-21ee9c40b398
Total devices 1 FS bytes used 10.28GiB
devid 1 size 200.59GiB used 15.02GiB path /dev/nvme0n1p3
Label: 'disk' uuid: 6ccbdbf6-54b2-49be-ad73-7736146ea43a
Total devices 2 FS bytes used 193.99GiB
devid 2 size 931.51GiB used 196.06GiB path /dev/sda
devid 3 size 465.76GiB used 0.00B path /dev/sdc
subvolume
挂载主卷 可以访问子卷内容
注意
- 不要使用 subvolid=ID 挂载子卷 ID 会变
- 使用 subvol=home 挂载子卷
# 挂载主卷
mount /dev/sda /mnt
btrfs filesystem show
# 创建子卷
btrfs subvolume create /mnt/home
btrfs subvolume create /mnt/var
btrfs subvolume create /mnt/data
btrfs subvolume create /mnt/code
# 查看子卷
[root@lotus caddy]# btrfs subvolume list /mnt
ID 256 gen 43598 top level 5 path home
ID 257 gen 43597 top level 5 path var
ID 258 gen 43452 top level 5 path data
ID 259 gen 43597 top level 5 path code
ID 260 gen 43437 top level 257 path var/lib/portables
ID 261 gen 43437 top level 257 path var/lib/machines
[root@lotus caddy]# btrfs subvolume show /mnt/code
code
Name: code
UUID: b51969d9-8160-f04a-8ec8-7902c697a0a0
Parent UUID: -
Received UUID: -
Creation time: 2022-04-04 13:24:11 +0800
Subvolume ID: 259
Generation: 43599
Gen at creation: 11
Parent ID: 5
Top level ID: 5
Flags: -
Send transid: 0
Send time: 2022-04-04 13:24:11 +0800
Receive transid: 0
Receive time: -
Snapshot(s):
# 卸载 主卷
umount /mnt
# 创建子卷挂载目录
mkdir -p /mnt/home /mnt/var /mnt/data /mnt/code
# 挂载子卷
mount -o subvol=home /dev/sda /mnt/home
mount -o subvol=var /dev/sda /mnt/var
mount -o subvol=data /dev/sda /mnt/data
mount -o subvol=code /dev/sda /mnt/code
# 查看
lsblk
子卷快照
# 挂载子卷
mount -o subvol=code /dev/sda /mnt/code
# 创建快照
btrfs subvolume snapshot /mnt/code /mnt/code_snapshot
# mnt 下会多出一个 code_snapshot 快照文件夹 里面内容与 code 一模一样
# 当需要恢复时可以将 code_snapshot 文件 cp 覆盖掉 code 内文件
# 删除快照
btrfs subvolume delete /mnt/code_snapshot
删除子卷
# 挂载主卷
mount /dev/sda /mnt
# 卸载子卷
umount /mnt/data
# 删除子卷
btrfs subvolume delete /mnt/data
文件系统转换
# 格式化为ext4
mkfs.ext4 /dev/sdc
# ext4 转 btrfs
btrfs-convert /dev/sdc
# 查看
btrfs filesystem show
# 查看
blkid /dev/sdc
# rollback 撤销 btrfs 转换
btrfs-convert -r /dev/sdc
# 查看
blkid /dev/sdc
磁盘碎片整理
btrfs filesystem defragment -r /
Logical Volume Manager
Logical Volume Manager (LVM) is a device mapper framework that provides logical volume management for the Linux kernel.
Logical Volume Manager (LVM)
btrfs
archlinux
pacman -S lvm2
Micro OS
command
# 新建
pvcreate /dev/sdb
pvs/pvdisplay
vgcreate lvm /dev/sdb
vgs/vgdisplay
lvcreate -l +100%FREE lvm -n six
lvs/lvdisplay
# 格式化为 btrfs 文件格式 MicroOS 默认 btrfs
mkfs.btrfs /dev/lvm/six
mount /dev/lvm/six /home/six
# 扩展
pvcreate /dev/sdc /dev/sdd
vgextend lvm /dev/sdd /dev/sdc
# --resizefs 必加 否则 df -hT 内 Size 未变
# Filesystem Type Size Used Avail Use% Mounted on
# /dev/mapper/lvm-six btrfs 6.0G 3.6M 5.8G 1% /home/six
lvextend -l +100%FREE --resizefs /dev/lvm/six
# 删除
umount /home/six
lvremove lvm/six
vgremove lvm
pvremove /dev/sdd /dev/sdb /dev/sdc
virtualbox Micro OS
virtualbox Micro OS 实操记录(openSUSE-Kubic-DVD-x86_64-Current.iso)
新建
localhost:/home # pvcreate /dev/sdb
Physical volume "/dev/sdb" successfully created.
localhost:/home # pvs
PV VG Fmt Attr PSize PFree
/dev/sdb lvm lvm2 a-- 2.00g 2.00g
localhost:/home # vgcreate lvm /dev/sdb
Volume group "lvm" successfully created
localhost:/home # vgs
VG #PV #LV #SN Attr VSize VFree
lvm 1 0 0 wz--n- 2.00g 2.00g
localhost:/home # lvcreate -l +100%FREE lvm -n six
WARNING: btrfs signature detected on /dev/lvm/six at offset 65600. Wipe it? [y/n]: y
Wiping btrfs signature on /dev/lvm/six.
Logical volume "six" created.
localhost:/home # lvs
LV VG Attr LSize Pool Origin Data% Meta% Move Log Cpy%Sync Convert
six lvm -wi-a----- 2.00g
localhost:/home # lsblk
NAME MAJ:MIN RM SIZE RO TYPE MOUNTPOINT
sda 8:0 0 20G 0 disk
├─sda1 8:1 0 8M 0 part
├─sda2 8:2 0 8.3G 0 part /boot/writable
└─sda3 8:3 0 11.7G 0 part /var
sdb 8:16 0 2G 0 disk
└─lvm-six 254:0 0 2G 0 lvm
sdc 8:32 0 2G 0 disk
sdd 8:48 0 2G 0 disk
sr0 11:0 1 1.8G 0 rom
localhost:/home # df -hT
Filesystem Type Size Used Avail Use% Mounted on
devtmpfs devtmpfs 471M 0 471M 0% /dev
tmpfs tmpfs 482M 0 482M 0% /dev/shm
tmpfs tmpfs 193M 3.2M 190M 2% /run
/dev/sda2 btrfs 8.4G 1.4G 6.5G 18% /
/dev/sda2 btrfs 8.4G 1.4G 6.5G 18% /root
/dev/sda3 btrfs 12G 90M 12G 1% /var
overlay overlay 12G 90M 12G 1% /etc
tmpfs tmpfs 482M 0 482M 0% /tmp
/dev/sda2 btrfs 8.4G 1.4G 6.5G 18% /.snapshots
/dev/sda2 btrfs 8.4G 1.4G 6.5G 18% /boot/grub2/x86_64-efi
/dev/sda2 btrfs 8.4G 1.4G 6.5G 18% /opt
/dev/sda2 btrfs 8.4G 1.4G 6.5G 18% /boot/grub2/i386-pc
/dev/sda2 btrfs 8.4G 1.4G 6.5G 18% /usr/local
/dev/sda2 btrfs 8.4G 1.4G 6.5G 18% /srv
/dev/sda2 btrfs 8.4G 1.4G 6.5G 18% /home
/dev/sda2 btrfs 8.4G 1.4G 6.5G 18% /boot/writable
localhost:/home # mkfs.
mkfs.bfs mkfs.btrfs mkfs.cramfs mkfs.fat mkfs.minix mkfs.msdos mkfs.vfat
localhost:/home # mkfs.btrfs /dev/lvm/six
btrfs-progs v5.14.1
See http://btrfs.wiki.kernel.org for more information.
Label: (null)
UUID: 31a87e89-d900-4861-8068-1c30fb3b088c
Node size: 16384
Sector size: 4096
Filesystem size: 2.00GiB
Block group profiles:
Data: single 8.00MiB
Metadata: DUP 102.19MiB
System: DUP 8.00MiB
SSD detected: no
Zoned device: no
Incompat features: extref, skinny-metadata
Runtime features:
Checksum: crc32c
Number of devices: 1
Devices:
ID SIZE PATH
1 2.00GiB /dev/lvm/six
localhost:/home # mkdir -p /home/six
localhost:/home # mount /dev/lvm/six /home/six
localhost:/home # lsblk
NAME MAJ:MIN RM SIZE RO TYPE MOUNTPOINT
sda 8:0 0 20G 0 disk
├─sda1 8:1 0 8M 0 part
├─sda2 8:2 0 8.3G 0 part /boot/writable
└─sda3 8:3 0 11.7G 0 part /var
sdb 8:16 0 2G 0 disk
└─lvm-six 254:0 0 2G 0 lvm /home/six
sdc 8:32 0 2G 0 disk
sdd 8:48 0 2G 0 disk
sr0 11:0 1 1.8G 0 rom
localhost:/home # df -hT
Filesystem Type Size Used Avail Use% Mounted on
devtmpfs devtmpfs 471M 0 471M 0% /dev
tmpfs tmpfs 482M 0 482M 0% /dev/shm
tmpfs tmpfs 193M 3.2M 190M 2% /run
/dev/sda2 btrfs 8.4G 1.4G 6.5G 18% /
/dev/sda2 btrfs 8.4G 1.4G 6.5G 18% /root
/dev/sda3 btrfs 12G 90M 12G 1% /var
overlay overlay 12G 90M 12G 1% /etc
tmpfs tmpfs 482M 0 482M 0% /tmp
/dev/sda2 btrfs 8.4G 1.4G 6.5G 18% /.snapshots
/dev/sda2 btrfs 8.4G 1.4G 6.5G 18% /boot/grub2/x86_64-efi
/dev/sda2 btrfs 8.4G 1.4G 6.5G 18% /opt
/dev/sda2 btrfs 8.4G 1.4G 6.5G 18% /boot/grub2/i386-pc
/dev/sda2 btrfs 8.4G 1.4G 6.5G 18% /usr/local
/dev/sda2 btrfs 8.4G 1.4G 6.5G 18% /srv
/dev/sda2 btrfs 8.4G 1.4G 6.5G 18% /home
/dev/sda2 btrfs 8.4G 1.4G 6.5G 18% /boot/writable
/dev/mapper/lvm-six btrfs 2.0G 3.5M 1.8G 1% /home/six
扩展
localhost:/home # lsblk
NAME MAJ:MIN RM SIZE RO TYPE MOUNTPOINT
sda 8:0 0 20G 0 disk
├─sda1 8:1 0 8M 0 part
├─sda2 8:2 0 8.3G 0 part /boot/writable
└─sda3 8:3 0 11.7G 0 part /var
sdb 8:16 0 2G 0 disk
└─lvm-six 254:0 0 2G 0 lvm /home/six
sdc 8:32 0 2G 0 disk
sdd 8:48 0 2G 0 disk
sr0 11:0 1 1.8G 0 rom
localhost:/home # pvcreate /dev/sdc /dev/sdd
Physical volume "/dev/sdc" successfully created.
Physical volume "/dev/sdd" successfully created.
localhost:/home # pvs
PV VG Fmt Attr PSize PFree
/dev/sdb lvm lvm2 a-- 2.00g 0
/dev/sdc lvm lvm2 a-- 2.00g 2.00g
/dev/sdd lvm lvm2 a-- 2.00g 2.00g
localhost:/home # vgextend lvm /dev/sdd /dev/sdc
Volume group "lvm" successfully extended
localhost:/home # vgs
VG #PV #LV #SN Attr VSize VFree
lvm 3 1 0 wz--n- 5.99g 3.99g
localhost:/home # lvextend -l +100%FREE --resizefs /dev/lvm/six
Size of logical volume lvm/six changed from 2.00 GiB (511 extents) to 5.99 GiB (1533 extents).
Logical volume lvm/six successfully resized.
Resize device id 1 (/dev/mapper/lvm-six) from 2.00GiB to 5.99GiB
localhost:/home # lvs
LV VG Attr LSize Pool Origin Data% Meta% Move Log Cpy%Sync Convert
six lvm -wi-ao---- 5.99g
localhost:/home # vgs
VG #PV #LV #SN Attr VSize VFree
lvm 3 1 0 wz--n- 5.99g 0
localhost:/home # df -hT
Filesystem Type Size Used Avail Use% Mounted on
devtmpfs devtmpfs 471M 0 471M 0% /dev
tmpfs tmpfs 482M 0 482M 0% /dev/shm
tmpfs tmpfs 193M 3.2M 190M 2% /run
/dev/sda2 btrfs 8.4G 1.4G 6.5G 18% /
/dev/sda2 btrfs 8.4G 1.4G 6.5G 18% /root
/dev/sda3 btrfs 12G 90M 12G 1% /var
overlay overlay 12G 90M 12G 1% /etc
tmpfs tmpfs 482M 0 482M 0% /tmp
/dev/sda2 btrfs 8.4G 1.4G 6.5G 18% /.snapshots
/dev/sda2 btrfs 8.4G 1.4G 6.5G 18% /boot/grub2/x86_64-efi
/dev/sda2 btrfs 8.4G 1.4G 6.5G 18% /opt
/dev/sda2 btrfs 8.4G 1.4G 6.5G 18% /boot/grub2/i386-pc
/dev/sda2 btrfs 8.4G 1.4G 6.5G 18% /usr/local
/dev/sda2 btrfs 8.4G 1.4G 6.5G 18% /srv
/dev/sda2 btrfs 8.4G 1.4G 6.5G 18% /home
/dev/sda2 btrfs 8.4G 1.4G 6.5G 18% /boot/writable
/dev/mapper/lvm-six btrfs 6.0G 3.6M 5.8G 1% /home/six
删除
localhost:/home # lsblk
NAME MAJ:MIN RM SIZE RO TYPE MOUNTPOINT
sda 8:0 0 20G 0 disk
├─sda1 8:1 0 8M 0 part
├─sda2 8:2 0 8.3G 0 part /boot/writable
└─sda3 8:3 0 11.7G 0 part /var
sdb 8:16 0 2G 0 disk
└─lvm-six 254:0 0 6G 0 lvm /home/six
sdc 8:32 0 2G 0 disk
└─lvm-six 254:0 0 6G 0 lvm /home/six
sdd 8:48 0 2G 0 disk
└─lvm-six 254:0 0 6G 0 lvm /home/six
sr0 11:0 1 1.8G 0 rom
localhost:/home # umount /home/six
localhost:/home # lvremove lvm/six
Do you really want to remove and DISCARD active logical volume lvm/six? [y/n]: y
Logical volume "six" successfully removed.
localhost:/home # vgremove lvm
Volume group "lvm" successfully removed
localhost:/home # pvs
PV VG Fmt Attr PSize PFree
/dev/sdb lvm2 --- 2.00g 2.00g
/dev/sdc lvm2 --- 2.00g 2.00g
/dev/sdd lvm2 --- 2.00g 2.00g
localhost:/home # pvremove /dev/sdd /dev/sdb /dev/sdc
Labels on physical volume "/dev/sdd" successfully wiped.
Labels on physical volume "/dev/sdb" successfully wiped.
Labels on physical volume "/dev/sdc" successfully wiped.
grub
GRUB (GRand Unified Bootloader) is a boot loader.
首先查看分区
lsblk --fs
挂载win10 boot所在分区
mount /dev/sdd2 /mnt
查看 $hints_string命令
grub-probe --target=hints_string /mnt/EFI/Microsoft/Boot/bootmgfw.efi
查看 $fs_uuid命令
grub-probe --target=fs_uuid /mnt/EFI/Microsoft/Boot/bootmgfw.efi`(`lsblk --fs` 也能看到)
编辑 /boot/grub/grub.cfg
if [ "${grub_platform}" == "efi" ]; then
menuentry "Microsoft Windows Vista/7/8/8.1 UEFI/GPT" {
insmod part_gpt
insmod fat
insmod chain
search --no-floppy --fs-uuid --set=root $hints_string $fs_uuid
chainloader /EFI/Microsoft/Boot/bootmgfw.efi
}
fi
example:
### BEGIN /etc/grub.d/30_os-prober ###
if [ "${grub_platform}" == "efi" ]; then
menuentry "Microsoft Windows Vista/7/8/8.1/10 UEFI/GPT" {
insmod part_gpt
insmod fat
insmod chain
search --no-floppy --fs-uuid --set=root --hint-bios=hd3,gpt2 --hint-efi=hd3,g pt2 --hint-baremetal=ahci3,gpt2 C018-7605
chainloader /EFI/Microsoft/Boot/bootmgfw.efi
}
fi
### END /etc/grub.d/30_os-prober ###
problem
小米游戏本开机变慢发现是 systemd-journal-flush.service 耗时30秒+
查看日志文件大小40M
journalctl -b -u systemd-journald
查看启动耗时
journalctl -b -u systemd-journal-flush.service
xorg
Xorg (commonly referred to as simply X) is the most popular display server among Linux users.
startx
Linux 提供虚拟控制台的功能,一组终端设备共享PC电脑的屏幕、键盘和鼠标。通常一个 Linux 安装配置 8 个或者 12 个虚拟控制台。
虚拟控制台通过字符设备文件 /dev/ttyN 使用,其中 N 代表一个数字,从 1 开始。
使用字符界面登陆 Linux 系统,所使用的终端设备就是系统中的第一个虚拟控制台,即终端设备 /dev/tty1。
当已经在字符界面时(例如 TTY3),在字符界面之间切换(例如切换到 TTY4),可以直接按 Alt + F4(不需要按住 Ctrl)。
从字符界面切回图形界面,直接按下 Ctrl + Alt + F7 即可。KDE 的 SDDM 和 GNOME 的 GDM 是显示管理器display manager,默认使用第一个未使用的虚拟控制台,通常是 /dev/tty7。
从图形界面切回字符界面,使用 Ctrl+Alt+F<N> 在不同的虚拟控制台之间切换,其中 N 是虚拟控制台 /dev/ttyN 所对应的数字。如你正在使用图形界面(如 GNOME 或 KDE),按下 Ctrl + Alt + F3(或 F2-F6 任意一个未被占用的),屏幕会立即切换到黑色的字符登录界面。
默认情况,X 视窗系统从 session:0 启动。要在 Linux 系统上运行多个 X 视窗会话必须告诉 startX 启动 session:1。
命令 startx -- :1, Linux 将在下一个未使用的虚拟控制台上启动 X 服务器。
在一个 Xsession 中启动 gkrellm,并让其在另一个 Xsession 中显示 DISPLAY=:1 gkrellm &。
xorg-xrandr
xrandr is an official configuration utility to the RandR (Resize and Rotate) X Window System extension. It can be used to set the size, orientation or reflection of the outputs for a screen.
archlinux-wiki 多显示器
archlinux-wiki 显示器亮度
安装
pacman -S xorg-xrandr
example
帮助
xrandr --help
列出信息
xrandr
列出激活的监视器
xrandr --listactivemonitors
列出监视器
xrandr --listmonitors
列出显卡输出源
xrandr --listproviders
分辨率+刷新率
xrandr --output eDP1 \
--brightness 0.77 \
--mode 1920x1080 \
--rate 60 \
--primary --auto \
--output "$extern" \
--left-of "$intern" --auto
小米游戏本
type-c 接口名称 DP1,可以正常双屏输出信号
hdmi 接口名称 HDMI-1, 独立显卡 GTX1060 Mobile,驱动 nvidia 显示器无法检测到信号
fn 键基本全部失效
简单脚本
#!/bin/zsh
intern=eDP1
extern=DP1
# 注意亮度值`0.00~1.00`
if xrandr | grep "$extern disconnected"; then
xrandr --output "$extern" --off --output "$intern" --brightness 0.77 --auto
else
xrandr --output "$intern" --brightness 0.77 --primary --auto --output "$extern" --left-of "$intern" --auto
fi
启动问题排查
开机启动树
systemd-cgls
开机耗时总览
systemd-analyze
开机耗时详情
systemd-analyze blame
开机启动依赖项
systemd-analyze critical-chain
problem
小米游戏本开机变慢发现是 systemd-journal-flush.service 耗时30秒+
查看日志文件大小40M
journalctl -b -u systemd-journald
查看启动耗时
journalctl -b -u systemd-journal-flush.service
Linux 基础知识
gunzip
解压
gunzip -c xxx.log.gz > ./xxx.log
压缩
gzip -c xxx.log > ./xxx.log.gz
zip
解压
unzip xxx.zip -d ./unzip/
解压 windows 中文乱码
unzip -O CP936 xxx.zip -d ./unzip/
压缩
zip -r xxx.zip ./xxx
jar
解压war包
jar -xvf **.war
解压jar包
jar -xvf flyos-dev-2.1.9.3.jar
压缩jar包
jar -cfM0 flyos-dev-2.1.9.3.jar BOOT-INF META-INF org
tar
不解压列出tar内容
tar -tvf **.tar
将file文件夹添加到**.tar
tar -cvf **.tar ./file/
解压tar 到file
tar -xvf **.tar ./file
Shell:即工作环境
user通过shell操作硬件,windows操作系统只是把shell封装成可视化界面进行与硬件交互
用户登陆
~ 表示当前用户目录 /home/用户名
/ 表示 /root根目录
pwd 查看当前所在目录
# 为root提示符号
$ 为普通用户
命令
command 【option】命令选项 【arguments】命令参数 例如 ls -l / 查看 / 目录下的目录详细信息
date 时间
cal 日历
bc 计算器
man cal 和 info cal 查看 命令参数 命令的帮助文档
关机命令
shutdown
-h 关机 -r 重启 -f 快速重启
hh:mm 执行时间 21:23 21点23分执行
+m m分钟后执行
now 即+0 立即执行
还可以加广播提示其他用户
shutdown -h +10 'the system will shutdown'
centos archlinux 可以执行 poweroff 关机
显示文件系统内容
Linux提供多用户多任务环境操作实现,文件可存取访问的身份owner,group,other,权限read,write,execute(可执行)
- read = r = 4
- write = w = 2
- execute = x =1
# 显示当前目录更多文件信息
ls -l
# 显示当前目录隐藏文件
ls -a
# 显示当前目录全部文件+文件信息
ls -al
drwxr-xr-x. 2 root root 6 Jul 23 10:12 study
| 文件权限 | 链接数 | 文件所有者 | 文件所属用户组 | 文件大小 | 文件最后修改时间 | 文件名 |
|---|---|---|---|---|---|---|
| drwxr-xr-x | 2 | root | root | 6 | Jul 23 10:12 | study |
文件权限
| d | rwx | r-x | r-x |
|---|---|---|---|
| 文件类型 | 文件所有者权限 | 文件所属用户组权限 | 其他人对此文件的权限 |
- 文件类型
- d:目录
- -:文件
- 纯文本文件(ASCII)
- 二进制文件(binary)
- 数据格式文件(date)
- i:连接文件,类似windows下的快捷方式
- b:设备与设备文件,可存储接口设备与系统外设及存储相关/块设备,在/dev下
- c:串行端口设备,字符设备文件
- s:套接字,数据接口文件,网络上的数据连接 /var/run
- p:管道(FIFO,PIPE) 解决多个程序访问一个文件时造成的错误问题
- 文件扩展名:只是为了让用户了解文件的用途。linux文件是没有所谓的扩展名的,一个文件是否执行与文件权限的 【drwxr-xr-x】 十个属性相关,有x属性则表示可以执行,但是可以执行与执行成功并不一致
- 常用扩展名
*.sh脚本或批处理文件 script 脚本是用shell写成的*.Z,*.tar,*.tar.gz,*.zip,*.tg经打包的压缩文件
- 常用扩展名
- 改变文件属性和权限
- 改变文件所属用户组
chgrp groupName file - 改变文件所有者
chown userName file - 改变文件的权限
chmod 777 file
- 改变文件所属用户组
- 权限计算方法:777是rwxrwxrwx的累加,如下
- owner = rwx = 4+2+1 = 7
- group = rwx = 4+2+1 = 7
- other = rwx = 4+2+1 = 7
# 显示/目录下的文件
ls -a -l /
# 列出目录下文件名及其目录类型(后跟*号表示可执行文件,@表示符号连接/表示目录名)
ls -F
# 按照最后修改文件时间列出文件名
ls -t
# 列出当前目录及其子目录的文件名
ls -R
操作目录和文件
# 在当前目录下创建目录 myfile
mkdir myfile
# 删除当前目录下的myfile目录(myfile目录下必须为空才能删除成功)
rmdir myfile
# 返回上级目录 . 表示当前目录 .. 表示上级目录
cd ..
# 复制当前目录下的XX.log文件到 ./ 目录下的one目录内 即当前目录下的one目录内
cp XX.log ./one
# 当前目录下将目录one复制到two内 -r表示可以复制目录及目录内的所有文件(递归)
cp -r one two
# 当前目录内复制xx.log并将新复制的文件改名为xx.log.bak
cp xx.log xx.log.bak
# 将当前目录下的xx.log文件移到当前目录下的one目录内
mv xx.log ./one
# 将当前目录下的xx.log移到当前目录下,并改名为xx.syslog(改名字)
mv xx.log xx.syslog
# 在当前目录下创建1.txt文件
touch 1.txt
# 查看文件类型
file 1.txt
# 删除当前目录下的1.txt文件,强制删除不是递归
rm -f 1.txt
# 循环删除目录,直到该目录下内容全部被删除,即递归
rm -r
# 删除当前目录下所有1开头的 **.txt** 文件 *号匹配任意字符和字符串
rm -f 1*.txt
rm -f 1?.txt
# 删除当前目录下以11开头1,2,3结尾的 **.txt** 文件[abc]表示a,b,c任一字符,[a-x]a到x的任一字符,[1-9]1到9任一数字
rm -f 11[1-3].txt
# 删除当前目录下第二个字符不是1的.txt文件 与上一条含义相反
rm -f 1[!1]*.txt
# 搜索xx.log文件;此操作需要数据库支持,默认7天更新一次,也可以手动更新执行updatedb需耗时
locate xx.log
# print working directory<sub>打印当前所在目录</sub>
pwd
用户:只有 root 可以设置其他用户密码,其他用户只能修改自己的密码
useradd caddy 增加 caddy 用户root权限
passwd caddy 修改 caddy 密码root权限
passwd 修改自己密码,不用指定用户名caddy权限
显示文件内容
# 适合显示内容少的,如果太多行,只会显示后面的部分(看不全)
cat xx.log
# 解决 **cat** 显示不全的问题 按 **space** 翻页 **q** 键退出(不能倒退查看已经看过的内容)
more xx.log
# 解决 **more** 不能上下翻页的问题 **PageUp PageDown** 翻页 **q** 退出
less xx.log
# 显示文件前几行(默认10行)
head xx.log
# 显示文件最后几行(默认10行)
tail xx.log
# 显示前/后10行
head/tail -10 xx.log
# 从最后一行开始显示文件内容
tac xx.log
# 显示并输出行号
nl xx.log
# 以二进制读取文件
od xx.log
进程监控
top & htop
[caddy@blackbox ~]$ top
pacman -S htop
[caddy@blackbox ~]$ htop
交互式的实时linux进程监控工具
监控磁盘I/O
iotop
pacman -S iotop
[caddy@blackbox ~]$ iotop
监控并显示实时磁盘I/O、进程的统计功能。
在查找具体进程和大量使用磁盘读写进程的时候,这个工具就非常有用
只有在kernelv2.6.20及以后的版本中才有。python版本需要 python2.7及以上版本
输入/输出统计
iostat
pacman -S sysstat
[caddy@blackbox ~]$ man iostat
收集显示系统存储设备输入和输出状态统计的简单工具
踪存储设备的性能问题,其中存储设备包括设备、本地磁盘,以及诸如使用NFS等的远端磁盘
[caddy@blackbox ~]$ iostat
Linux 5.11.10-arch1-1 (blackbox) 03/28/2021 _x86_64_ (12 CPU)
avg-cpu: %user %nice %system %iowait %steal %idle
0.48 0.00 0.25 0.03 0.00 99.25
Device tps kB_read/s kB_wrtn/s kB_dscd/s kB_read kB_wrtn kB_dscd
nvme0n1 10.74 320.47 39.38 0.00 965612 118658 0
- avg-cpu
- %user: 在用户级别运行所使用的CPU的百分比.
- %nice:优先进程消耗的CPU时间,占所有CPU的百分比.
- %system: 在系统级别(kernel)运行所使用CPU的百分比.
- %iowait: CPU等待硬件I/O时,所占用CPU百分比.
- %steal: 管理程序维护另一个虚拟处理器时,虚拟CPU的无意识等待时间百分比.
- %idle: CPU空闲时间的百分比.
- Device
- tps: 每秒钟发送到的I/O请求数.
- KB_read /s: 每秒读取的block数.
- KB_wrtn/s: 每秒写入的block数.
- KB_read: 启动到现在 读入的block总数.
- KB_wrtn: 启动到现在写入的block总数.
swap虚拟内存统计
vmstat 采样时间间隔数 采样次数
vmstat 2 1
vmstat 2 2
vmstat 2
[caddy@blackbox ~]$ man vmstat
[caddy@blackbox ~]$ vmstat 2 2
procs -----------memory---------- ---swap-- -----io---- -system-- ------cpu-----
r b swpd free buff cache si so bi bo in cs us sy id wa st
0 0 0 30582452 75880 1105616 0 0 36 4 143 219 1 0 99 0 0
0 0 0 30582576 75880 1105540 0 0 0 0 333 364 0 0 100 0 0
- r :表示运行队列,如果运行队列过大,表示你的CPU很繁忙,一般会造成CPU使用率很高
- b :表示阻塞的进程数swpd :虚拟内存已使用的大小,如果大于0,表示你的机器物理内存不足了,如果不是程序内存泄露的原因,那么你该升级内存了或者把耗内存的任务迁移到其他机器
- free :空闲的物理内存的大小
- buff : 系统占用的缓存大小
- cache :直接用来记忆我们打开的文件,给文件做缓冲
- si :每秒从磁盘读入虚拟内存的大小,如果这个值大于0,表示物理内存不够用或者内存泄露了
- us :用户CPU时间
- sy :系统CPU时间
- so : 每秒虚拟内存写入磁盘的大小,如果这个值大于0,同上。
- sy : 系统CPU时间,如果太高,表示系统调用时间长,例如是IO操作频繁。
- id : 空闲 CPU时间,一般来说,id + us + sy = 100
- wt : 等待IO CPU时间。
列出打开的文件
lsof 显示所有打开的文件和进程。打开的文件包括磁盘文件、网络套接字、管道、设备和进程。主要情形之一就是在无法挂载磁盘和显示正在使用或者打开某个文件的错误信息的时候。使用这条命令,你可以很容易地看到正在使用哪个文件
网络状态统计
Arch Linux has deprecated net-tools in favor of iproute2
| Deprecated command | Replacement commands |
|---|---|
| arp | ip neighbor |
| ifconfig | ip address, ip link |
| netstat | ss |
| route | ip route |
netstat replace with ss
监控网络性能,定位并解决网络相关问题
# Display man page
man ss
# Display all TCP Sockets with service names
ss -at
# Display all TCP Sockets with port numbers
ss -atn
# Display all UDP Sockets
ss -au
实时局域网IP监控
iptraf
pacman -S iptraf-ng
[caddy@blackbox ~]$ sudo iptraf-ng
实时网络(局域网)监控应用
网络的IP流量监控,包括TCP标记、ICMP详细信息、TCP/UDP流量分离、TCP连接包和字节数。
同时还采集有关接口状态的常见信息和详细信息:
TCP、UDP、IP、ICMP、非IP,IP校验和错误,接口活动等
a lightweight and flexible Linux® distribution that tries to Keep It Simple.
archlinux 安装记录
安装前相关知识
BIOS引导启动系统
MBR分区表+BIOS启动
MBR把硬盘分为很多区块,同时这些区块都配上对应逻辑块地址,
MBR分区下每一个分区表的大小是固定的,MBR的第一个扇区内存有启动代码
启动代码是BIOS启动系统的关键,它负责引导启动操作系统
主引导代码–>第一个分区信息–>第二个分区信息–>第三个分区信息–>第四个分区信息–>硬盘有效标志
BIOS
BIOS : Basic Input Output System基本输入输出系统。
简单来说它用于加载电脑最基本的程序代码,而这些代码是存储在CMOS里面的,他同时初始化硬件,检测硬件功能及引导操作系统的任务。
UEFI引导启动系统
GPT分区表
GPT全称GUID磁盘分区表,表示这块分区表时全局唯一标识磁盘分区表。
分区表大小不固定,硬盘容量不再限制于2TB。
在GPT硬盘第一个数据块中也有MBR的引导表示也叫做PMBR
UEFI+GPT的系统不需要主引导记录这些东西,开机会快很多。
UEFI启动
UEFI:Unified Extensible Firmware Interface
统一的可扩展固件接口,可以直接预启动开始加载操作系统
可以把很多开机程序都省去(BIOS的加电自检,硬件初始化)
UEFI图形化界面更加直观,操作者进入BIOS后可以更直观查看各项数据(暂时理解为台式机的EFI BIOS系统界面)
UEFI启动不需要活动分区,不需要主引导记录,所以UEFI比大多数BIOS快,
区别主要在启动过程不同,UEFI省略很多的自检步骤,硬盘分区下他们也不同
文件系统 File System
| 名称 | example | need package | 描述 |
|---|---|---|---|
| fat | mkfs.fat -F 32 -n fat /dev/sdd1 | pacman -S dosfstools | mkfs.vfat and mkfs.msdos are both symlinks to mkfs.fat, they are the same utility |
| exfat | mkfs.exfat -L exfat /dev/sdc2 | pacman -S exfatprogs | windows linux mac 都可访问 U盘使用此格式 (无arch wiki) |
| btrfs | mkfs.btrfs -L btrfs /dev/sdc3 | pacman -S btrfs-progs | copy on write |
| ext4 | mkfs.ext4 /dev/sdc4 | pacman -S e2fsprogs |
dd命令制作启动盘
- 查看U盘
fdisk -l - 如果u盘挂载,卸载掉,否则会提示设备资源正忙
umount /dev/sdd* - 格式化u盘vfat格式文件系统 centos7 提示找不到目录
mkfs -t vfat -F 32 /dev/sdd1mkfs.fat -F 32 /dev/sdd1
- 写入iso镜像到U盘
dd if=/root/archlinux.iso of=/dev/sdd1 - 查看进度和读写速度 新终端执行
watch -n 5 pkill -USR1 ^dd$
安装系统前检查机器
- 安装过程需要联网,并且配国内镜像源
- 联网工具
ip link&wifi-menu - 更新时间
timedatectl set-ntp true
- 联网工具
- 检查启动模式
ls /sys/firmware/efi/efivars - 看分区
fdisk -lorfdisk -l /dev/sdborlsblk
磁盘分区
bios模式
fdisk /dev/sdb
一个系统安装分区---sdb1
mkfs.ext4 /dev/sdb1
mount /dev/sdb1 /mnt
UEFI模式 需要 GPT 分区表
- 固态盘
fdisk /dev/nvme0n1/dev/nvme0n1p1: 主引导分区 最少300Mmkfs.fat -F 32 /dev/nvme0n1p1
/dev/nvme0n1p2: swap 交换分区 启用休眠 大小 >= 内存大小mkswap /dev/nvme0n1p2
/dev/nvme0n1p3: root 分区mkfs.btrfs -L root /dev/nvme0n1p3
- 机械盘(btrfs subvolumes)
mkfs.btrfs -L disk /dev/sdc- home 用户
- var 系统日志
- code 保存代码
- data 保存数据
# 固态盘分区 格式化
fdisk /dev/nvme0n1
mkfs.fat -F 32 /dev/nvme0n1p1
mkswap /dev/nvme0n1p2
mkfs.btrfs -L root /dev/nvme0n1p3
# 机械盘 使用 btrfs subvolumes
mkfs.btrfs -L disk /dev/sdc
mount /dev/sdc /mnt
btrfs subvolume create /mnt/home
btrfs subvolume create /mnt/var
btrfs subvolume create /mnt/data
btrfs subvolume create /mnt/code
btrfs filesystem show
btrfs subvolume list /mnt
umount /mnt
# 挂载 准备装机
mount /dev/nvme0n1p3 /mnt
mkdir -p /mnt/boot /mnt/home /mnt/var /mnt/data /mnt/code
mount /dev/nvme0n1p1 /mnt/boot
mount -o subvol=home /dev/sdc /mnt/home
mount -o subvol=var /dev/sdc /mnt/var
mount -o subvol=data /dev/sdc /mnt/data
mount -o subvol=code /dev/sdc /mnt/code
lsblk
格式化时报错/dev/sdb5 is apparently in use by the system 解除占用
cat /proc/partitions
dmsetup status
dmsetup remove_all
dmsetup status
开始安装系统
archlinuxcn
- 国内加速源 /etc/pacman.conf
- archlinuxcn 源 /etc/pacman.d/mirrorlist
shell
vim /etc/pacman.d/mirrorlist
# 开头
Server = https://mirrors.bfsu.edu.cn/archlinux/$repo/os/$arch
# 安装系统
pacstrap /mnt base linux linux-firmware
# 生成挂载信息文件
genfstab -U /mnt >> /mnt/etc/fstab
# 切换到新系统
arch-chroot /mnt
# 安装软件包
pacman -S vi vim networkmanager openssh sudo
# 配置 archlinuxcn 源
vim /etc/pacman.conf
# 末尾
[archlinuxcn]
Server = https://mirrors.bfsu.edu.cn/archlinuxcn/$arch
# 导入archlinuxcn GPG包
pacman -S archlinuxcn-keyring
#安装报错failed to install packages to new root
pacman-key --refresh-keys
# 设置时区
ln -sf /usr/share/zoneinfo/$Region/$City /etc/localtime
hwclock --systohc
# 本地化
vim /etc/locale.gen
# 取消注释
en_US.UTF-8 UTF-8
zh_CN.UTF-8 UTF-8
# 设置locale
vim /etc/locale.conf
LANG=en_US.UTF-8
# 生成locale信息
locale-gen
# 主机名
vim /etc/hostname
box
# hosts设置
vim /etc/hosts
127.0.0.1 localhost
::1 localhost
127.0.1.1 myhostname.localdomain myhostname
52.192.72.89 github.com
# 设置root密码
passwd
# 添加用户
useradd -m caddy
# 设置 caddy 密码
passwd caddy
# 用户添加 sudo visudo 专门编辑 /etc/sudoers 需要 vi
visudo /etc/sudoers
caddy ALL=(ALL) ALL
# 网络
systemctl enable NetworkManager
# 无线网络
# gui
nmtui
# terminal
nmcli device wifi list
nmcli device wifi connect "your wifi name" password "your wifi password"
# openssh
systemctl enable sshd
## 禁止 root ssh 仅允许 caddy 用户 ssh
vim /etc/ssh/sshd_config
PermitRootLogin no
AllowUsers caddy
# 安装grub
pacman -S grub efibootmgr
# 设置引导
grub-install --target=x86_64-efi --efi-directory=boot --bootloader-id=GRUB
# 生成grub配置
grub-mkconfig -o /boot/grub/grub.cfg
exit
# 取消挂载 重启
lsblk
# 取消多个挂载目录
umount -R /mnt
lsblk
# 或者分别取消挂载
umount /mnt/boot
umount /mnt/code
umount /mnt/data
umount /mnt/var
umount /mnt/home
umount /mnt
lsblk
reboot
显卡驱动
# 查看显卡型号
lspci | grep VGA
# 官方仓库提供的驱动包:
# # +----------------------+--------------------+--------------+
# # | | 开源 | 私有 |
# # +----------------------+--------------------+--------------+
# # | 通用 | xf86-video-vesa | |
# # +----------------------+--------------------+--------------+
# # | Intel | xf86-video-intel | |
# # +--------+-------------+--------------------+--------------+
# # | | GeForce 9+ | | nvidia |
# # + +-------------+ +--------------+
# # | nVidia | GeForce 8/9 | xf86-video-nouveau | nvidia-340xx |
# # + +-------------+ +--------------+
# # | | GeForce 6/7 | | nvidia-304xx |
# # +--------+-------------+--------------------+--------------+
# # | AMD/ATI | xf86-video-ati | |
sudo pacman -S xf86-video-intel(笔记本)
sudo pacman -S nvidia nvidia-utils(nvidia独立显卡)
display manager
SDDM
su root
sddm --example-conifg > /etc/sddm.conf
ll /usr/share/sddm/themes
vim /etc/sddm.conf
# ... Current= maya
wayland
hyprland
xorg
pacman -S xorg xorg-server xorg-xinit xorg-apps
自动配置文件 参考进行个性化配置 nvidia-xconfig
vim /etc/X11/xorg.conf
Section "ServerLayout"
Identifier "Layout0"
Screen 0 "Screen0" 0 0
InputDevice "Keyboard0" "CoreKeyboard"
InputDevice "Mouse0" "CorePointer"
EndSection
Section "Files"
EndSection
Section "InputDevice"
# generated from default
Identifier "Mouse0"
Driver "mouse"
Option "Protocol" "auto"
Option "Device" "/dev/psaux"
Option "Emulate3Buttons" "no"
Option "ZAxisMapping" "4 5"
EndSection
Section "InputDevice"
# generated from default
Identifier "Keyboard0"
Driver "kbd"
EndSection
Section "Monitor"
Identifier "Monitor0"
VendorName "Unknown"
ModelName "Unknown"
Option "DPMS" "1"
EndSection
Section "Device"
Identifier "Device0"
Driver "nvidia"
VendorName "NVIDIA Corporation"
Option "NoLogo" "1"
Option "RenderAccel" "1"
Option "TripleBuffer" "1"
Option "RegistryDwords" "PerfLevelSrc=0x3333"
EndSection
Section "Screen"
Identifier "Screen0"
Device "Device0"
Monitor "Monitor0"
DefaultDepth 24
SubSection "Display"
Depth 24
EndSubSection
EndSection
KDE图像化界面
pacman -S plasma kde-applications
pacman -S sddm sddm-kcm
systemctl enable sddm
字体
pacman -S fcitx5-im fcitx5-chinese-addons fcitx5-material-color
# 或者
pacman -S fcitx5 fcitx5-configtool fcitx5-qt fcitx5-gtk fcitx5-chinese-addons fcitx5-material-color
# 添加拼音
fcitx5-configtool
字体配置
# kde使用此配置
## /etc/profile
fcitx5 # 开机启动
# i3 使用此配置
## ~/.config/i3/config
exec --no-startup-id fcitx5
virtualbox 安装 archlinux
注意
- virtualbox 开启 efi
- system/Motherboard/Extended Fature/Enbale EFI
- 系统/主板/启用 EFI
- 新增的虚拟硬盘默认为 MBR分区表
fdisk /dev/sda输入 g 修改为GPT分区表 - virtual box windows 版本 不能正确加载grub 不能引导 EFI 会自动进到 Shell
- 手动执行grub引导脚步
\EFI\GRUB\grubx64.efi - 注意观察日志 找到 引导程序目录 在Shell下执行以下操作
fs0:进入FS0目录mkdir \EFI\bootcp \EFI\GRUB\grubx64.efi \EFI\boot\bootx64.efi- 之后手动执行
\EFI\boot\bootx64.efi进入系统 再重启即可正常引导grub
- 手动执行grub引导脚步
- 安装过程没有区别
virtualbox archlinux 安装记录
磁盘分区 GPT分区表 + UEFI模式
- 机械盘
fdisk /dev/sda/dev/sda1: 主引导分区 最少300Mmkfs.fat -F 32 /dev/sda1
/dev/sda2: swap 交换分区 启用休眠 大小 >= 内存大小mkswap /dev/sda2
/dev/sda3: btrfs 分区 subvolumes 子卷 root、var、home、datamkfs.btrfs -L all /dev/sda3
# 分区 格式化
fdisk /dev/sda
mkfs.fat -F 32 /dev/sda1
mkswap -L swap /dev/sda2
mkfs.btrfs -L all /dev/sda3
# /dev/sda3 使用 btrfs subvolumes
mount /dev/sda3 /mnt
btrfs subvolume create /mnt/home
btrfs subvolume create /mnt/var
btrfs subvolume create /mnt/data
btrfs filesystem show
btrfs subvolume list /mnt
umount /mnt
# 挂载 准备装机
mount -o subvol=root /dev/sda3 /mnt
mkdir -p /mnt/boot /mnt/home /mnt/var /mnt/data
mount /dev/sda1 /mnt/boot
mount -o subvol=home /dev/sda3 /mnt/home
mount -o subvol=var /dev/sda3 /mnt/var
mount -o subvol=data /dev/sda3 /mnt/data
lsblk
格式化时报错/dev/sdb5 is apparently in use by the system 解除占用
cat /proc/partitions
dmsetup status
dmsetup remove_all
dmsetup status
开始安装系统
archlinuxcn
shell
vim /etc/pacman.d/mirrorlist
# 开头
Server = https://mirrors.bfsu.edu.cn/archlinux/$repo/os/$arch
# 安装系统
pacstrap /mnt base linux linux-firmware
# 生成挂载信息文件
genfstab -U /mnt >> /mnt/etc/fstab
# 切换到新系统
arch-chroot /mnt
# 安装基础软件包
pacman -S vi vim networkmanager openssh sudo
# 配置 archlinuxcn 源
vim /etc/pacman.conf
# 末尾添加
[archlinuxcn]
Server = https://mirrors.bfsu.edu.cn/archlinuxcn/$arch
# 报错failed to install packages to new root
pacman-key --refresh-keys
# 设置时区
ln -sf /usr/share/zoneinfo/$Region/$City /etc/localtime
hwclock --systohc
# 本地化
vim /etc/locale.gen
# 取消注释 或者 新增
en_US.UTF-8 UTF-8
zh_CN.UTF-8 UTF-8
# 设置locale
vim /etc/locale.conf
LANG=en_US.UTF-8
# 生成locale信息
locale-gen
# 主机名
vim /etc/hostname
vbox
# hosts设置
vim /etc/hosts
127.0.0.1 localhost
::1 localhost
127.0.1.1 myhostname.localdomain myhostname
52.192.72.89 github.com
# 设置root密码
passwd
# 添加用户
useradd -m caddy
passwd caddy
# 网络
systemctl enable NetworkManager
# 无线网络
# gui
nmtui
# terminal
nmcli device wifi list
nmcli device wifi connect "your wifi name" password "your wifi password"
# openssh
systemctl enable sshd
## 禁止 root ssh 仅允许 caddy 用户 ssh
vim /etc/ssh/sshd_config
PermitRootLogin no
AllowUsers caddy
# 用户添加 sudo visudo 可以编辑 /etc/sudoers 需要 vi
visudo /etc/sudoers
caddy ALL=(ALL) ALL
# 安装grub
pacman -S grub efibootmgr
# 设置引导
grub-install --target=x86_64-efi --efi-directory=boot --bootloader-id=GRUB
# 生成grub配置
grub-mkconfig -o /boot/grub/grub.cfg
exit
# 取消挂载 重启
lsblk
# 取消多个挂载目录
umount -R /mnt
lsblk
# 或者分别取消挂载
umount /mnt/boot
umount /mnt/code
umount /mnt/data
umount /mnt/var
umount /mnt/home
umount /mnt
lsblk
reboot
opensuse
The openSUSE project is a worldwide effort that promotes the use of Linux everywhere.
init
旧电脑启动后需要 systemctl restart wicked 才可以 ping 通
opensuse 启动后执行脚本
# micro os 测试可行
mkdir -p /etc/init.d
touch /etc/init.d/after.local
vim /etc/init.d/after.local
chmod +x /etc/init.d/after.local
reboot
after.local
#!/usr/bin/sh
/usr/bin/systemctl restart wicked
/usr/bin/echo "测试是否执行脚本" > /root/test.log
原子更新
transactional-update shell
zypper ref #刷新
zypper dup #更新
exit
transactional-update cleanup #清理未使用的系统快照
zypper
repo
Repository Management:
repos, lr List all defined repositories.
addrepo, ar Add a new repository.
removerepo, rr Remove specified repository.
renamerepo, nr Rename specified repository.
modifyrepo, mr Modify specified repository.
refresh, ref Refresh all repositories.
clean, cc Clean local caches.
# 例子
zypper repos -d # 查看源详细信息
zypper mr -da # 禁用全部源
# 添加国内源
zypper addrepo -f https://mirrors.bfsu.edu.cn/opensuse/tumbleweed/repo/non-oss bfsu-non-oss
zypper addrepo -f https://mirrors.bfsu.edu.cn/opensuse/tumbleweed/repo/oss/ bfsu-oss
zypper ar -f https://mirrors.bfsu.edu.cn/opensuse/tumbleweed/repo/non-oss bfsu-non-oss
zypper ar -f https://mirrors.bfsu.edu.cn/opensuse/tumbleweed/repo/oss/ bfsu-oss
zypper refresh # 刷新
zypper ref # 刷新
zypper dup # 更新
package
zypper in docker # 安装docker
master:~/parking # cat /etc/docker/daemon.json
{
"registry-mirrors":["https://rjm3pmfv.mirror.aliyuncs.com"]
}
zypper in docker-compose # 安装docker-compose
zypper in htop # htop
zypper in tmux # tmux
zypper in lrzsz # lrzsz
zypper in zsh # zsh
zypper in git # git
# 安装 ohmyzsh
sh -c "$(curl -fsSL https://raw.github.com/ohmyzsh/ohmyzsh/master/tools/install.sh)"
zypper in podman # 安装 podman
zypper in nfs-kernel-server # 安装 NFS
opensuse java 管理工具 alternatives --config java
example
caddy@localhost:~> java -version
java version "1.8.0_321"
Java(TM) SE Runtime Environment (build 1.8.0_321-b07)
Java HotSpot(TM) 64-Bit Server VM (build 25.321-b07, mixed mode)
caddy@localhost:~> sudo alternatives --config java
[sudo] root 的密码:
There are 3 choices for the alternative java (providing /usr/bin/java).
Selection Path Priority Status
------------------------------------------------------------
0 /usr/java/jdk-17.0.2/bin/java 170002000 auto mode
1 /usr/java/jdk-17.0.2/bin/java 170002000 manual mode
* 2 /usr/java/jdk1.8.0_321-amd64/bin/java 180321 manual mode
3 /usr/lib64/jvm/jre-11-openjdk/bin/java 2105 manual mode
Press <enter> to keep the current choice[*], or type selection number: 1
update-alternatives: using /usr/java/jdk-17.0.2/bin/java to provide /usr/bin/java (java) in manual mode
caddy@localhost:~> java -version
java version "17.0.2" 2022-01-18 LTS
Java(TM) SE Runtime Environment (build 17.0.2+8-LTS-86)
Java HotSpot(TM) 64-Bit Server VM (build 17.0.2+8-LTS-86, mixed mode, sharing)
Micro OS
kubic
- https://en.opensuse.org/Kubic:Installation
- 国内外国语大学开源软件镜像站
- 国内外国语大学开源软件镜像仓库
注意:
- openSUSE-Kubic 默认有定时重启系统和滚动更新系统的服务
systemctl status transactional-update.timer自动滚动更新systemctl status rebootmgr.service重启系统rebootmgrctl get-window查看维护开始时间和持续时间 默认 window-start=03:30 window-duration=1h30m
- 安装选择
kubeadm Node - 设置时区
Asia/Shanghai - 设置
hostname&ip&dns&gatewayvirtualbox nat 10.0.0.1
network
ip link
# 激活网卡
ip link set wlp2s0 up
# 关闭网卡
ip link set wlp2s0 down
# 查看网卡状态
ifstatus wlp2s0
# 连接网络
ifup wlp2s0
# 断开
ifdown wlp2s0
网络配置
BOOTPROTO='dhcp'
STARTMODE='auto'
WIRELESS_ESSID='fiy'
WIRELESS_AUTH_MODE='PSK'
WIRELESS_MODE='managed'
WIRELESS_WPA_PSK='fiy123456'
WIRELESS_AP_SCANMODE='1'
WIRELESS_NWID=''
IPADDR='192.168.1.10/24'
BOOTPROTO='static'
STARTMODE='auto'
WIRELESS_ESSID='fiy'
WIRELESS_AUTH_MODE='PSK'
WIRELESS_MODE='managed'
WIRELESS_WPA_PSK='fiy123456'
WIRELESS_AP_SCANMODE='1'
WIRELESS_NWID=''
ssh
echo "PermitRootLogin yes" >> /etc/ssh/sshd_config
# 重启 ssh
systemctl restart sshd.service
service sshd restart
master
kubeadm init --image-repository registry.aliyuncs.com/google_containers
# 根据提示 复制配置文件
mkdir -p $HOME/.kube
sudo cp -i /etc/kubernetes/admin.conf $HOME/.kube/config
sudo chown $(id -u):$(id -g) $HOME/.kube/config
# Setup weave
kubectl apply -f /usr/share/k8s-yaml/weave/weave.yaml
#You may need to reboot the master after applying this change if you see runtime network not ready: NetworkReady=false reason:NetworkPluginNotReady message:Network plugin returns error: Missing CNI default network when runnnig kubectl describe nodes.
# 输出join信息
kubeadm token create --print-join-command
slave
mkdir .kube
scp root@10.0.0.6:/etc/kubernetes/admin.conf $HOME/.kube/config
# 在 master 输出join信息
kubeadm token create --print-join-command
kubeadm join 10.0.0.6:6443 --token 7eagfo.s93tp0nxirady7w7 \
--discovery-token-ca-cert-hash sha256:82b4363e47a2e37d0a40298c37d6f9129fdae982cc403b94585bfabdd4351afb
# 设置nodes roles
master:~ # kubectl label no slave kubernetes.io/role=slave
node/slave labeled
check
master:~ # kubectl get nodes
NAME STATUS ROLES AGE VERSION
master NotReady control-plane,master 2m v1.22.2
master:~ # kubectl get pod -n kube-system
NAME READY STATUS RESTARTS AGE
coredns-7f6cbbb7b8-bwd6h 0/1 Pending 0 2m29s
coredns-7f6cbbb7b8-tx95n 0/1 Pending 0 2m29s
etcd-master 1/1 Running 0 2m36s
kube-apiserver-master 1/1 Running 0 2m37s
kube-controller-manager-master 1/1 Running 0 2m28s
kube-proxy-7wsmt 1/1 Running 0 2m29s
kube-scheduler-master 1/1 Running 0 2m34s
weave-net-5ksh4 0/2 Init:0/1 0 48s
master:~ # kubectl get pods -n kube-system -l name=weave-net -o wide
NAME READY STATUS RESTARTS AGE IP NODE NOMINATED NODE READINESS GATES
weave-net-5ksh4 2/2 Running 1 (14m ago) 78m 10.0.0.6 master <none> <none>
master:~ # reboot
master:~ # kubectl get pod -n kube-system
NAME READY STATUS RESTARTS AGE
coredns-7f6cbbb7b8-bwd6h 1/1 Running 0 80m
coredns-7f6cbbb7b8-tx95n 1/1 Running 0 80m
etcd-master 1/1 Running 1 80m
kube-apiserver-master 1/1 Running 1 80m
kube-controller-manager-master 1/1 Running 1 80m
kube-proxy-7wsmt 1/1 Running 1 80m
kube-scheduler-master 1/1 Running 1 80m
weave-net-5ksh4 2/2 Running 1 (15m ago) 78m
k8s一些指令
kubeadm reset
kubectl get nodes
kubectl get namespaces
kubectl get pods -n kube-system
kubectl get pod -n kube-system
kubectl get pod --all-namespaces
kubectl get pods
kubectl get pods -n kube-system -l name=weave-net -o yaml | grep IP
kubectl drain slave --delete-local-data --ignore-daemonsets
kubectl delete node slave
kubectl cluster-info
kubectl describe deployment nginx-deployment
kubectl describe pod nginx-deployment-66b6c48dd5-p9kbk
nfs
挂载网络上的文件系统
Install NFS kernel server
zypper in nfs-kernel-serversystemctl status nfs-server.servicesystemctl start nfs-server.servicesystemctl enable nfs-server.service
server configure /etc/exports
# This shares the directory read-only to ALL hosts
/root/export/this/directory (ro)
# This shares the directory read-and-write to all hosts in the 192.168.1.0 network, which subnet mask 255.255.255.0
/root/export/this/directory 192.168.1.0/24(rw,async)
# 当客户端使用root用户时无法需要在服务端添加此配置 no_root_squash;默认 root_squash
/root/export/this/directory 192.168.10.0/24(rw,no_root_squash,async)
client configure /etc/fstab
192.168.1.2:/root/export/this/directory /local/mountpoint nfs auto 0 0
rebootmg
# Disable Automatic Updates
systemctl --now disable transactional-update.timer
# Disable Rebootmgr
systemctl --now disable rebootmgr
## or
rebootmgrctl set-strategy off
/etc/rebootmgr.conf A default configuration file would be:
[rebootmgr]
window-start=03:30
window-duration=1h30m
strategy=best-effort
lock-group=default
BSD
Microsoft Windows
lsof
安装
sudo pacman -S lsof
查找占用端口的 PID
lsof -i:8080
结束进程
kill -9 $PID
windows kill process
netstat
查看帮助
netstat /?
查找占用端口的 PID
netstat -ano | findstr "$port"
tasklist
查看帮助
tasklist /?
查找 PID 程序名
tasklist | findstr "$PID"
查找程序
tasklist | findstr "YunDetectService.exe"
taskkill
查看帮助
taskkill /?
结束进程映像名称
taskkill /f /t /im "YunDetectService.exe"
结束进程PID
taskkill /f /t /pid "$PID"
runas
cmd/powershell 使用管理员权限运行
runas ?
runas --help
runas /noprofile /user:administrator powershell
ExecutionPolicy
get-executionpolicy
set-executionpolicy remotesigned
New-Item
New-Item 别名 ni,新建文件/文件夹
get-help new-item
New-Item xxx -ItemType file
New-Item xxx -ItemType directory
vim in powershell
$profile 输出当前用户 powershell 启动时加载脚本
默认位置 C:\Users\leo\Documents\WindowsPowerShell\Microsoft.PowerShell_profile.ps1,不存在则新建
new-item -Path $profile -ItemType "file" -Force
编辑 C:\Users\leo\Documents\WindowsPowerShell\Microsoft.PowerShell_profile.ps1
添加以下内容,重新打开 powershell 使生效
$VIMPATH="C:\Program Files (x86)\Vim\vim90\vim.exe"
Set-Alias vi $VIMPATH
Set-Alias vim $VIMPATH
character encoding
microsoft docs
Changing the default encoding
PowerShell has two default variables that can be used to change the default encoding behavior.
$PSDefaultParameterValues$OutputEncoding
Beginning in PowerShell 5.1, the redirection operators ( > and >>) call the Out-File cmdlet. Therefore, you can set the default encoding of them using the $PSDefaultParameterValues preference variable as shown in this example:
# vim $profile
$PSDefaultParameterValues['Out-File:Encoding'] = 'utf8'
Use the following statement to change the default encoding for all cmdlets that have the Encoding parameter.
# vim $profile
$PSDefaultParameterValues['*:Encoding'] = 'utf8'
Windows PowerShell 5.1 Encoding 参数支持以下值
Ascii使用 Ascii(7位)字符集BigEndianUnicode使用具有 big-endian 字节顺序的 UTF-16。BigEndianUTF32使用具有 big-endian 字节顺序的 UTF-32。Byte将一组字符编码为字节序列。Default使用与系统的活动代码页对应的编码, (通常为 ANSI) 。Oem使用与系统的当前 OEM 代码页对应的编码。String与 Unicode 相同。Unicode使用具有 little-endian 字节顺序的 UTF-16。Unknown与 Unicode 相同。UTF32使用具有 little-endian 字节顺序的 UTF-32。UTF7使用 UTF-7。UTF8将 UTF-8 (与 BOM) 配合使用。
通常,Windows PowerShell 默认使用 Unicode UTF-16LE 编码。
但是,与Windows PowerShell 中 cmdlet 使用的默认编码并不一致。
使用除 UTF7 之外 的任何 Unicode 编码始终会创建 BOM。
For cmdlets that write output to files:
Out-Fileand the redirection重定向 operators操作符>and>>createUTF-16LE, which notably differs fromSet-ContentandAdd-Content.New-ModuleManifestandExport-CliXmlalso createUTF-16LEfiles.- When the target file is empty or doesn’t exist,
Set-ContentandAdd-ContentuseDefaultencoding.Defaultis the encoding specified by the active system locale’sANSIlegacy code page. Export-CsvcreatesAsciifiles but uses different encoding when usingAppendparameter (see below).Export-PSSessioncreatesUTF-8files withBOMby default.New-Item -Type File -Valuecreates a BOM-less UTF-8 file.Send-MailMessageusesDefaultencoding by default.Start-TranscriptcreatesUtf8files with aBOM. When theAppendparameter is used, the encoding can be different (see below).
For commands that append to an existing file:
Out-File -Appendand the>>redirection operator make no attempt to match the encoding of the existing target file’s content. Instead, they use thedefaultencoding unless the Encoding parameter is used. You must use the files original原始的 encoding when appending content.- In the absence不存在 of an explicit明确的 Encoding parameter,
Add-Contentdetects侦察出 the existing encoding and automatically applies it to the new content. If the existing content has no BOM,DefaultANSI encoding is used. The behavior ofAdd-Contentis the same in PowerShell (v6 and higher) except the default encoding isUtf8. Export-Csv -Appendmatches the existing encoding when the target file contains a BOM. In the absence不存在 of a BOM, it usesUtf8encoding.Start-Transcript -Appendmatches the existing encoding of files that include a BOM. In the absence不存在 of a BOM, it defaults toAsciiencoding. This encoding can result in导致 data loss丢失 or character corruption腐蚀 when the data in the transcript转写本 contains multibyte多字节 characters.
For cmdlets that read string data in the absence不存在 of a BOM:
Get-ContentandImport-PowerShellDataFileuses theDefaultANSI encoding. ANSI is also what the PowerShell engine uses when it reads source code from files.Import-Csv,Import-CliXml, andSelect-Stringassume Utf8 in the absence不存在 of a BOM.
System Operations Commands
System Config
nmap
Nmap (“Network Mapper”) is an open source tool for network exploration and security auditing. It was designed to rapidly scan large networks, although it works fine against single hosts.
install
pacman -S nmap
使用方法
使用 TCP SYN 发现活跃主机
nmap -PS 192.168.1.0/24
使用 TCP 方式扫描端口
nmap -sS -sV -n -p1-65535 -oX tcp.xml 192.168.1.0
使用 UDP 方式扫描端口
nmap -sS -sU -n -p1-65535 -oX udp.xml 192.168.1.0
判断操作系统
nmap -O 192.168.1.0/24
判断服务版本
nmap -sV 192.168.1.0/24
扫描结果端口状态说明
- open 目标端口开启
- closed 目标端口关闭
- filtered 通常被防火墙拦截,无法判断目标端口开启与否
- unfiltered 目标端口可以访问,但无法判断开启与否
- open|filtered 无法确定端口是开启还是filtered
- closed|filtered 无法确定端口是关闭还是filtered
端口分类
- 公认端口 well-known port: 0-1024 最常用端口,通常于协议绑定
- 注册端口 registered port: 1025-49151 最常用端口,通常于协议绑定
- 动态或私有端口 dynamic/private port: 49152-65535 最常用端口,通常于协议绑定
- 特例: 端口还与协议相关。比如 UDP 端口 53 通常用于 DNS 查询、TCP 端口 53 通常用于 DNS 记录迁移
扫描类型
-sT TCP conect()扫描,最基本的TCP扫描方式。
connect() 是一种系统调用,由操作系统提供,用来打开一个连接
如果目标端口有程序监听,connect() 就会成功返回,否则这个端口是不可达的。
无需 root 权限,任何 unix 用户都可以自由使用这个系统调用。
这种扫描很容易被检测到,在目标主机的日志中会记录大批的连接请求以及错误信息
-sS TCP 同步扫描 TCP SYN,因为不必全部打开一个 TCP 连接,被称为半开扫描 half-open。
发出一个TCP 同步包 SYN,然后等待回应。
如果返回 SYN|ACK(响应) 包,表示目标端口正在监听,
源主机马上发出一个RST(复位)数据包断开喝目标主机的连接,实际由操作系统内核自动完成。
如果返回 RST 数据包,表示目标端口没有监听程序。
好处:很少有系统能够把这记入系统日志。不过需要 root 权限 定制 SYN 数据包
-sU
UDP 扫描,发送0字节UDP包,快速扫描 Windows 的UDP端口。
使用此扫描方法,可以获取目标主机上提供哪些UDP(用户数据报协议 RFC768)服务
nmap 首先向目标主机的每个端口发出一个0字节的UDP报
收到端口不可达的ICMP消息,端口就是关闭的,否则就是打开的
-sP ping 扫描,仅想获取哪些主机正在运行,通过向指定的网络内的每个IP地址发送ICMP echo 请求数据包即可。
注意,nmap 在任何情况下都会进行 ping 扫描,只有目标主机处于运行状态,才会进行后续的扫描
如果只想知道目标主机是否运行,不想进行其他扫描,才使用这个选项
-sA ACK扫描,TCP ACK扫描,当防火墙开启时,查看防火墙有未过滤某端口。
通常用来穿过防火墙规则集。有助于确定一个防火墙是功能比较完善的或是一个简单的包过滤程序,只是阻塞进入的SYN包。
这种扫描是向特定端口发送 ACK 包(使用随机的应答/序列号)
如果返回一个 RST包,这个端口就标记为 unfiltered 状态
如果什么都没有返回,或者返回一个不可达 ICMP消息,这个端口就归入 filtered 类。
注意 nmap 通常不输出 unfiltered 的端口,在输出中不显示所有被探测的端口
这种扫描方式不能找出处于打开状态的端口
-sW 滑动窗口扫描,非常类似于 ACK 扫描,除了它有时可以检测到处于打开状态的端口。
因为滑动窗口的大小是不规则的,有些操作系统可以报告其大小
-sR RPC扫描,和其他不同的端口扫描方法结合使用
-b FTP 反弹攻击(FTP Bounce attack)外网用户通过 FTP渗透内网
通用选项
-P0 nmap 扫描前 不Ping 目标主机。有些防火墙不允许ICMP echo 请求穿过,这个选项可以对这些网络进行扫描
-PT nmap 扫描前 使用 TCP ACK 包确定目标主机是否在运行
-PT 默认80端口。 扫描之前,使用 TCP ping 确定哪些主机正在运行。
nmap不是通过发送 ICMP echo 请求包,然后等待响应来实现这种功能
而是向目标网络或者单一主机发出 TCP ACK包然后等待回应
如果主机正常运行就会返回 RST包,只有在目标网络/主机阻塞了ping包,而仍旧允许扫描时,这个选项才有效
对于非root用户,使用 connect() 系统调用来实现这个功能
可以使用 -PT 来设定目标端口 ,默认80 这个端口通常不会被过滤
-PS nmap使用 TCP SYN包进行扫描
对于 root 用户 这个选项让nmap 使用 SYN 包而不是 ACK包对目标主机进行扫描。
如果主机正在运行返回一个 RST包(或者一个 SYN/ACK包)
-PI nmap 进行ping扫描,设置这个选项,让nmap使用真正的 ***ping(ICMP echo请求)***来扫描目标主机是否正在运行。
这个选项让nmap发现正在运行的主机的同时,nmap也会对直接子网广播地址进行观察
直接子网广播地址一些外部可达的IP地址,把外部的包转换为一个内向的IP广播包,向一个计算机子网发送。
这些IP广播包应该删除,因为会造成拒绝服务攻击 例如 smurf
-PB 结合 -PT 和 -PI 功能,这是默认的 ping 扫描选项,使用 ***ACK(-PT)***和 ***ICMP(-PI)***两种扫描类型并行扫描
如果防火墙能够过滤其中一种包,之后使用这种方法,就能穿过防火墙
-O nmap扫描TCP/IP指纹特征,确定目标主机系统类型
-I 反向标志扫描,扫描监听端口的用户
-f 分片发送 SYN FIN Xmas Null 扫描的数据包
-v 冗余模式扫描,可以得到扫描详细信息
-oN 扫描结果重定向到文件
-resume 使被中断的扫描可以继续
-iL 扫描目录文件列表
-p
指定端口或扫描端口列表及范围,默认扫秒 1-1024端口和 /usr/share/nmap/nmap-services文件中指定的端口 例:
- -p 23 只扫描目标主机的 23 端口
- -p 20-30,139,60000- 扫描 20~30端口,139端口,所有大于60000的端口
扫描目标
- 192.168.1.25
- 192.168.1.0/24 表示:192.168.1 网段所有ip
- 192.168..** 表示 192.168.1.1~ 192.168.255.255 所有ip
Aircrack Ng
iwconfig查看网卡
iwconfig
wlp9s0 IEEE 802.11 ESSID:off/any
Mode:Managed Access Point: Not-Associated Tx-Power=-2147483648 dBm
Retry short limit:7 RTS thr:off Fragment thr:off
Power Management:on
将无线网卡设置为监听模式,并查看确认
airmon-ng start wlp9s0
iwconfig
wlp9s0mon IEEE 802.11 Mode:Monitor Frequency:2.457 GHz Tx-Power=-2147483648 dBm
Retry short limit:7 RTS thr:off Fragment thr:off
Power Management:on
扫描附近wifi
airodump-ng wlp9s0mon
CH 12 ][ Elapsed: 0 s ][ 2021-03-28 02:12
BSSID PWR Beacons #Data, #/s CH MB ENC CIPHER AUTH ESSID
B4:29:3D:19:8A:A1 -6 4 0 0 11 65 WPA2 CCMP PSK i6310
B4:0F:3B:5A:60:09 -49 5 0 0 5 130 WPA2 CCMP PSK Tenda_5A6008
查看指定wifi的连接设备 keep it alive
airodump-ng -c 5 --bssid B4:0F:3B:5A:60:09 -w temp/Tenda_5A6008 wlp9s0mon
未获取到握手包
CH 5 ][ Elapsed: 2 mins ][ 2021-03-28 02:16
BSSID PWR RXQ Beacons #Data, #/s CH MB ENC CIPHER AUTH ESSID
B4:0F:3B:5A:60:09 -50 100 1389 27 0 5 130 WPA2 CCMP PSK Tenda_5A6008
BSSID STATION PWR Rate Lost Frames Notes Probes
B4:0F:3B:5A:60:09 CE:95:40:7E:DA:92 -44 0e- 1 0 20
B4:0F:3B:5A:60:09 4A:26:6E:B7:EE:FE -48 0e- 1 0 43
获取到握手包
CH 5 ][ Elapsed: 30 s ][ 2021-03-28 02:18 ][ WPA handshake: B4:0F:3B:5A:60:09
BSSID PWR RXQ Beacons #Data, #/s CH MB ENC CIPHER AUTH ESSID
B4:0F:3B:5A:60:09 -49 100 321 400 7 5 130 WPA2 CCMP PSK Tenda_5A6008
BSSID STATION PWR Rate Lost Frames Notes Probes
B4:0F:3B:5A:60:09 CE:95:40:7E:DA:92 0 0e- 1 0 623
B4:0F:3B:5A:60:09 4A:26:6E:B7:EE:FE -46 0e- 6 7 219 EAPOL
获取到握手包后打开新的shell,keep it alive
sudo aireplay-ng -0 2 -c C8:C2:FA:4C:15:51 -a B4:29:3D:19:8A:A1 wlp9s0mon
利用字典暴破wifi
aircrack-ng -w 字典.txt Tenda_5A6008-02.cap
Network & Service Management
Firewall
Firewalld is a firewall daemon developed by Red Hat. It uses nftables by default.
安装
# archlinux
pacman -S firewalld
启动 firewalld 服务,使用 firewall-cmd 配置规则
不启动 firewalld 服务可以使用 firewall-offline-cmd 配置规则
选项 --permanent 与 --timeout 互斥
不使用 --permanent 选项配置规则,会直接修改运行时配置,但是重启服务后会被还原
使用 firewall-cmd --runtime-to-permanent 可将运行时规则持久化,重启后依然生效
使用 --permanent 选项配置规则,当前运行时的配置不会被修改,可以使用下面任意操作应用规则
- 重启服务
systemctl restart firewalld - 重载规则
firewall-cmd --reload
选项 --timeout 与 --permanent 互斥
# 开放 ssh服务 3小时
firewall-cmd --add-service ssh --timeout=3h
在有限的时间内添加服务或端口 --timeout=value
--timeout=3h3 hours--timeout=3m3 minutes--timeout=3s3 seconds
Services
# 查看开放服务
firewall-cmd --list-service
# To get a list of available services
firewall-cmd --get-services
# query information about a particular service
firewall-cmd --info-service samba
# To add a service to a zone
firewall-cmd --zone=zone_name --add-service service_name
# To add a service to a zone --permanent need firewall-cmd --reload
firewall-cmd --zone=zone_name --add-service service_name --permanent
firewall-cmd --reload
# Removing a service
firewall-cmd --zone=zone_name --remove-service service_name
# To add a service to a zone --permanent need firewall-cmd --reload
firewall-cmd --zone=zone_name --remove-service service_name --permanent
firewall-cmd --reload
ports
firewall-cmd --zone=zone_name --add-port port_num/protocol
Thereprotocolis eithertcporudp
# 查看开放端口
firewall-cmd --list-ports
# 开放端口 There protocol is either tcp or udp.
firewall-cmd --zone=zone_name --add-port port_num/protocol
# 开放端口
firewall-cmd --zone=home --add-port=66/tcp
# 开放端口 --permanent
firewall-cmd --zone=home --add-port=66/tcp --permanent
firewall-cmd --reload
# 关闭端口
firewall-cmd --zone=zone_name --remove-port port_num/protocol
# 关闭端口
firewall-cmd --zone=home --remove-port=66/tcp
# 关闭端口 --permanent
firewall-cmd --zone=home --remove-port=66/tcp --permanent
firewall-cmd --reload
Zones
Zone is a collection of rules that can be applied to a specific interface.
Some commands (such as adding/removing ports/services) require a zone to specified.
Zone can be specified by name by passing --zone=zone_name parameter.
If no zone is specified default zone is assumed.
# To have an overview of the current zones and interfaces
firewall-cmd --get-active-zones
# list all the zones with entirety their configuration
firewall-cmd --list-all-zones
# just a specific zone configuration
firewall-cmd --info-zone=zone_name
# Changing zone of an interface
firewall-cmd --zone=new_zone --change-interface=interface_name
# List connection profiles
nmcli connection show
# Assign the "myssid" profile to the "home" zone
nmcli connection modify myssid connection.zone home
# query the name of the default zone
firewall-cmd --get-default-zone
# put the name of the default zone
firewall-cmd --set-default-zone=new_zone
Samba
Samba is the standard Windows interoperability suite of programs for Linux and Unix. Since 1992, Samba has provided secure, stable and fast file and print services for all clients using the SMB/CIFS protocol, such as all versions of DOS and Windows, OS/2, Linux and many others.
注意:优先配置 配置文件 /etc/samba/smb.conf
配置文件官方样例 smb.conf.default
smb.conf 文档说明
自用配置文件 smb.conf
配置完毕 进行安装:
pacman -S samba
# 创建 共享专用账户
useradd -m hi
# 禁止登录 禁止 ssh login
usermod --shell /usr/bin/nologin --lock hi
# samba 拥有自己的密码管理
smbpasswd -a hi
# 列出 samba 用户
pdbedit -L -v
# 启动测试
systemctl start smb
# 开机自启动
systemctl enable smb
Linux 客户端挂载 samba
sudo mount //192.168.1.165/work /mnt -o username=fly,password=fly,iocharset=utf8
vsftpd
vsftpd (Very Secure FTP Daemon) is a lightweight, stable and secure FTP server for UNIX-like systems.
vsftpdVery Secure FTP Daemon 文件服务器 Centos7 搭建
install
yum -y install vsftpd
systemctl enable vsftpd
config
不允许匿名登录
vi /etc/vsftpd/vsftpd.conf
anonymous_enable=NO
创建ftp用户
useradd ftpuser
passwd password
禁用ssh
不允许用户 ssh 登录系统,但是能登陆 vsftpd
# 将which nologin 显示的内容加到shells文件末尾
which nologin
vi /etc/shells
usermod -s /usr/sbin/nologin ftpuser
# 测试
su -ftpuser
systemctl restart vsfypd
开放防火墙策略
firewall-cmd --zone=public --add-service=ftp --permanent
firewall-cmd --reload:q
修改sshd配置
vi /etc/ssh/sshd_config
LoginGraceTime 0
MaxSessions 1000
Subsystem sftp internal-sftp
Match group ftpuser
ChrootDirectory /home/ftpuser
X11Forwarding no
AllowTcpForwarding no
ForceCommand internal-sftp
ClientAliveInterval 60
ClientAliveCountMax 10
权限设置
# ChrootDirectory设置的目录权限及其所有上级文件夹权限,属主和属组必须是root
chown root:root /home/ftpuser
# ChrootDirectory只有属主能拥有写权限,权限最大设置只能是755
chmod 755 /home/ftpuser
重启
修改配置后要重启 sshd 和 vsftpd 服务
systemctl restart sshd
systemctl restart vsftpd
service sshd restart
service restart vsftpd
NFS
Docker
Docker is a utility to pack, ship and run any application as a lightweight container.
局域网访问
开启远程
vi /lib/systemd/system/docker.service
修改配置
[Service]
ExecStart=/usr/bin/dockerd -H tcp://0.0.0.0:2375 -H unix:///var/run/docker.sock
重启docker
systemctl daemon-reload
systemctl restart docker
firewall-cmd 开启端口
firewall-cmd --zone=public --add-port=2375/tcp --permanent
Docker Registry 私有仓库
registry server
self-signed certificates
创建 自签证书 和 htpasswd
mkdir -p certs
openssl req -newkey rsa:4096 -nodes -sha256 -keyout certs/domain.key -addext "subjectAltName = DNS:myregistry.domain.com" -x509 -days 365 -out certs/domain.crt
slave:~ # openssl req -newkey rsa:4096 -nodes -sha256 -keyout certs/domain.key -addext "subjectAltName = DNS:myregistry.domain.com" -x509 -days 365 -out certs/domain.crt
Generating a RSA private key
...................................................................................................................................................................................................................................................................................................................................++++
.............................................++++
writing new private key to 'certs/domain.key'
-----
You are about to be asked to enter information that will be incorporated
into your certificate request.
What you are about to enter is what is called a Distinguished Name or a DN.
There are quite a few fields but you can leave some blank
For some fields there will be a default value,
If you enter '.', the field will be left blank.
-----
Country Name (2 letter code) [AU]:CN
State or Province Name (full name) [Some-State]:Beijing
Locality Name (eg, city) []:Beijing
Organization Name (eg, company) [Internet Widgits Pty Ltd]:bougainvilleas
Organizational Unit Name (eg, section) []:main
Common Name (e.g. server FQDN or YOUR name) []:myregistry.domain.com
Email Address []:caddyren@qq.com
# Create a password file with one entry for the user testuser, with password testpassword
mkdir -p auth
docker run --entrypoint htpasswd httpd:2 -Bbn user password > auth/htpasswd
docker-compose.yml for docker registry
version: "3.9"
services:
registry:
image: registry:2
ports:
- "443:443"
environment:
REGISTRY_HTTP_ADDR: 0.0.0.0:443
REGISTRY_HTTP_TLS_CERTIFICATE: /certs/domain.crt
REGISTRY_HTTP_TLS_KEY: /certs/domain.key
REGISTRY_AUTH: htpasswd
REGISTRY_AUTH_HTPASSWD_PATH: /auth/htpasswd
REGISTRY_AUTH_HTPASSWD_REALM: Registrt Realm
volumes:
- /home/caddy/registry:/var/lib/registry
- /home/caddy/certs:/certs
- /home/caddy/auth:/auth
- /etc/localtime:/etc/localtime:ro # 同步宿主机和容器时间
client
add hosts
echo "192.168.1.162 myregistry.domain.com" >> /etc/hosts
ping myregistry.domain.com
客户端所在机器信任自签证书 Certificate Authorities
archlinux
trust anchor domain.crt
systemctl restart docker.service
docker login -u=test -p=test myregistry.domain.com
curl -u test:test -X GET https://myregistry.domain.com/v2/_catalog
opensuse
scp certs/domain.crt root@192.168.1.100:/etc/pki/trust/anchors/
update-ca-certificates
systemctl restart docker.service
docker login -u=test -p=test myregistry.domain.com
curl -u test:test -X GET https://myregistry.domain.com/v2/_catalog
other linux
k8s
kubectl 生成 secret
kubectl create secret docker-registry reg --docker-server=myregistry.domain.com --docker-username=test --docker-password=test
测试验证用脚本 rabbitmq.yaml
apiVersion: apps/v1
kind: Deployment
metadata:
name: mq
labels:
app: mq
spec:
replicas: 1
selector:
matchLabels:
app: mq
template:
metadata:
labels:
app: mq
spec:
imagePullSecrets:
- name: reg #################################### 认证
containers:
- name: rabbitmq
image: myregistry.domain.com/mq:v1
imagePullPolicy: IfNotPresent # IfNotPresent Always Never
ports:
- containerPort: 15672
- containerPort: 5672
env:
- name: RABBITMQ_DEFAULT_USER
value: user
- name: RABBITMQ_DEFAULT_PASS
value: "123456"
volumeMounts:
- name: mq
mountPath: /etc/localtime
readOnly: true
volumes:
- name: mq
hostPath:
path: /etc/localtime
---
apiVersion: v1
kind: Service
metadata:
name: mq
spec:
type: NodePort
selector:
app: mq
ports:
- name: manager
port: 15672
targetPort: 15672
nodePort: 30001
- name: http
port: 5672
targetPort: 5672
nodePort: 30002
example for kubectl
kubectl apply -f rabbitmq.yaml
kubectl get po
kubectl describe po -l app=mq
docker
# Pull the alpine:3.14 image from docker hub.
docker pull alpine:3.14
docker tag alpine:3.14 myregistry.domain.com/alpine:t1
# Tag the image as myregistry.domain.com/alpine:t1. This creates an additional tag for the existing image. When the first part of the tag is a hostname and port, Docker interprets this as the location of a registry, when pushing
# need login
docker login -u=test -p=test myregistry.domain.com
docker push myregistry.domain.com/alpine:t1
# 删除宿主机 images
docker rmi myregistry.domain.com/alpine:t1
docker images
# Pull the myregistry.domain.com/alpine:t1 image from your local registry.
docker pull myregistry.domain.com/alpine:t1
docker images
podman
Podman is an alternative to Docker, providing a similar interface. It supports rootless containers and a shim service for docker-compose.
install
#archlinux 安装
pacman -S podman
# opensuse 安装
zypper in podman
rootless mode
sudo usermod --add-subuids 10000-75535 USERNAME
sudo usermod --add-subgids 10000-75535 USERNAME
echo USERNAME:10000:65536 >> /etc/subuid
echo USERNAME:10000:65536 >> /etc/subgid
docker hub
docker hub 国内加速镜像配置文件 /etc/containers/registries.conf
[[registry]]
prefix = "docker.io"
location = "docker.io"
[[registry.mirror]]
location = "rjm3pmfv.mirror.aliyuncs.com"
command
podman --help
man podman
podman <subcommand> --help
man podman-<subcommand>
podman pod --help
man podman-pod
searching images
podman search docker.io/httpd
podman search --limit 3 --format "{{.Name}}\t{{.Stars}}\t{{.Official}}" docker.io/httpd
podman search --limit 3 --list-tags --format "{{.Name}}\t{{.Tag}}" docker.io/httpd
searching official images
podman search docker.io/httpd --filter=is-official
podman search docker.io/httpd -f=is-official
pulling some images
podman pull docker.io/library/httpd
Running a container
podman run -dt -p 8080:80/tcp docker.io/library/httpd
- podman images list all images
- podman ps Listing running containers
- podman ps -a Listing all containers
- podman inspect -l | grep IPAddress Inspecting a running container
- podman logs -l Viewing the container’s logs
- podman top -l Viewing the container’s pids
- podman stop -l Stopping the container
- podman rm -l Removing the container
pod
podman pod create --publish 5672:5672,15672:15672,3306:3306,6379:6379,8001:8001 --name mysql-mq-redis-pod
mysql
MySQL 8.0 Release Notes
MySQL 5.7 Release Notes
podman pull docker.io/library/mysql:8.0.33
podman pull docker.io/library/mysql:5.7.42
pod
podman run -d --pod mysql-mq-redis-pod --env MYSQL_ROOT_PASSWORD=toor --tz=Asia/Shanghai \
-v ~/samba/podman/mysql:/var/lib/mysql --name mysql docker.io/library/mysql:8.0.33
podman run -d --pod mysql-mq-redis-pod --env MYSQL_ROOT_PASSWORD=toor --tz=Asia/Shanghai \
-v ~/samba/podman/mysql:/var/lib/mysql --name mysql docker.io/library/mysql:5.7.42
no pod
podman run --rm -d --env MYSQL_ROOT_PASSWORD=toor -p 3306:3306 --tz=Asia/Shanghai \
-v ~/samba/podman/mysql:/var/lib/mysql --name mysql docker.io/library/mysql:8.0.33
podman run --rm -d --env MYSQL_ROOT_PASSWORD=toor -p 3306:3306 --tz=Asia/Shanghai \
-v ~/samba/podman/mysql:/var/lib/mysql --name mysql docker.io/library/mysql:5.7.42
rabbitmq
Downloading and Installing RabbitMQ
podman pull docker.io/library/rabbitmq:3.11-management-alpine
pod
podman run -d --pod mysql-mq-redis-pod \
--env RABBITMQ_DEFAULT_USER=guest --env RABBITMQ_DEFAULT_PASS=tseug --tz=Asia/Shanghai \
--name rabbitmq docker.io/library/rabbitmq:3.11-management-alpine
no pod
podman run -d \
--env RABBITMQ_DEFAULT_USER=guest --env RABBITMQ_DEFAULT_PASS=guest --tz=Asia/Shanghai \
-p 5672:5672 -p 15672:15672 --name rabbitmq docker.io/library/rabbitmq:3.11-management-alpine
redis
podman pull docker.io/library/redis:latest
podman pull docker.io/library/redis:7.0-alpine
podman pull docker.io/library/redis:6.2-alpine
podman pull docker.io/library/redis:6.0-alpine
podman pull docker.io/library/redis:5.0-alpine
podman pull docker.io/redis/redis-stack-server:latest
podman pull docker.io/redis/redis-stack:latest
pod
podman run -d --pod mysql-mq-redis-pod \
-v ~/samba/podman/redis/conf:/etc/redis -v ~/samba/podman/redis/data:/data --tz=Asia/Shanghai \
--name redis docker.io/library/redis:6.2-alpine
podman run -d --pod mysql-mq-redis-pod \
-v ~/samba/podman/redis/conf:/etc/redis -v ~/samba/podman/redis/data:/data --tz=Asia/Shanghai \
--name redis-stack-server docker.io/redis/redis-stack-server:latest
podman run -d --pod mysql-mq-redis-pod \
-v ~/samba/podman/redis/conf:/etc/redis -v ~/samba/podman/redis/data:/data --tz=Asia/Shanghai \
--name redis-stack docker.io/redis/redis-stack:latest
no pod
podman run -d -p 6379:6379 \
-v ~/samba/podman/redis/conf:/etc/redis -v ~/samba/podman/redis/data:/data --tz=Asia/Shanghai \
--name redis docker.io/library/redis:6.2-alpine
podman run -d -p 6379:6379 \
-v ~/samba/podman/redis/conf:/etc/redis -v ~/samba/podman/redis/data:/data --tz=Asia/Shanghai \
--name redis-stack-server docker.io/redis/redis-stack-server:latest
podman run -d -p 6379:6379 -p 8001:8001 \
-v ~/samba/podman/redis/conf:/etc/redis -v ~/samba/podman/redis/data:/data --tz=Asia/Shanghai \
--name redis-stack docker.io/redis/redis-stack:latest
redis-cli
podman exec -it redis-stack redis-cli
elasticsearch
elasticsearch releases
kibana releases
podman pull docker.io/library/elasticsearch:latest docker.io/library/kibana:latest
podman pull docker.io/library/elasticsearch:8.6.0 docker.io/library/kibana:8.6.0
pod
podman pod create --publish 9200:9200,9300:9300,5601:5601 --name elk-pod
podman pod logs -f elk-pod
podman run -d --pod elk-pod --env "ES_JAVA_OPTS=-Xms512m -Xmx512m" --tz=Asia/Shanghai \
--name elasticsearch docker.io/library/elasticsearch:8.6.0
podman run -d --pod elk-pod --env ELASTICSEARCH_URL=http://elasticsearch:9200/ --tz=Asia/Shanghai \
--name kibana docker.io/library/kibana:8.6.0
podman exec -it kibana /bin/bash
cat /etc/libana/kibana.yml
no pod
podman run -d --name elasticsearch --env "ES_JAVA_OPTS=-Xms512m -Xmx512m" --tz=Asia/Shanghai \
-p 9200:9200 -p 9300:9300 docker.io/library/elasticsearch:8.6.0
podman run -d --name kibana --env ELASTICSEARCH_URL=http://宿主机IP:9200/ --tz=Asia/Shanghai \
-p 5601:5601 docker.io/library/kibana:latest
K8s
Kubernetes 使用 go 语言,根据 google 10 年容器化基础架构 borg 开发
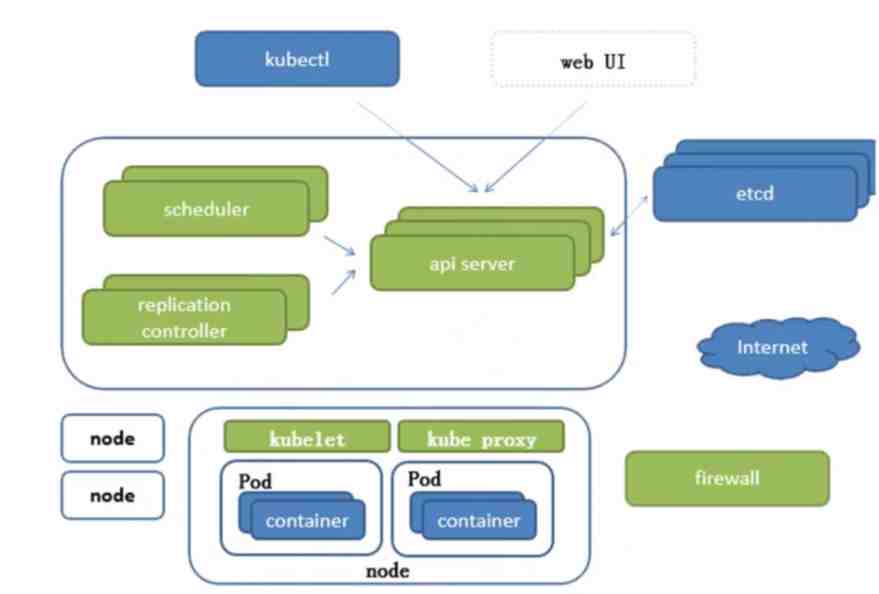
api Server
- 所有服务访问统一入口
replication controller
- 维持副本期望数目
scheduler
- 负责介绍任务,选择合适的节点进行分配任务
ETCD
etcd 可信赖的分布式键值存储服务,能够为整个分布式集群存储一些关键数据,协助分布式集群的正常运转,存储k8s集群所有重要信息(持久化
- 可信赖:天生支持集群,不需要借助其他组建
- 保存整个集群需要持久化的配置文件、配置信息,主要用于恢复数据
- v2版本,数据存储在内存中,在Kubernetes v1.11弃用
- v3版本,引入本地卷的持久化操作,关机后可以从本地磁盘恢复
- 架构图
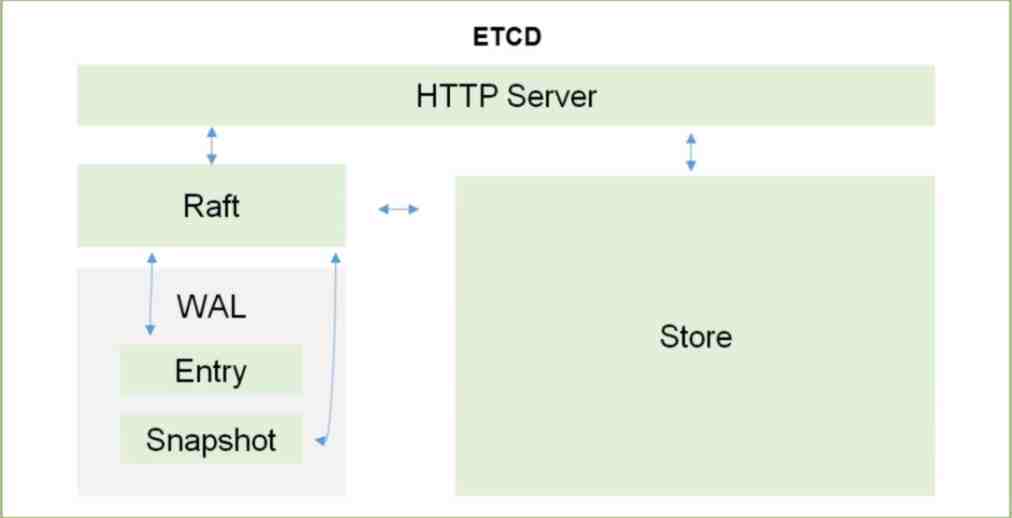
Kubelet
直接跟容器引擎交互实现容器的生命周期管理
API Server 监听8001端口
master:~ # kubectl proxy
Starting to serve on 127.0.0.1:8001
http://localhost:8001
kubectl 版本
kubectl version
curl http://localhost:8001/version
namespace
Not All Objects are in a Namespace
Most Kubernetes resources (e.g. pods, services, replication controllers, and others) are in some namespaces. However, namespace resources are not themselves in a namespace. And low-level resources, such as nodes and persistentVolumes, are not in any namespace
flag –namespace
example
master:~ # kubectl get namespace
NAME STATUS AGE
default Active 6d9h
kube-node-lease Active 6d9h
kube-public Active 6d9h
kube-system Active 6d9h
kubernetes-dashboard Active 6d6h
master:~ # kubectl run nginx --image=nginx --namespace=<insert-namespace-name-here>
master:~ # kubectl get pods --namespace=<insert-namespace-name-here>
nodes/no
kubectl get nodes
kubectl get no
kubectl describe no/master-dell
master-dell:~/yaml/fly # kubectl describe no/master-dell
Name: master-dell
Roles: control-plane,master
# 省略 内容
Taints: node-role.kubernetes.io/master:NoSchedule
# 省略 内容
taints node 调度策略 kubectl taint nodes master-dell node-role.kubernetes.io/master=:PreferNoSchedule
taints node 调度策略
不能被调度,当只有一个 master 时要将 master 设置为可调度
Taints: node-role.kubernetes.io/master:NoSchedule
不仅不会调度,还会驱逐Node上的Pod
Taints: node-role.kubernetes.io/master:NoExecute
尽量不要调度到此Node
Taints: node-role.kubernetes.io/master:PreferNoSchedule
deployments/deploy
kubectl get deployments
kubectl get deploy
kubectl describe deployment
kubectl create deployment rabbitmq --image=rabbitmq:3.9-management-alpine
kubectl get po/rabbitmq-66b64b6c68-tnnc2 deploy/rabbitmq
kubectl delete deploy rabbitmq
pods/po
kubectl get po
kubectl get pods
kubectl get pods -l app=rabbitmq
kubectl get pods -l version=v1
kubectl get pods -o wide
kubectl get pods -o json
kubectl describe pods
kubectl describe pods rabbitmq-66b64b6c68-lwbfn
kubectl describe pods -l app=rabbitmq
curl http://localhost:8001/api/v1/namespaces/default/pods/rabbitmq-66b64b6c68-lwbfn
kubectl logs rabbitmq-66b64b6c68-lwbfn
kubectl logs -l app=rabbitmq
kubectl exec -ti rabbitmq-66b64b6c68-lwbfn -- bash
services/svc
kubectl get svc
kubectl get services -l app=rabbitmq
kubectl expose deployment/rabbitmq --type="NodePort" --port 15672
kubectl describe services/rabbitmq
kubectl delete services -l app=rabbitmq
kubectl delete service rabbitmq-66b64b6c68-lwbfn
label
kubectl label pods rabbitmq-66b64b6c68-lwbfn version=v1
kubectl get pods -l version=v1
scale
kubectl scale deployments/kubernetes-bootcamp --replicas=4
kubectl get pods -o wide
update
kubectl set image deployments rabbitmq rabbitmq=rabbitmq:3.8.26-management-alpine
kubectl rollout status deployments rabbitmq
kubectl rollout undo deploy rabbitmq
Kube proxy
- 负责写入规则至IPTABLES、IPVS实现服务映射访问
CoreDNS
- 可以为集群中的SVC创建一个域名IP的对应关系解析
Dashboard
- 给K8s集群提供一个B/S架构访问体系
外部访问
- 下载 recommended.yaml
https://raw.githubusercontent.com/kubernetes/dashboard/v2.4.0/aio/deploy/recommended.yaml - 改造 recommended.yaml to dashboard.yaml文件
- 部署
kubectl apply -f dashboard.yaml - https 访问
https://192.168.1.100:30003 - 获取 ServiceAccount kubernetes-dashboard token 登录
- 查看所有 secrets
kubectl get secrets -n kubernetes-dashboard - 查看 secrets token
kubectl describe secrets/kubernetes-dashboard-token-f6pcf -n kubernetes-dashboard
- 查看所有 secrets
改动 service 使用 NodePort 直接暴露服务
kind: Service
apiVersion: v1
metadata:
labels:
k8s-app: kubernetes-dashboard
name: kubernetes-dashboard
namespace: kubernetes-dashboard
spec:
type: NodePort # 暴露 服务
ports:
- port: 443
targetPort: 8443
nodePort: 30003
selector:
k8s-app: kubernetes-dashboard
改动 ServiceAccount 权限为 cluster-admin
apiVersion: rbac.authorization.k8s.io/v1
kind: ClusterRoleBinding
metadata:
name: kubernetes-dashboard
roleRef:
apiGroup: rbac.authorization.k8s.io
kind: ClusterRole
name: cluster-admin # 管理员才有权限 查看 资源 与 服务
subjects:
- kind: ServiceAccount
name: kubernetes-dashboard
namespace: kubernetes-dashboard
localhost
- Dashboard UI
- https://kubernetes.io/docs/tasks/access-application-cluster/web-ui-dashboard/
- https://github.com/kubernetes/dashboard/blob/master/docs/user/accessing-dashboard/README.md
kubectl apply -f https://raw.githubusercontent.com/kubernetes/dashboard/v2.4.0/aio/deploy/recommended.yaml
slave:~ # kubectl get namespaces
NAME STATUS AGE
default Active 3h36m
kube-node-lease Active 3h36m
kube-public Active 3h36m
kube-system Active 3h36m
kubernetes-dashboard Active 36m
slave:~ # kubectl get pods -n kubernetes-dashboard
NAME READY STATUS RESTARTS AGE
dashboard-metrics-scraper-c45b7869d-vrc6t 1/1 Running 0 43m
kubernetes-dashboard-576cb95f94-87lz5 1/1 Running 0 43m
slave:~ # kubectl get svc -n kubernetes-dashboard
NAME TYPE CLUSTER-IP EXTERNAL-IP PORT(S) AGE
dashboard-metrics-scraper ClusterIP 10.100.244.14 <none> 8000/TCP 43m
kubernetes-dashboard ClusterIP 10.107.123.253 <none> 443/TCP 43m
- 在新 terminal 开启代理
kubectl proxy之后保持窗口 - 在本机浏览器访问
http://localhost:8001/api/v1/namespaces/kubernetes-dashboard/services/https:kubernetes-dashboard:/proxy/ - 获取 ServiceAccount kubernetes-dashboard token 登录
- 查看所有 secrets
kubectl get secrets -n kubernetes-dashboard - 查看 secrets token
kubectl describe secrets/kubernetes-dashboard-token-f6pcf -n kubernetes-dashboard - 此时的用户 非 cluster-admin 无权限查看资源 参考上面 改动 ServiceAccount 权限为 cluster-admin
- 查看所有 secrets
删除
kubectl delete -f dashboard.yaml
deployment、pods、services
kubectl get deploy -n kubernetes-dashboard
kubectl delete deploy/kubernetes-dashboard -n kubernetes-dashboard
kubectl get po -n kubernetes-dashboard
kubectl delete po/kubernetes-dashboard -n kubernetes-dashboard
kubectl get svc -n kubernetes-dashboard
kubectl delete svc/kubernetes-dashboard -n kubernetes-dashboard
cluster role、ServiceAccount、ClusterRoleBinding、RoleBinding
kubectl get clusterrole -n kubernetes-dashboard
kubectl delete clusterrole/kubernetes-dashboard -n kubernetes-dashboard
kubectl get serviceaccount -n kubernetes-dashboard
kubectl delete serviceaccount/kubernetes-dashboard -n kubernetes-dashboard
kubectl get ClusterRoleBinding -n kubernetes-dashboard
master:~ # kubectl get ClusterRoleBinding -n kubernetes-dashboard
NAME ROLE AGE
kubernetes-dashboard ClusterRole/cluster-admin 92m
# 删除
kubectl delete ClusterRoleBinding/kubernetes-dashboard -n kubernetes-dashboard
kubectl get RoleBinding -n kubernetes-dashboard
master:~ # kubectl get RoleBinding -n kubernetes-dashboard
NAME ROLE AGE
kubernetes-dashboard Role/kubernetes-dashboard 93m
kubectl delete RoleBinding/kubernetes-dashboard -n kubernetes-dashboard
Ingress Controller
- 官方只能实现四层代理,Ingress可以实现七层代理
Federation
- 提供一个可以跨集群中心多K8s统一管理功能
Prometheus
- 提供K8s集群的监控能力
ELK
- 提供k8s集群日志统一分析介入平台
注意
高可用集群副本数目最好是>=3的奇数
基础概念
Pod
控制器类型
k8s网络通讯模式
构建k8s集群
资源清单 yaml
资源
资源清单语法
编写pod
资源生命周期
Pod控制器:掌握各种控制器的特点以及使用定义方式
Service:服务发现 ,SVC原理 及其构建方式
服务分类
有状态服务:DBMS
无状态服务:LVS APACHE (Docker 更适合)
存储:掌握多种存储类型的特点,并且能够在不同环境中选择合适的存储方案的存储方案
调度器:调度器原理,根据要求把pod定义到想要的节点运行
安全:集群的认证、鉴权、访问控制、原理及流程
HELM:类似包管理工具,掌握HELM原理,HELM模板自定义,HELM部署一些常用插件
运维:修改kubeadm达到证书可用期限为10年,能够构建高可用的Kubernetes集群
mysql rabbitmq redis redisjson
Hyprland
Hyprland is a wlroots-based tiling Wayland compositor written in C++. Noteworthy features of Hyprland include dynamic tiling, tabbed windows, a clean and readable C++ code-base, and a custom renderer that provides window animations, rounded corners, and Dual-Kawase Blur on transparent windows.
config
i3wm
i3 is a dynamic tiling window manager inspired by wmii that is primarily targeted at developers and advanced users.
pacman -S i3-gaps i3lock i3status feh picom scrot terminator
配置文件
- 全局配置
/etc/i3/config/etc/i3status.conf
- 用户配置
鼠标光标大小
- ~/.Xresources
- Xcursor.size= 12
package
i3-gaps(i3-wm的子分支,支持更多配置)配置
gaps inner 3
gaps outer 3
smart_gaps on
new_window none
new_float normal
hide_edge_borders both
i3-lock 锁屏
# i3lock image must be PNG, just save as PNG ,not mv png to PNG
mode "i3lock: Return to lock/Escape to Cancel" {
bindsym Return mode "default" exec i3lock -I 600 -i /home/caddy/Pictures/bg/lock.PNG
bindsym Escape mode "default"
}
bindsym Ctrl+mod1+l mode "i3lock: Return to lock/Escape to Cancel"
i3-status
bar status_command
i3status -c ~/.config/i3/i3status.conf
壁纸 feh
exec --no-startup-id feh --bg-fill ~/Pictures/bg/d469095e66520d0a42c0b9566b81d65c431b935d.jpg
窗口透明 picom
exec --no-startup-id picom
截图 scrot
pacman -S scrot
# printscreen--scrot(Print=PrtSc/PrintScreen)
bindsym $mod+Print exec --no-startup-id scrot
terminator
conky
Waybar
Highly customizable Wayland bar for Sway and Wlroots based compositors.
config
Database Management
MySQL
MySQL is a widely spread, multi-threaded, multi-user SQL database, developed by Oracle.
k8s
分页查询
mysql 延迟关联 优化 分页查询
-- 找到 500 000 + 10 条记录id,然后回表查询 500 000 + 10 条记录 最后按分页条件返回10条记录
EXPLAIN
SELECT *
FROM `t_park_his_parking_record` LIMIT 500000, 10;
-- 找到 500 000 + 10 条记录的id,按分页取 10 个id,回表查询这 10 条记录,最后返回10条记录
EXPLAIN
SELECT *
FROM `t_park_his_parking_record`
INNER JOIN (SELECT id FROM `t_park_his_parking_record` LIMIT 500000, 10) AS t USING (id);
-- 查看 sql 执行情况
show profiles;
EXPLAIN
EXPLAIN
SELECT * FROM xxx WHERE id = 1;
结果
| id | select_type | table | partitions | type | possible_keys | key | key_len | ref | rows | filtered | Extra |
|---|---|---|---|---|---|---|---|---|---|---|---|
| 1 | SIMPLE | xxx | null | const | PRIMARY | PRIMARY | 8 | const | 1 | 100 | null |
select_type: 表示对应行是简单查询还是复杂查询SIMPLE: 不包含子查询和union的简单查询PRIMARY: 复杂查询中最外层的selectSUBQUERY: 包含在select中的子查询 不在from的子句中DERIVED: 包含在from子句中的子查询mysql会将查询结果放入一个临时表中 此临时表也叫衍生表UNION: 在union中的第二个和随后的select,UNION RESULT为合并的结果
table: 表示当前行访问的表<derivedN>: 子查询 表示当前查询依赖id=N行的查询,所以先执行id=N行的查询
partitions: 查询将匹配记录的分区,对于非分区表该值为NULLtype: 表示关联类型或访问类型,MySql决定如何查找表中的行。 依次从最优到最差分别为system > const > eq_ref > ref > range > index > allNULL:MySql能在优化阶段分解查询语句,在执行阶段不用再去访问表或索引system和const:MySql对查询的某部分进行优化,并把其转化为一个常量.可以通过show warnings命令查看结果.system是const的一个特例表示表里只有一条元组匹配时为systemeq_ref: 主键或唯一键索引被连接使用,最多只会返回一条符合条件的记录.简单的select查询不会出现这种typeref: 相比eq_ref不使用唯一索引,而是使用普通索引或唯一索引的部分前缀,索引和某个值比较,会找到多个符合条件的行range: 通常出现在范围查询中,inbetween大于小于等. 使用索引来检索给定范围的行index: 扫描全索引拿到结果,一般是扫描某个二级索引,二级索引一般比较少,所以通常比ALL快一点ALL: 全表扫描 扫描聚簇索引的所有叶子节点
possible_keys: 此列显示在查询中可能用到的索引- 如果该列为
NULL则表示没有相关索引 - 可以通过检查
where子句是否可添加一个适当的索引来提高性能
- 如果该列为
key: 此列显示MySql在查询时实际使用到的索引。在执行计划中可能出现possible_keys列有值,而key列为null,这种情况可能是表中数据不多,MySql认为索引对当前查询帮助不大而选择了全表查询。如果想强制MySql使用或忽视possible_keys列中的索引,在查询时使用force index或ignore indexkey_len: 此列显示MySql在索引里使用的字节数,通过此列可以算出具体使用了索引中的哪些列,索引最大长度为 768 字节- 当长度过大时,
MySql会做一个类似最左前缀处理,将前半部分字符提取出做索引 - 当字段可以为
null时,需要一个字节去记录 - 计算规则:
- 字符类型:
char(n): n个数字或者字母占n个字节,汉字占3n个字节varchar(n): n个数字或者字母占n个字节,汉字占3n+2个字节.+2字节用来存储字符串长度
- 数字类型:
tinyint: 1字节smallint: 2字节int: 4字节bigint: 8字节
- 时间类型:
date: 3字节timestamp: 4字节datetime: 8字节
- 字符类型:
- 当长度过大时,
ref此列显示key列记录的索引中,表查找值时使用到的列或常量.常见的有const字段名rows此列是MySql在查询中估计要读取的行数,注意这里不是结果集的行数filteredExtra额外信息Using index使用覆盖索引(如果select后面查询的字段都可以从这个索引的树中获取,不需要通过辅助索引树找到主键,再通过主键去主键索引树里获取其它字段值)Using where使用where语句来处理结果,并且查询的列未被索引覆盖Using index condition查询的列不完全被索引覆盖,where条件中是一个查询的范围Using temporary MySql需要创建一张临时表来处理查询,出现这种情况一般都是要进行优化的Using filesort将使用外部排序而不是索引排序,数据较小时从内存排序,否则需要在磁盘完成排序Select tables optimized away使用某些聚合函数maxmin等来访问存在索引的某个字段
type-conversion
官网文档mysql5.7
以下规则描述了比较操作的转换是如何发生的:
- 如果一个或两个参数为NULL,则比较结果为NULL,但NULL-safe <=> 相等比较运算符除外。对于NULL <=> NULL,结果为真。不需要转换。
- 如果比较操作中的两个参数都是字符串,则将它们作为字符串进行比较。
- 如果两个参数都是整数,则将它们作为整数进行比较。
- 如果不与数字进行比较,十六进制值将被视为二进制字符串。
- 如果其中一个参数是 a TIMESTAMP or DATETIME 列而另一个参数是常量,则在执行比较之前,该常量将转换为时间戳。这样做是为了对 ODBC 更友好。这不是为 的参数完成的 IN()。为安全起见,在进行比较时始终使用完整的日期时间、日期或时间字符串。例如,要在使用BETWEEN日期或时间值时获得最佳结果 ,请使用CAST()将值显式转换为所需的数据类型。
- 来自一个或多个表的单行子查询不被视为常量。例如,如果子查询返回要与DATETIME 值进行比较的整数,则比较将作为两个整数进行。整数不会转换为时间值。要将操作数作为DATETIME值进行比较 ,请使用 CAST()将子查询值显式转换为DATETIME。
- 如果其中一个参数是十进制值,则比较取决于另一个参数。如果另一个参数是十进制或整数值,则将参数作为十进制值进行比较,如果另一个参数是浮点值,则作为浮点值进行比较。
- 在所有其他情况下,参数将作为浮点(实数)数进行比较。例如,字符串和数字操作数的比较是作为浮点数的比较进行的。
example:
-- 1.10108200024e17
select (0+'110108200024000007') FROM DUAL
-- 1.10108200024e17
select (0+'110108200024000008') FROM DUAL
-- 1.1010820002400002e17
select (0+'110108200024000010') FROM DUAL
SELECT '9223372036854775807' = 9223372036854775807;
-- -> 1
SELECT '9223372036854775807' = 9223372036854775806;
-- -> 1
commands
建库
USE `mysql`;
CREATE DATABASE `dbName` CHARACTER SET 'utf8mb4.' COLLATE 'utf8mb4_general_ci';
USE `dbName`;
SET NAMES utf8mb4;
SET FOREIGN_KEY_CHECKS = 0;
创建用户 且 赋予权限
CREATE USER IF NOT EXISTS 'lotus'@'%' IDENTIFIED BY 'lotus';
GRANT ALL PRIVILEGES ON `dbName`.* TO 'lotus'@'%';
FLUSH PRIVILEGES;
导出数据库
# 导出库 .sql 文件
mysqldump -u DBUser -p databaseName > dbName.sql
# 导出表 .sql 文件
mysqldump -u DBUser -p databaseName tableName > tableName.sql
# `-d` 不导出数据
mysqldump -u DBUser -p -d tableName > databaseName.sql
# 在 `create` 语句前加 `drop table`
mysqldump -u DBUser -p --add-drop-table databaseName tableName > databaseName.sql
导入数据库
进入数据库操作 登录
mysql -u root -p
设置
USE mysql;
CREATE DATABASE `dbName` CHARACTER SET 'utf8mb4.' COLLATE 'utf8mb4_general_ci';
USE dbName;
SET NAMES utf8mb4;
source /root/dbName.sql;
直接导入
mysql -u root -p dbName < dbName.sql
table
-- 清空表
truncate TABLE table_name;
-- 添加主键
alter table t_name add primary key(id);
-- 添加字段
alter table t_name add column del_flag tinyint(1) NULL default 0 COMMENT '注释';
-- 修改id字段位置到最前
alter table t_name modify id int first;
-- 修改id位置到name之后
alter table t_name modify id int after name;
-- 修改字段名字及属性:把id改成new_id且字段类型为varchar(10)
alter table t_name change id new_id varchar(10) COMMENT '注释';
-- 删除id字段
alter table t_name drop column id;
-- 重命名表
alter table t_name rename new_name;
data
-- 增
insert into t_name values('','','','');
-- 删
delete from t_name where id=1111;
-- 改
update t_name set id=110;
-- 查
select * from t_name where time<'12:00:00'and date='2016-05-13';
-- 查 as 别名
select name as '姓名' from student where id=1;
ONLY_FULL_GROUP_BY
mysql5.7 sqlmode 默认开启 **_ONLY_FULL_GROUP_BY** 问题。参考博客
-- 查询 mysql 版本
SELECT VERSION();
-- 查询 sql mode
SELECT @@sql_mode;
-- 设置全局
SET @@global.sql_mode ='STRICT_TRANS_TABLES,NO_ZERO_IN_DATE,NO_ZERO_DATE,ERROR_FOR_DIVISION_BY_ZERO,NO_AUTO_CREATE_USER,NO_ENGINE_SUBSTITUTION';
-- 设置单库
use dbName;
SET sql_mode ='STRICT_TRANS_TABLES,NO_ZERO_IN_DATE,NO_ZERO_DATE,ERROR_FOR_DIVISION_BY_ZERO,NO_AUTO_CREATE_USER,NO_ENGINE_SUBSTITUTION';
my.cnf 末尾添加
sql_mode=STRICT_TRANS_TABLES,NO_ZERO_IN_DATE,NO_ZERO_DATE,ERROR_FOR_DIVISION_BY_ZERO,NO_AUTO_CREATE_USER,NO_ENGINE_SUBSTITUTION
event_scheduler=1
PostgreSQL
The World’s Most Advanced Open Source Relational Database
command
常用语法
# 切换/连接数据库
create database jeelowcode;
# 列出所有数据库
\l
# 切换/连接数据库
\c jeelowcode
# 删除数据库
drop database jeelowcode;
# 查看所有表
\dt
# 查看表结构
\d users
# 删除表
DROP TABLE users;
CREATE USER username WITH PASSWORD 'mypassword'; 创建新用户
GRANT ALL PRIVILEGES ON DATABASE mydb TO username; 授予用户数据库权限
GRANT SELECT, INSERT ON TABLE users TO username; 授予用户表操作权限
pg_ctl
pg_ctl --help
pg_ctl 是一个用于初始化、启动、停止或控制PostgreSQL服务器的工具.
使用方法:
pg_ctl init[db] [-D 数据目录] [-s] [-o 选项]
pg_ctl start [-D 数据目录] [-l 文件名] [-W] [-t 秒数] [-s]
[-o 选项] [-p 路径] [-c]
pg_ctl stop [-D 数据目录] [-m SHUTDOWN-MODE] [-W] [-t 秒数] [-s]
pg_ctl restart [-D 数据目录] [-m SHUTDOWN-MODE] [-W] [-t 秒数] [-s]
[-o 选项] [-c]
pg_ctl reload [-D 数据目录] [-s]
pg_ctl status [-D 数据目录]
pg_ctl promote [-D 数据目录] [-W] [-t 秒数] [-s]
pg_ctl logrotate [-D 数据目录] [-s]
pg_ctl kill 信号名称 进程号
pg_ctl register [-D 数据目录] [-N 服务名称] [-U 用户名] [-P 口令]
[-S 启动类型] [-e 源] [-W] [-t 秒数] [-s] [-o 选项]
pg_ctl unregister [-N 服务名称]
普通选项:
-D, --pgdata=数据目录 数据库存储区域的位置
-e SOURCE 当作为一个服务运行时要记录的事件的来源
-s, --silent 只打印错误信息, 没有其他信息
-t, --timeout=SECS 当使用-w 选项时需要等待的秒数
-V, --version 输出版本信息, 然后退出
-w, --wait 等待直到操作完成(默认)
-W, --no-wait 不用等待操作完成
-?, --help 显示此帮助, 然后退出
如果省略了 -D 选项, 将使用 PGDATA 环境变量.
启动或重启的选项:
-c, --core-files 在这种平台上不可用
-l, --log=FILENAME 写入 (或追加) 服务器日志到文件FILENAME
-o, --options=OPTIONS 传递给postgres的命令行选项
(PostgreSQL 服务器执行文件)或initdb
-p PATH-TO-POSTMASTER 正常情况不必要
停止或重启的选项:
-m, --mode=MODE 可以是 "smart", "fast", 或者 "immediate"
关闭模式有如下几种:
smart 所有客户端断开连接后退出
fast 直接退出, 正确的关闭(默认)
immediate 不完全的关闭退出; 重启后恢复
允许关闭的信号名称:
ABRT HUP INT KILL QUIT TERM USR1 USR2
注册或注销的选项:
-N 服务名称 注册到 PostgreSQL 服务器的服务名称
-P 口令 注册到 PostgreSQL 服务器帐户的口令
-U 用户名 注册到 PostgreSQL 服务器帐户的用户名
-S START-TYPE 注册到PostgreSQL服务器的服务启动类型
启动类型有:
auto 在系统启动时自动启动服务(默认选项)
demand 按需启动服务
psql
psql
命令 功能
\? 查看所有psql命令帮助
\h 查看SQL命令帮助(如 \h CREATE TABLE)
\l 列出所有数据库
\c dbname 连接到另一个数据库
\dt 列出当前数据库的所有表
\d tablename 查看指定表的结构
\x 切换扩展显示模式(查看宽表时有用)
\q 退出psql
PS C:\Users\PC> psql --help
psql是PostgreSQL 的交互式客户端工具。
使用方法:
psql [选项]... [数据库名称 [用户名称]]
通用选项:
-c, --command=命令 执行单一命令(SQL或内部指令)然后结束
-d, --dbname=DBNAME database name to connect to
-f, --file=文件名 从文件中执行命令然后退出
-l, --list 列出所有可用的数据库,然后退出
-v, --set=, --variable=NAME=VALUE
设置psql变量NAME为VALUE
(例如,-v ON_ERROR_STOP=1)
-V, --version 输出版本信息, 然后退出
-X, --no-psqlrc 不读取启动文档(~/.psqlrc)
-1 ("one"), --single-transaction
作为一个单一事务来执行命令文件(如果是非交互型的)
-?, --help[=options] 显示此帮助,然后退出
--help=commands 列出反斜线命令,然后退出
--help=variables 列出特殊变量,然后退出
输入和输出选项:
-a, --echo-all 显示所有来自于脚本的输入
-b, --echo-errors 回显失败的命令
-e, --echo-queries 显示发送给服务器的命令
-E, --echo-hidden 显示内部命令产生的查询
-L, --log-file=文件名 将会话日志写入文件
-n, --no-readline 禁用增强命令行编辑功能(readline)
-o, --output=FILENAME 将查询结果写入文件(或 |管道)
-q, --quiet 以沉默模式运行(不显示消息,只有查询结果)
-s, --single-step 单步模式 (确认每个查询)
-S, --single-line 单行模式 (一行就是一条 SQL 命令)
输出格式选项 :
-A, --no-align 使用非对齐表格输出模式
--csv CSV(逗号分隔值)表输出模式
-F, --field-separator=STRING
为字段设置分隔符,用于不整齐的输出(默认:"|")
-H, --html HTML 表格输出模式
-P, --pset=变量[=参数] 设置将变量打印到参数的选项(查阅 \pset 命令)
-R, --record-separator=STRING
为不整齐的输出设置字录的分隔符(默认:换行符号)
-t, --tuples-only 只打印记录i
-T, --table-attr=文本 设定 HTML 表格标记属性(例如,宽度,边界)
-x, --expanded 打开扩展表格输出
-z, --field-separator-zero
为不整齐的输出设置字段分隔符为字节0
-0, --record-separator-zero
为不整齐的输出设置记录分隔符为字节0
联接选项:
-h, --host=HOSTNAME database server host or socket directory
-p, --port=PORT database server port
-U, --username=USERNAME database user name
-w, --no-password 永远不提示输入口令
-W, --password 强制口令提示 (自动)
Win11 Installing
未配置环境变量
# 初始化 pgsql 数据库
# -D 数据目录 -A 密码认证方式 -U 超级管理员 -W 强制要求设置密码
.\initdb.exe -D D:\pgsql_data -A scram-sha-256 -U postgres -W
# 启动 pgsql
# -D 数据目录 -l 指定日志文件
.\pg_ctl.exe -D D:\pgsql_data -l pgsql.log start
# 关闭 pgsql
# -D 数据目录 -l 指定日志文件
.\pg_ctl.exe -D D:\pgsql_data -l pgsql.log stop
# 重启 pgsql
# -D 数据目录 -l 指定日志文件
.\pg_ctl.exe -D D:\pgsql_data -l pgsql.log restart
# 到此时 仅能本地连接
.\psql.exe -h localhost -U postgres
# 配置文件 D:\pgsql_data\pg_hba.conf
# 测试环境 在配置文件末尾 添加一行规则,允许所有远程IP连接
host all all 0.0.0.0/0 scram-sha-256
# 生产环境 在配置文件末尾 添加一行规则,仅允许指定网段IP连接
host all all 192.168.1.0/24 scram-sha-256
配置环境变量 Path
C:\Program Files\pgsql\bin
C:\Program Files\pgsql\pgAdmin 4\runtime
注册服务
# 将 pgsql 注册为 win11 服务
pg_ctl register -N "PostgreSQL" -D D:\pgsql_data -S demand -w
# 查看服务状态
Get-Service PostgreSQL
# 启动服务
Start-Service PostgreSQL
# 停止服务
Stop-Service PostgreSQL
# 重启服务
Restart-Service PostgreSQL
# 删除服务
sc.exe delete PostgreSQL
Design Pattern
Design Pattern
设计模式原则
OCP 是最基础的一个原则,其余原则是 OCP 的具体形态
- OCP: Open Close Principle 开闭原则
- DIP: Dependence Inversion Principle 依赖倒置原则
- SRP: Single Responsibility Principle 单一职责原则
- ISP: Interface Segregation Principle 接口隔离原则
- LoD or LKP: Law of Demeter 迪米特法则 Least Knowledge Principle 最少知道原则
- LSP: Liskov Substitution Principle 里氏替换原则
OCP
OCP是最基础的一个原则,其余原则是OCP的具体形态
OCP可以提高复用性OCP可以提高可维护性OCP是面向对象开发的要求OCP对测试影响很大
Open Close Principle.Software entities like classes,modules and functions should be open for extension扩展 but closed for modifications修改.
一个软件实体应该通过扩展来实现变化,而不是通过修改已有的代码来实现变化
- 变化
- 逻辑变化:
只变化一个逻辑,而不涉及其他模块。比如原有的一个算法是a*b+c,现在需要修改为a*b*c,可以通过修改原有类中的方法来完成,前提条件是所有依赖或关联类都按照相同的逻辑处理。 - 子模块变化:
一个模块变化,会对其他的模块产生影响,特别是低层次的模块变化必然引起高层模块的变化。因此在通过扩展完成变化时,高层次的模块修改是必然的。 - 可见视图变化:
可见视图是提供给客户使用的界面,如 JSP程序、Swing界面等,该部分的变化一般会引起连锁反应(特别是在国内做项目,做欧美的外包项目一般不会影响太大)。如果仅仅是界面上按钮、文字的重新排布倒是简单;最司空见惯的是业务耦合变化:一个展示数据的列表,按照原有的需求是6列,突然有一天要增加1列,而且这一列要跨N张表,处理M个逻辑才能展现出来,这样的变化是比较恐怖的,但还是可以通过扩展来完成变化,这就要看原有的设计是否灵活。
- 逻辑变化:
注意:
在设计时尽量适应一些变化,以提高项目的稳定性和灵活性,真正实现拥抱变化。
开闭原则对扩展开放,对修改关闭。并不是不做任何修改,低层模块的变更,必然要有高层模块进行耦合,否则就是一个孤立无意义的代码片段。
一个项目的基本路径应该是这样的:项目开发、重构、测试、投产、运维,其中的重构可以对原有的设计和代码进行修改,运维尽量减少对原有代码的修改,保持历史代码的纯洁性,提高系统的稳定性。
- 如何使用
- 抽象约束: 抽象是对一组事物的通用描述,没有具体的实现,也就表示它可以有非常多的可能性,可以跟随需求的变化而变化。因此,通过接口或抽象类可以约束一组可能变化的行为,并且能够实现对扩展开放。
- 通过接口或抽象类约束扩展,对扩展进行边界限定,不允许扩展出现在接口或抽象类中的
public方法 - 参数类型、引用对象尽量使用接口或抽象类,而不是实现类
- 抽象层尽量保持稳定,一旦确定即不允许修改
- 通过接口或抽象类约束扩展,对扩展进行边界限定,不允许扩展出现在接口或抽象类中的
- 抽象约束: 抽象是对一组事物的通用描述,没有具体的实现,也就表示它可以有非常多的可能性,可以跟随需求的变化而变化。因此,通过接口或抽象类可以约束一组可能变化的行为,并且能够实现对扩展开放。
- 使用
metadata元数据。即配置参数,用来描述环境和数据的数据,可以从文件、数据库中获得控制模块行为。尽量使用metadata来控制程序的行为,减少重复开发 - 制定项目章程。即约定优于配置
- 封装变化:封装可能发生的变化,即是
protected variations受保护的变化。找出预计有变化或不稳定的点,为这些变化点创建稳定的接口,一旦预测到或“第六感”发觉有变化,就可以进行封装,23种设计模式即是从各个不同的角度对变化进行封装。- 将相同的变化封装到一个接口或抽象类中;
- 将不同的变化封装到不同的接口或抽象类中,不应该有两个不同的变化出现在同一个接口或抽象类中。
DIP
Dependence Inversion Principle依赖倒置原则. High level modules should not depend upon low level modules.Both should depend upon abstractions.高层模块不应该依赖低层模块,两者都应该依赖其抽象. Abstractions should not depend upon details.抽象不应该依赖细节. Details should depend upon abstractions.细节应该依赖抽象
JAVA中的表现
Object-Oriented DesignOOD面向对象设计- 模块间的依赖通过抽象发生
- 实现类之间不发生直接的依赖关系
- 其依赖关系是通过接口或抽象类产生的
- 接口或抽象类不依赖于实现类
- 实现类依赖接口或抽象类
好处
- 减少类间的耦合性
- 提高系统的稳定性固化的、健壮的才是稳定的
- 降低并行开发引起的风险
- 提高代码的可读性和可维护性
依赖三种写法
- 构造函数传递依赖对象
Setter方法传递依赖对象- 接口注入接口声明依赖对象
注意
稳定性固化的、健壮的才是稳定的较高的设计,在周围环境频繁变化的时候,依然可以做到“我自岿然不动”
在Java中,只要定义变量就必然要有类型,一个变量可以有两种类型:表面类型和实际类型
表面类型:是在定义的时候赋予的类型实际类型:是对象的类型(具体类型new xxx())
TDDTest Driven Development 测试驱动开发模式就是依赖倒置原则的最高级应用
倒置:
依赖正置就是类间的依赖是实实在在的实现类间的依赖,也就是面向实现编程,这也是正常人的思维方式,我要开奔驰车就依赖奔驰车,我要使用笔记本电脑就直接依赖笔记本电脑。而编写程序需要的是对现实世界事物进行抽象,抽象的结果就是有了抽象类和接口,然后根据系统设计的需要产生抽象间的依赖,代替人们传统思维中事物间的依赖,倒置就来自于此。
最佳实践
- 依赖倒置原则的本质就是通过抽象(接口或抽象类)使各个类或模块的实现彼此独立,不互相影响,实现模块间的松耦合
- 每个类尽量都有接口或抽象类,或者抽象类和接口两者都具备
- 变量的表面类型尽量是接口或者是抽象类
- 任何类都不应该从具体类派生
- 尽量不要重写基类的方法
- 结合LSP里氏替换原则使用
- 接口负责定义public属性和方法,并且声明与其他对象的依赖关系
- 抽象类负责公共构造部分的实现,实现类准确的实现业务逻辑,同时在适当的时候对父类进行细化
SRP
Single Responsibility Principle单一职责原则.
There should never be more than one reason for a class to change.应该有且仅有一个原因引起类的变更
好处
- 类的复杂性降低,实现什么职责都有清晰明确的定义
- 可读性提高
- 可维护性提高
名词
BO业务对象Business ObjectBiz业务逻辑Business LogicVO值对象Value Object
注意:
单一职责原则提出了一个编写程序的标准,用职责或变化原因来衡量接口或类设计得是否优良。但是职责和变化原因都是不可度量的,因项目而异,因环境而异。接口一定要做到单一职责。类的设计尽量做到只有一个原因引起变化。
ISP
Interface Segregation Principle接口隔离原则.
Clients should not be forced to depend upon interfaces that they don’t use.客户端不应该依赖它不需要的接口.
The dependency of one class to another one should depend on the smallest possible interface.类间的依赖关系应该建立在最小的接口上.
注意:
接口尽量细化,同时接口中的方法尽量少。单一职责要求的是类和接口职责单一,注重的是职责,这是业务逻辑上的划分;而接口隔离原则要求接口的方法尽量少。
规范约束
- 接口要尽量小
- 不出现
Fat Interface臃肿的接口 - 根据接口隔离原则拆分接口时,首先必须满足单一职责原则
- 不出现
- 接口要高内聚
- 高内聚就是提高接口、类、模块的处理能力,减少对外的交互
- 不讲任何条件、立刻完成任务的行为就是高内聚的表现
- 要求在接口中尽量少公布
public方法,接口是对外的承诺,承诺越少对系统的开发越有利,变更的风险也就越少,同时也有利于降低成本
- 定制服务
- 单独为一个个体提供优良的服务
- 做系统设计时需要考虑对系统之间或模块之间的接口采用定制服务
- 只提供访问者需要的方法
- 接口设计是有限度的
- 接口的设计粒度越小,系统越灵活
- 灵活的同时也带来了结构的复杂化,开发难度增加,可维护性降低,所以接口设计一定要注意适度
最佳实践
- 接口隔离原则是对接口的定义,同时也是对类的定义;接口和类尽量使用原子接口或原子类来组装
- 一个接口只服务于一个子模块或业务逻辑
- 通过业务逻辑压缩接口中的public方法
- 接口时常去回顾,尽量让接口达到“满身筋骨肉”,而不是“肥嘟嘟”的一大堆方法;
- 已经被污染了的接口,尽量去修改
- 若变更的风险较大,则采用适配器模式进行转化处理;
LoD_LKP
Law of Demeter迪米特法则 或 Least Knowledge Principle最少知识原则.
Only talk to your immediate直接的 friends.
- 一个对象应该对其他对象有最少的了解
- 一个类应该对自己需要耦合或调用的类知道得最少
低耦合含义
- Only talk to your immediate直接的 friends. 只和朋友交流,两个对象之间的耦合就称为朋友关系,这种关系的类型有很多,例如组合、聚合、依赖等。类与类之间的关系是建立在类间的,而不是方法间,因此一个方法尽量不引入一个类中不存在的对象JDK API提供的类除外
- 朋友类的定义:
- 出现在成员变量、方法的输入输出参数中的类称为成员朋友类
- 而出现在方法体内部的类不属于朋友类
- 朋友类的定义:
- 朋友间也是有距离的: 一个类公开的
public属性或方法越多,修改时涉及的面也就越大,变更引起的风险扩散也就越大。因此,为了保持朋友类间的距离,在设计时需要反复衡量:- 是否还可以再减少
public方法和属性 - 是否可以修改为
private、package-private包类型,在类、方法、变量前不加访问权限,则默认为包类型、protected等访问权限 - 是否可以加上
final关键字等
- 是否还可以再减少
- 是自己的就是自己的:
如果一个方法放在本类中,既不增加类间关系,也对本类不产生负面影响,那就放置在本类中 - 谨慎使用
Serializable:
项目中使用RMIRemoteMethod Invocation远程方法调用方式传递一个VOValue Object值对象,这个对象就必须实现Serializable接口仅仅是一个标志性接口,不需要实现具体的方法,也就是把需要网络传输的对象进行序列化,否则就会出现NotSerializableException异常。客户端的VO修改了一个属性的访问权限,从private变更为public,访问权限扩大了,如果服务器上没有做出相应的变更,就会报序列化失败。
注意:
迪米特法则要求类尽量不要对外公布太多的public方法和非静态的public变量,尽量内敛,多使用private、package-private、protected等访问权限
最佳实践:
高内聚低耦合: 迪米特法则的核心观念就是类间解耦,弱耦合,只有弱耦合了以后,类的复用率才可以提高。其要求的结果就是产生了大量的中转或跳转类,导致系统的复杂性提高,同时也为维护带来了难度。在采用迪米特法则时需要反复权衡,既做到让结构清晰,又做到高内聚低耦合
LSP
Liskov Substitution Principle里氏替换原则.
If for each object o1 of type S there is an object o2 of type T such that for all programs P defined in terms of T,the behavior of P is unchanged when o1 is substituted替代 for o2 then S is a subtype of T如果对每一个类型为S的对象o1,都有类型为T的对象o2,使得以T定义的所有程序P在所有的对象o1都代换成o2时,程序P的行为没有发生变化,那么类型S是类型T的子类型。
S o1=new S();
T o2=new T();
...
P p=new P();
如果o1 替换 o2后,P行为没有发生变化,则S是T的子类型
p.method(o2);
Functions that use pointers or references to base classes must be able to use objects of derived派生的 classes without knowing it所有引用基类的地方,即使不知道其子类信息,也必须能使用其子类的对象。但是,反过来就不行了,有子类出现的地方,父类未必就能适应.
继承: 在面向对象的语言中,继承是必不可少的、非常优秀的语言机制
- 优点
- 代码共享,减少创建类的工作量,每个子类都拥有父类的方法和属性
- 提高代码的重用性
- 子类可以形似父类,但又异于父类,“龙生龙,凤生凤,老鼠生来会打洞”是说子拥有父的“种”,“世界上没有两片完全相同的叶子”是指明子与父的不同
- 提高代码的可扩展性,实现父类的方法就可以“为所欲为”了,很多开源框架的扩展接口都是通过继承父类来完成的
- 提高产品或项目的开放性
- 采用里氏替换原则的目的就是增强程序的健壮性,版本升级时也可以保持非常好的兼容性。即使增加子类,原有的子类还可以继续运行。在实际项目中,每个子类对应不同的业务含义,使用父类作为参数,传递不同的子类完成不同的业务逻辑
- 缺点
- 继承是侵入性的。只要继承,就必须拥有父类的所有属性和方法;降低代码的灵活性。子类必须拥有父类的属性和方法,让子类自由的世界中多了些约束;
- 增强了耦合性。当父类的常量、变量和方法被修改时,需要考虑子类的修改,而且在缺乏规范的环境下,这种修改可能带来非常糟糕的结果——大段的代码需要重构。
扩展
Java使用extends关键字来实现继承,它采用了单一继承的规则C++则采用了多重继承的规则,一个子类可以继承多个父类。- 从整体上来看,利大于弊,怎么才能让“利”的因素发挥最大的作用,同时减少“弊”带来的麻烦呢?解决方案是引入里氏替换原则
规范
- 子类必须完全实现父类的方法
- 子类可以有自己的个性
- 覆盖或实现父类的方法时输入参数可以被放大
- 方法中的输入参数称为前置条件。
- 里氏替换原则要求制定一个契约,就是父类或接口。契约制定了,也就同时制定了前置条件和后置条件。
- 前置条件就是你要让我执行,就必须满足我的条件;
- 后置条件就是我执行完了需要反馈(返回值),标准是什么
- 重写或实现父类的方法时输出结果可以被缩小
- 父类的一个方法的返回值是一个类型
T,子类的相同方法重载或重写的返回值为S,里氏替换原则就要求S必须小于等于T。分两种情况- 如果是重写,父类和子类的同名方法的输入参数是相同的,两个方法的范围值
S小于等于T,这是重写的要求,这才是重中之重。 - 如果是重载,则要求方法的输入参数类型或数量不相同,在里氏替换原则要求下,就是子类的输入参数宽于或等于父类的输入参数,也就是说你写的这个方法是不会被调用的,参考上面讲的前置条件
- 如果是重写,父类和子类的同名方法的输入参数是相同的,两个方法的范围值
- 父类的一个方法的返回值是一个类型
注意
- 在类中调用其他类时务必要使用父类或接口,如果不能使用父类或接口,则说明类的设计已经违背了
LSP原则 - 如果子类不能完整地实现父类的方法,或者父类的某些方法在子类中已经发生“畸变”,则建议断开父子继承关系,采用依赖、聚集、组合等关系代替继承
downcast向下转型是不安全的,从里氏替换原则来看,就是有子类出现的地方父类未必就可以出现Override重写,参数,返回值一致Overload重载,只有方法名一致,参数返回值可以不一致
最佳实践
- 在项目中,采用里氏替换原则时,尽量避免子类的“个性”,一旦子类有“个性”,这个子类和父类之间的关系就很难调和
- 把子类当做父类使用,子类的“个性”被抹杀;
- 把子类单独作为一个业务来使用,则会让代码间的耦合关系变得扑朔迷离缺乏类替换的标准。
函数式编程
Functional Programming & Currying
Functional Programming
Supplier<T>
Represents a supplier of results.There is no requirement that a new or distinct result be returned each time the supplier is invoked.This is a functional interface whose functional method is get().
public class TimeUtils
{
public static Supplier<Long> NOW = ()->
Long.parseLong(LocalDateTime.now().format(DateTimeFormatter.ofPattern("yyyyMMddHHmmss")));
public static <T> T getTime(Supplier<T> supplier)
{
return supplier.get();
}
public static void main(String[] args)
{
final Long time = getTime(NOW);
}
}
Predicate<T>
Represents a predicate (boolean-valued function) of one argument.This is a functional interface whose functional method is test(Object).
public class Utils
{
public static Predicate<Integer> positive = (i)->i > 0;
public static Predicate<Integer> negative = (i)->i < 0;
public static Predicate<Integer> zero = positive.negate().and(negative.negate());
public static Predicate<Integer> zero1 = positive.or(negative).negate();
public static boolean number(Integer i, Predicate<Integer> positive)
{
return positive.test(i);
}
public static Predicate<Integer> number()
{
return (i)->i > 0;
}
public static void main(String[] args)
{
System.err.println(number(-1, negative));
System.err.println(number(1, positive));
System.err.println(number(0, zero));
System.err.println(number(-0, zero1));
System.err.println(number().test(1));
}
}
BiPredicate<T,U>
Represents a predicate (boolean-valued function) of two arguments. This is the two-arity specialization of Predicate.This is a functional interface whose functional method is test(Object, Object).
public class Utils
{
public static Predicate<Integer> isEquals(Integer i)
{
return i::equals;
}
public static BiPredicate<Integer, Integer> isEquals1 = Integer::equals;
public static Boolean isEquals2(Integer i, Integer j, BiPredicate<Integer, Integer> predicate)
{
return predicate.test(i, j);
}
public static Predicate<Integer> isEquals2(Integer i)
{
return j->j.equals(i);
}
public static void main(String[] args)
{
System.err.println(isEquals(1).test(2));
System.err.println(isEquals1.test(1, 2));
System.err.println(isEquals2(1, 2, isEquals1));
System.err.println(isEquals2(1).test(2));
}
}
Consumer<T>
Represents an operation that accepts a single input argument and returns no result. Unlike most other functional interfaces, Consumer is expected to operate via side-effects.This is a functional interface whose functional method is accept(Object).
public class Utils
{
public static Consumer<PO> updateTime = po->po.setUpdateTime("update");
public static void setUpdateTime(PO po, Consumer<PO> consumer)
{
consumer.accept(po);
}
public static Consumer<PO> setUpdateTime1()
{
return p->p.setUpdateTime("update");
}
public static void main(String[] args)
{
PO po = PO.builder().build();
updateTime.accept(po);
System.err.println(po.toString());
PO po1 = PO.builder().build();
setUpdateTime(po1, updateTime);
System.err.println(po1.toString());
PO po2 = PO.builder().build();
setUpdateTime1().accept(po2);
System.err.println(po2.toString());
}
}
@Data
@Builder
class PO
{
String desc;
String createTime;
String updateTime;
}
@Data
@Builder
class VO
{
String desc;
}
BiConsumer<T,U>
Represents an operation that accepts two input arguments and returns no result. This is the two-arity specialization of Consumer. Unlike most other functional interfaces, BiConsumer is expected to operate via side-effects.This is a functional interface whose functional method is accept(Object, Object).
public class Utils
{
public static BiConsumer<PO, VO> VO2PO = (po, vo)->po.setDesc(vo.getDesc());
public static void VO2PO(PO po, VO vo, BiConsumer<PO, VO> consumer)
{
consumer.accept(po, vo);
}
public static Consumer<VO> VO2PO(PO po)
{
return (vo)->po.setDesc(vo.getDesc());
}
public static void main(String[] args)
{
VO vo = VO.builder().desc("v").build();
PO po = PO.builder().build();
VO2PO.accept(po, vo);
System.err.println(po.toString());
PO po1 = PO.builder().build();
VO2PO(po1, vo, VO2PO);
System.err.println(po1.toString());
PO po2 = PO.builder().build();
VO2PO(po2).accept(vo);
System.err.println(po2.toString());
}
}
@Data
@Builder
class PO
{
String desc;
String createTime;
String updateTime;
}
@Data
@Builder
class VO
{
String desc;
}
Function<T,R>
Represents a function that accepts one argument and produces a result.This is a functional interface whose functional method is apply(Object).
public class TimeUtils
{
public static Function<LocalDateTime, Long> getLongTime = t->
Long.parseLong(t.format(DateTimeFormatter.ofPattern("yyyyMMddHHmmss")));
public static Long getLongTime(LocalDateTime time, Function<LocalDateTime, Long> function)
{
return function.apply(time);
}
public static Function<LocalDateTime, Long> getLongTime()
{
return t->Long.parseLong(t.format(DateTimeFormatter.ofPattern("yyyyMMddHHmmss")));
}
public static void main(String[] args)
{
final LocalDateTime now = LocalDateTime.now();
System.err.println(getLongTime.apply(now));
System.err.println(getLongTime(now, getLongTime));
System.err.println(getLongTime().apply(now));
}
}
BiFunction<T,U,R>
Represents a function that accepts two arguments and produces a result. This is the two-arity specialization of Function. This is a functional interface whose functional method is apply(Object, Object).
public class TimeUtils
{
public static BiFunction<LocalDateTime, String, Long> getLongTime = (t, s)->
Long.parseLong(t.format(DateTimeFormatter.ofPattern(s)));
public static Long getLongTime(LocalDateTime time, String pattern, BiFunction<LocalDateTime, String, Long> function)
{
return function.apply(time, pattern);
}
public static Function<LocalDateTime, Long> getLongTime(String pattern)
{
return t->Long.parseLong(t.format(DateTimeFormatter.ofPattern(pattern)));
}
public static Function<String, Long> getLongTime(LocalDateTime time)
{
return s->Long.parseLong(time.format(DateTimeFormatter.ofPattern(s)));
}
public static void main(String[] args)
{
final LocalDateTime now = LocalDateTime.now();
final String pattern = "yyyyMMddHHmmss";
System.err.println(getLongTime.apply(now, pattern));
System.err.println(getLongTime(now, pattern, getLongTime));
System.err.println(getLongTime(now).apply(pattern));
System.err.println(getLongTime(pattern).apply(now));
}
}
Currying
public class Currying
{
public static BiFunction<LocalDateTime, String, Long> getLongTime = (t, s)->
Long.parseLong(t.format(DateTimeFormatter.ofPattern(s)));
public static Function<LocalDateTime, Long> getLongTime(String pattern)
{
return t->Long.parseLong(t.format(DateTimeFormatter.ofPattern(pattern)));
}
public static Function<String, Long> getLongTime(LocalDateTime time)
{
return s->Long.parseLong(time.format(DateTimeFormatter.ofPattern(s)));
}
}
莱文斯坦距离
莱文斯坦距离,又称 Levenshtein 距离,是编辑距离的一种。指两个字串之间,由一个转成另一个所需的最少编辑操作次数,包括将一个字符替换成另一个字符、插入一个字符、删除一个字符。编辑距离表示字符串相似度, 编辑距离越小,字符串越相似
推导过程
| a | ||
|---|---|---|
| b | 0 | 1 |
| 1 | 1 |
| a | b | ||
|---|---|---|---|
| b | 0 | 1 | 2 |
| 1 | 1 | 1 |
| a | b | c | ||
|---|---|---|---|---|
| b | 0 | 1 | 2 | 3 |
| 1 | 1 | 1 | 1 |
| a | b | c | ||
|---|---|---|---|---|
| b | 0 | 1 | 2 | 3 |
| a | 1 | 1 | 1 | 2 |
| b | 2 | 1 | 2 | 2 |
| c | 3 | 2 | 1 | 2 |
| 4 | 3 | 2 | 1 |
java code
public double levenshtein(final String a, final String b)
{
int[][] ret=new int[a.length()+1][b.length()+1];
for (int i = 0; i <= a.length(); i++)
{
for (int j = 0; j <= b.length(); j++)
{
if(i==0)
{
ret[i][j]=j;
}else if(j==0)
{
ret[i][j]=i;
}else if(a.charAt(i-1)==b.charAt(j-1))
{
ret[i][j]=ret[i-1][j-1];
}else
ret[i][j]=1+Math.min(ret[i-1][j-1],Math.min(ret[i][j-1],ret[i-1][j]));
}
}
return ret[a.length()][b.length()];
}
/**
* 由 levenshtein 优化而成的写法更省空间
*/
public double levenshteinPro(final String a, final String b)
{
int[] v0 =new int[b.length()+1];
int[] v1 =new int[b.length()+1];
int[] temp;
for (int i = 0; i <= b.length(); i++)
v0[i]=i;
for (int i = 0; i < a.length(); i++)
{
v1[0]=i+1;
for (int j = 0; j < b.length(); j++)
{
int cost=1;
if(a.charAt(i)==b.charAt(j))
{
相同不需要替换 不需+1
cost=0;
}
v1[j+1]=cost + Math.min(v1[j],Math.min(v0[j],v0[j+1]));
}
System.err.println(Arrays.toString(v1));
temp=v1;
v1=v0;
v0=temp;
}
return v0[b.length()];
}
Jaccard 相似系数
Jaccard index 杰卡德系数,Jaccard 相似系数(Jaccard similarity coefficient)参考文献
- 样本集合的交集 与集合并集的比例
- 顺序无关
java code
/**
* Jaccard similarity coefficient Jaccard相似系数
* 比较有限样本集之间的相似性与差异性。
* Jaccard系数值越大,样本相似度越高
*
* J(A,B)=|A∩B| ÷ |A∪B| = |A∩B| ÷ (|A| + |B| - |A∩B|)
*
* |A∩B| |A∩B|
* J(A,B)= ------------ = ----------------------
* |A∪B| |A| + |B| - |A∩B|
*
* Jshell 默认导入了 import java.util.*
* @param a 样本a
* @param b 样本b
* @return 相似度
*/
float jaccard(String a,String b)
{
都为空相似度为 1
if(a==null&&b==null)
return 1f;
if(a==null||b==null)
return 0f;
Set<Integer> aChar=a.chars().boxed().collect(Collectors.toSet());
Set<Integer> bChar=b.chars().boxed().collect(Collectors.toSet());
交集
Set<Integer> ns=new HashSet<>(aChar);
ns.retainAll(bChar);
if(ns.size()==0)
return 0;
并集
Set<Integer> us=new HashSet<>(aChar);
us.addAll(bChar);
return((float)ns.size())/(float)us.size();
}
jshell test
jshell> /open jshell/jaccard.txt
jshell> jaccard("abcde","abcde")
$3 ==> 1.0
jshell> jaccard("abcde","abcdf")
$4 ==> 0.6666667
jshell> jaccard("abcde","abfde")
$9 ==> 0.6666667
jshell> jaccard("abcde","abcgf")
$5 ==> 0.42857143
jshell> jaccard("abcde","abhgf")
$6 ==> 0.25
jshell> jaccard("abcde","aihgf")
$7 ==> 0.11111111
jshell> jaccard("abcde","jihgf")
$8 ==> 0.0
Sorensen Dice 相似度系数
Sorensen Dice 相似度系数:集合交集的 2 倍除以两个集合相加(并不是并集),顺序无关
java code
/**
* Sorensen Dice 相似度系数
* 计算简单集合之间相似度
* 集合交集的 2 倍除以两个集合相加(并不是并集)
*
* 2| A ∩ B |
* f(A,B)= ---------------
* |A| + |B|
*
* @param a 样本a
* @param b 样本b
* @return 相似度
*/
float dice(String a,String b)
{
都为空相似度为 1
if (a == null && b == null)
return 1f;
if (a == null || b == null)
return 0f;
Set<Integer> aChar = a.chars().boxed().collect(Collectors.toSet());
Set<Integer> bChar = b.chars().boxed().collect(Collectors.toSet());
int all=aChar.size()+ bChar.size();
交集
aChar.retainAll(bChar);
if(aChar.size()==0)
return 0;
return ( 2 * (float) aChar.size() ) / ( float ) all;
}
jshell test
jshell> /open d://jshell/dice.txt
jshell> dice("abcde","abcde")
$2 ==> 1.0
jshell> dice("abcde","abcdf")
$3 ==> 0.8
jshell> dice("abcde","abfde")
$4 ==> 0.8
jshell> dice("abcde","abcif")
$5 ==> 0.6
jshell> dice("abcde","abjif")
$6 ==> 0.4
jshell> dice("abcde","akjif")
$7 ==> 0.2
jshell> dice("abcde","lkjif")
$8 ==> 0.0
余弦相似性
余弦相似性通过测量两个向量的夹角的余弦值来度量它们之间的相似性
0 度角的余弦值是 1
而其他任何角度的余弦值都不大于 1
并且其最小值是-1
从两个向量之间的角度的余弦值确定两个向量是否大致指向相同的方向
两个向量有相同的指向时,余弦相似度的值为 1
两个向量夹角为 90°时,余弦相似度的值为 0
两个向量指向完全相反的方向时,余弦相似度的值为-1
这结果是与向量的长度无关的,仅仅与向量的指向方向相关
余弦相似度通常用于正空间,因此给出的值为 0 到 1 之间
循环依赖
请规避循环依赖的代码
Circular references between beans are now prohibited by default. If your application fails to start due to a BeanCurrentlyInCreationException you are strongly encouraged to update your configuration to break the dependency cycle. If you are unable to do so, circular references can be allowed again by setting spring.main.allow-circular-references to true, or using the new setter methods on SpringApplication and SpringApplicationBuilder This will restore 2.5’s behaviour and automatically attempt to break the dependency cycle.
通过构造器注入构成的循环依赖
/**
* A depend B
* B depend C
* C depend A
*/
@Component
public class StudentA{
private StudentB studentB;
public void setStudentB(StudentB studentB){
this.studentB=studentB;
}
public StudentA(){
}
@Autowired
public StudentA(StudentB studentB){
this.studentB=studentB;
}
}
@Component
public class StudentB{
private StudentC studentC;
public void setStudentC(StudentC studentC){
this.studentC=studentC;
}
public StudentB(){
}
@Autowired
public StudentB(StudentC studentC){
this.studentC=studentC;
}
}
@Component
public class StudentC{
private StudentA studentA;
public void setStudentA(StudentA studentA){
this.studentA=studentA;
}
public StudentC(){
}
@Autowired
public StudentC(StudentA studentA){
this.studentA=studentA;
}
}
@Lazy 懒加载解决循环依赖
@Component
public class StudentA{
private StudentB studentB;
public void setStudentB(StudentB studentB){
this.studentB=studentB;
}
public StudentA(){
}
@Autowired
public StudentA(@Lazy StudentB studentB){
this.studentB=studentB;
}
public void print(){
System.err.println("A");
}
}
@Component
public class StudentB{
private StudentC studentC;
public void setStudentC(StudentC studentC){
this.studentC=studentC;
}
public StudentB(){
}
@Autowired
public StudentB(@Lazy StudentC studentC){
this.studentC=studentC;
}
public void print(){
System.err.println("B");
}
}
@Component
public class StudentC{
private StudentA studentA;
public void setStudentA(StudentA studentA){
this.studentA=studentA;
}
public StudentC(){
}
@Autowired
public StudentC(@Lazy StudentA studentA){
this.studentA=studentA;
}
public void print(){
System.err.println("C");
}
}
测试驱动开发
Test Driven Development
MVP 最小可行性产品
Minimum Viable Product(MVP):通过快速构建一个最小可行性产品,然后通过快速的产品功能迭代,让产品尽可能早日上线,面向用户,并实现其商业价值。重构是常态,敏捷开发要求开发者每次的改进(添加、优化、修改bug)都不能太大。对于大的改进可能需要多个迭代周期,
TDD 测试驱动开发

Test Driven Development(TDD):
- 编写业务逻辑之前,先编写单元测试,首先会让测试失败,然后再通过实现具体的代码让测试通过
- 测试驱动开发可以很好地驱使开发者对业务需求的深层次思考,及早发现伪需求,从而保障系统功能的正确性
- 此外测试驱动开发的一个最大优势就是在保障不改变功能的情况下可以持续地对代码进行改进和重构
- 可以让开发者既能够快速开发又能够保障系统功能的稳定性
SpringBoot提供了spring-boot-start-test启动器,该启动器提供了常见的单元测试库
- JUnit — The de-facto standard for unit testing Java applications.一个Java语言的单元测试框架
- Spring Test & Spring Boot Test — Utilities and integration test support for Spring Boot applications. 为SpringBoot应用提供集成测试和工具支持
- AssertJ — A fluent assertion library.支持流式断言的Java测试框架
- Hamcrest — A library of matcher objects (also known as constraints or predicates).一个匹配器库
- Mockito — A Java mocking framework.一个java mock框架
- JSONassert — An assertion library for JSON.一个针对JSON的断言库
- JsonPath — XPath for JSON.JSON XPath库
- By default, Spring Boot uses Mockito 1.x. However it’s also possible to use 2.x if you wish
隔离测试 层层隔离
@MockBean
@TestConfiguration
测试 Service 层:test下cn.aiclr.demospringboot.api.service.DemoServiceTests
@TestConfiguration放到 ServiceImpl 类上,单元测试不会扫描装载这个 ServiceImpl,在测试类上加上@Import(ServiceImpl.class),显示声明导入该类,单元测试才能扫描到这个类,才可以使用@Autowired注入- 不使用
@TestConfiguration,单元测试不用@SpringBootTest,直接@Import(ServiceImpl.class),就可以使用@Autowired注入
@DataJpaTest
@WebMvcTest
- 层与层之间可以隔离测试
- 如果上层测试需要用到下层的依赖,就使用mock的方式构造一个依赖
- 比如测试DAO层可以使用@DataJpaTest注解;
- 测试controller层可以使用@WebMvcTest;
- 测试Service层可以使用@TestConfiguration把需要用到Bean依赖进来
单元测试 必须满足 FAIR 条件
- fast 快速:随着代码演进与重构,需要快速得到代码仍然满足预期的反馈;需要一个快速的编辑和运行周期
- autometed 自动化:节省时间
- isolated 隔离:确保测试不会遗留下可能会影响另一个测试的残余状态。从而可以以任何顺序运行测试,可以运行所有测试、单个测试或是选定的一些测试
- repeatable 可重复:测试一定要能够运行多次,并且得到的是确定性的、可预测的结果
测试种类
- 正面测试:帮助确定代码的表现符合预期
- 负面测试:检查代码能否按预期方式处理前置条件失效、无效输入等问题
- 异常测试:当异常情况出现时,代码是否会抛出正确的异常,以及表现是否符合预期
进制转换
进制转换 binary、decimal、hexadecimal、octal
| 进制 | 四位分隔转十六进制 | 三位分隔转八进制 |
|---|---|---|
| 二进制 | 1101 0101 | 11 010 101 |
| 八进制 | 3 2 5 | |
| 十六进制 | D 5 |
整数 十进制 转 二进制
- 123 = 128 - 5 = 128 - (4 + 1)
- 2^7 - (2^2 + 1)
- 1000 0000 - (100 + 1)
- 1000 0000 - 101
- 111 1011
- 123 = 64 + 32 + 16 + 8 + 2 + 1
- 1 x2^6 + 1 x2^5 + 1 x2^4 + 1 x2^3 + 0 x2^2 + 1 x2^1 + 1 x2^0
- 111 1011
- 短除法 计算到商为0 ,余数逆序 即为 二进制
- 123 / 2 = 61 余 1
- 61 / 2 = 30 余 1
- 30 / 2 = 15 余 0
- 15 / 2 = 7 余 1
- 7 / 2 = 3 余 1
- 3 / 2 = 1 余 1
- 1 / 2 = 0 余 1
小数 十进制 转 二进制
- 小数位乘 2 取整数位;剩余小数位继续乘 2 取整数位;直到小数位为 0
- 0.125 * 2 = 0.25
- 0.25 * 2 = 0.5
- 0.5 * 2 = 1.0
Linux 驱动程序开发实例(第2版)
设备驱动程序代码是Linux内核代码中最多的部分。
操作系统最重要的功能之一就是支持各类设备的访问,承担硬件与应用软件之间的桥梁作用。
Linux操作系统中主要包括字符设备、块设备、网络设备等三类基本的设备驱动程序,
内核中的设备驱动程序大部分基于这三类设备驱动。
第一章 Linux 设备驱动程序入门
1.1 设备驱动程序基础
1.1.1 驱动程序的概念
Linux驱动程序运行原理
flowchart LR
subgraph 硬件层
接口控制器 <-- 总线 --> 设备/外围芯片
end
subgraph 内核态
VFS <--> 驱动程序
驱动程序 <--> 接口控制器
end
subgraph 用户态
应用程序 <-- 系统调用 --> VFS
end
驱使设备按照用户的预期进行工作的软件,应用程序与设备沟通的桥梁。
设备驱动程序主要负责硬件设备的 参数配置、数据读写与 中断处理。
Linux的运行空间分为 内核空间与 用户空间。
为了保护系统的安全,这两个空间各自运行在不同的级别,不能相互直接访问和共享数据。
Linux内核为应用层提供了一系列系统调用接口,应用程序可以通过这组接口来获得操作系统内核提供的服务。
应用层程序运行在用户态,
设备驱动程序是操作系统的一部分,运行在内核态。
应用程序要控制硬件设备,首先通过系统调用访问内核,内核层根据系统调用号来调用驱动程序对应的接口函数来访问设备。
Linux中的大部分驱动程序是以内核模块的形式编写的。
内核模块是Linux内核向外部提供的一个接口,全称动态可加载内核模块(Loadable Kernel Module,LKM)。
Linux内核本身是一个单内核(monolithic kernel)
- 优点:效率高。
- 缺点:可扩展性差、可维护性差。
模块机制弥补上述缺陷。
内核模块可以被单独编译,在运行时被链接到内核作为内核的一部分在内核空间运行。
让内核支持可加载模块,需要配置内核的 [Enable loadable module support] 选项。
1.1.2 驱动程序的加载方式
Linux 设备驱动程序又两中加载方式。
- 直接编译进Linux内核,在Linux启动时加载
- 采用内核模块方式,可动态加载和卸载
希望将驱动程序编译进内核,需要修改内核代码和编译选项。
驱动程序代码源文件为 infrared_s3c2410.c
将 infrared_s3c2410.c 复制到内核代码的 /drivers/char目录
并在该目录下的 Kconfig 文件最后增加如下语句
config INFRARED_REMOTE
tristate "INFRARED Driver for REMOTE"
depends on ARCH_S3C64XX||ARCH_S3C2410
default y
help
在该目录下的 Makefile 中添加如下语句
Obj-$(CONFIG_INFRARED_REMOTE)+=infrared_s3c2410.o
进入Linux内核源代码目录,执行 make menuconfig 命令,选择 device drivers->character devices
进入内核配置窗口,可见最后一行即新增的驱动
在内核配置窗口中可以使用上下键、空格键和回车键进行选择、移动和取消选择。
内核配置窗口中以<>带头的行是内核模块的配置,以[]带头的行是内核功能的配置。 \
<*>表示相应的模块将被编译进内核。<>表示不编译进内核。<M>表示编译成可加载模块。
将 [INFRARED Driver for REMOTE] 行前面设置为<*>,则 infrared_s3c2410.o 将被编译进内核。
使用 make zImage 命令编译内核时所设置为<*>的项将被包含在内核映像中。
可加载模块方式让驱动程序的运行更加灵活,更利于调试。
可加载模块用于扩展 Linux 操作系统的功能。
使用内核模块可以按需加载,不需要重新编译内核。
这种方式控制内核大小,模块一旦被插入内核,就和内核其他部分一样,可以访问内核的地址空间、函数和数据。
可加载模块通常以 .ko 为扩展名。
内核配置窗口中<M>表示编译成可加载模块。
使用 make modules 命令编译内核时,所有设置为<M>的项将被编译。make modules 结束后,可以使用下面的命令安装内核中的可加载模块文件到一个指定的目录
make modules_install INSTALL_MOD_PATH=/home/usr/modules
使用 make 命令编译内核相当一执行 make zImage 和 make modules两个命令
1.1.3 编写可加载模块
Linux内核模块必须包含以下两个接口
module_init(your_init_func);模块初始化接口module_exit(your_exit_func);模块卸载接口
# 加载一个内核模块的命令是 `insmod`
insmod modulename.ko
# 卸载一个内核模块的命令是 `rmmod`
rmmod modulename
可加载模块的源代码可以放在内核代码树中,也可以独立于内核代码树。
独立于内核代码树,需要为可加载模块编写makefile文件。makefile文件最重要的就是设置如下几个变量
CC = arm-none-linux-gnueabi-gcc # CC是编译器
obj-m := smodule.o # 需要编译的目标模块
# ArchLinux内核路径 需要安装`base-devel`和`linux-headers`
# /lib/modules/6.3.1-arch1-1/build/
KERNELDIR ?= /lib/modules/$(shell uname -r)/build/
注意:
- 在编写可加载模块前先要有一个 内核代码目录树
- KERNELDIR 的内核版本必须与运行的内核版本一致,否则编译出的模块往往无法加载
1.1.4 带参数的可加载模块
1.1.5 模块依赖
1.1.6 printk 的等级
内核态的打印函数 printk 可以设定打印信息的等级
int console_printk[4]={
CONSOLE_LOGLEVEL_DEFAULT, /* 控制台日志级别 */
MESSAGE_LOGLEVEL_DEFAULT, /* 默认消息日志级别 */
CONSOLE_LOGLEVEL_MIN, /* 最小的控制台日志级别 */
CONSOLE_LOGLEVEL_DEFAULT, /* 默认控制台日志级别 */
};
#define console_loglevel(console_printk[0]) /* 当前控制台日志级别 优先级比它高的信息将打印到控制台 */
#define default_message_loglevel(console_printk[1]) /* 默认消息日志级别 */
#define minimum_console_loglevel(console_printk[2]) /* 最低的可设置的控制台日志级别 */
#define default_console_loglevel(console_printk[3]) /* 默认的控制台日志级别 */
printk 打印等级包括
#define KERN_EMERG KERN_SOH "0" /* 紧急,系统不可用 */
#define KERN_ALERT KERN_SOH "1" /* 必须立即响应 */
#define KERN_CRIT KERN_SOH "2" /* 严重 */
#define KERN_ERR KERN_SOH "3" /* 一般错误 */
#define KERN_WARNING KERN_SOH "4" /* 警告 */
#define KERN_NOTICE KERN_SOH "5" /* 普通,但需要注意 */
#define KERN_INFO KERN_SOH "6" /* 提示 */
#define KERN_DEBUG KERN_SOH "7" /* 调试信息 */
用法示例:
printk(KERN_INFO "kernel print %d\n" ,value)
未指定打印等级的信息,根据 default_message_loglevel 来确定是否打印。default_message_loglevel 优先级高于 console_loglevel 则打印,否则不打印。
通过 /proc/sys/kernel/printk 文件动态调整 printk 的打印等级 \
cat /proc/sys/kernel/printk
# 输出 1 4 1 4
# 四个值分别对应于console_printk数组的0~3字节
# 调整 printk 打印等级
echo 6 4 1 7>/proc/sys/kernel/printk
/proc/sys/kernel/printk | 1 | 4 | 1 | 4 |
|---|---|---|---|---|
| 打印等级 | KERN_ALERT | KERN_WARNING | KERN_ALERT | KERN_WARNING |
| 打印信息的等级 | CONSOLE_LOGLEVEL_DEFAULT | MESSAGE_LOGLEVEL_DEFAULT | CONSOLE_LOGLEVEL_MIN | CONSOLE_LOGLEVEL_DEFAULT |
| 控制台日志级别 | 默认消息日志级别 | 最小的控制台日志级别 | 默认控制台日志级别 | |
| 打印信息的等级 | console_loglevel(console_printk[0]) | default_message_loglevel(console_printk[1]) | minimum_console_loglevel(console_printk[2]) | default_console_loglevel(console_printk[3]) |
| 当前控制台日志级别 优先级比它高的信息将打印到控制台 | 默认消息日志级别 | 最低的可设置的控制台日志级别 | 默认的控制台日志级别 | |
| 未指定打印等级信息,若优先级高于console_logevel则打印,否则不打印 |
1.1.7 设备驱动程序类别
Linux操作系统中,设备驱动程序为各种设备提供了一致的访问接口,用户程序可以像对普通文件一样对设备文件进行 打开 和 读写 操作。
Linux包含如下三类设备驱动程序
- 字符设备:
Linux下的字符设备是指设备发送和接收数据以 字符 的形式进行。
字符设备接口支持面向字符的I/O操作,数据不经过系统的快速缓存,由驱动本身负责管理自己的缓冲区结构。
字符设备接口只支持 顺序存取 的 有限长度 的I/O操作。
典型的字符设备包括 串口、LED灯、键盘 等设备。 - 块设备:
块设备是以块的方式进行I/O操作的。
块设备是利用一块系统内存作缓冲区,用来临时存放块设备的数据。
当缓存的数据请求达到一定数量,会对设备进行读写操作。
块设备是主要针对磁盘等慢速设备设计的,以免读写设备耗费过多的CPU时间。
块设备支持随机存取功能,也几乎可以支持任意位置和任意长度的I/O请求。
典型的块设备包括硬盘、CF卡、SD卡等存储设备。 - 网络设备:
Linux操作系统中的网络设备是一类特殊的设备。
Linux的网络子系统主要是基于BSD UNIX的socket机制。
在网络子系统和驱动程序之间定义有专门的数据结构(sk_buff)进行数据的传递。
Linux操作系统支持对发送数据和接受数据的缓存,提供流量控制机制,也提供对多种网络协议的支持
Linux系统为每个设备分配了一个 主设备号 与 次设备号,主设备号唯一标识了 设备类型,次设备号标识 具体设备的实例。
由同一个设备驱动程序控制的所有设备具有相同的主设备号。
次设备号则用来区分具有相同主设备号的不同设备。
每一个字符设备或块设备在文件系统中都有一个特殊设备文件与之对应,这个文件就是设备节点。
字符设备和块设备的设备节点在/dev目录下面
网络设备在文件系统的/dev目录中没有节点,应用层可以通过socket访问网络设备。
查看字符设备和块设备的设备节点 ls -l /dev
crw-rw-rw- 1 root tty 5, 0 May 6 10:42 tty
crw--w---- 1 root tty 4, 0 May 6 07:30 tty0
crw------- 1 leo tty 4, 1 May 6 12:34 tty1
crw--w---- 1 root tty 4, 2 May 6 07:31 tty2
brw-rw---- 1 root disk 8, 0 May 6 07:30 sda
brw-rw---- 1 root disk 8, 1 May 6 07:30 sda1
brw-rw---- 1 root disk 8, 2 May 6 07:30 sda2
crw-rw-rw- 1 root root 1, 3 May 6 07:30 null
crw-rw-rw- 1 root root 1, 5 May 6 07:30 zero
每行第一个字母为 c 表示 字符设备,为 b 表示 块设备。
从0开始第4列代表设备的主设备号,第5列为设备的次设备号,最后一列为设备节点的名称。 /dev下面有两个 虚拟设备
/dev/null/dev/null是一个空设备,写入与读取数据均没有反馈cat afile > /dev/null不会有输出cat /dev/null > afile将会清空afile文件的内容/dev/zero
访问/dev/zero会得到一段值为0的二进制流。
使用0填充 t.txtdd if=/dev/zero of=/tmp/t.txt bs=1024 count=768
字符设备和块设备也可以通过 /proc/devices 文件查看:cat /proc/devices
1.2 字符设备驱动程序原理
1.2.1 file_operations 结构
对于字符设备驱动程序,最核心的就是 file_operations 结构,这个结构实际上是提供给 虚拟文件系统(VFS)的文件接口,它的每一个成员函数一般都对应一个系统调用。
用户进程利用系统调用对设备文件进行诸如读和写等操作时,系统调用通过设备文件的主设备号找到相应的设备驱动程序,并调用相应的驱动程序函数。file_operations结构定义参考
注意 unlocked_ioctl 已经取代了旧内核的 ioctl 接口,ioctl 是 BKL(Big Kernel Lock) 模式下的控制接口。
在内核中,file 结构代表一个打开的文件,file在执行 file_operation 中的 open 操作时创建。
假设驱动程序中定义的 file_operation 是 fops,下图是 应用层系统调用 与 驱动层 fops的调用关系图。
file_operations 的 open 与 release 接口的第一个参数是 inode 结构。
该结构被内核用来表示一个 文件节点,也就是一个具体的文件或目录。inode_operations 文件节点的操作结构定义 参考